Label Printer QL-810W/820NWB Quick Setup Guide (English)
D017P7001 Label Printer QL-810W/820NWB Quick Setup Guide (English) Thank you for purchasing model QL-810W/820NWB! Read the Product Safety Guide first, then read this Quick Setup Guide for the correct setup procedure. After reading this guide, keep it in a safe place for quick reference. Available Manuals Ŷ Product Safety Guide This guide provides safety information; read it before you use the Label Printer.
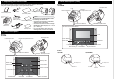
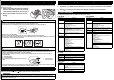
1. Unpacking the Label Printer 2. Parts Description (cont) Check that the package contains the following items before using the Label Printer. If any item is missing or damaged, contact your Brother dealer. X Front QL-820NWB Roll Spool Arm LCD DK Roll Compartment Cover Label Output Slot USB Cable Product Safety Guide Cleaning Sheet Quick Setup Guide DK Roll (starter roll) NOTE Protective Sheet AC Power Cord (The plug may differ by country.
. Connecting the AC Adapter 3. Loading the DK Roll 1. Make sure that the Label Printer is turned Off. Hold the Label Printer by the front, and firmly lift the DK Roll Compartment Cover to open it. Remove the Protective Sheet from the Label Output Slot. Protective Sheet IMPORTANT • Do not throw away the Protective Sheet. • When the Label Printer is not in use, lift the DK Roll Compartment Cover and remove any DK Rolls from inside the Label Printer.
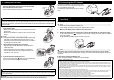
6. Installing the Coin Cell Battery (QL-820NWB only) 8. Setting LCD Language (QL-820NWB only) A coin cell battery is used as a backup power supply to maintain the settings for the internal clock. The Label Printer has a preinstalled coin cell battery. Please note that battery power will be consumed even if the Label Printer is not in use. 1. Make sure that the Label Printer is turned Off. Hold the Label Printer by the front, and firmly lift the DK Roll Compartment Cover to open it. 1.
10. Printing Using a Computer (P-touch Editor) Installing the Software and Printer Drivers to a Computer To print from your Windows® computer or Mac, install the printer drivers, P-touch Editor, and other applications to your computer.
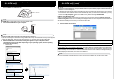
11. Printing Using a Computer (P-touch Editor Lite for QL-810W only) 1. 11. Printing Using a Computer (P-touch Editor Lite for QL-810W only) (cont) Turn the Label Printer On, then press and hold the P-touch Editor Lite Button until the green P-touch Editor Lite LED turns on. Editor Lite LED Editor Lite Button NOTE QL-810W only: P-touch Editor Lite is set as the default mode. 2. Connect the USB Cable to your computer.
12. Printing Using a Mobile Device Installing Applications for Use with Mobile Devices Brother offers various applications for use with your Label Printer, including applications that allow you to print directly from your Apple iPhone, iPad, and iPod touch or Android™ smartphone or tablet, and applications that allow you to transfer data wirelessly, such as templates, symbols, and databases created using a computer, to your Label Printer.
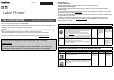
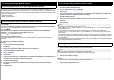
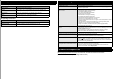
Main Specifications Troubleshooting X Product specifications Items Specifications Printing method Direct thermal printing via thermal head Interface USB / Wireless LAN (QL-810W/820NWB) / Wired LAN (QL-820NWB only) / Bluetooth (QL-820NWB only) Size (W×H×D) Approx. 4.9 in. (125.3 mm) x 5.7 in. (145 mm) x 9.2 in. (234 mm) Weight QL-810W: Approx.2.4lb (1.12 kg) (without DK Rolls) QL-820NWB: Approx. 2.6lb (1.16 kg) (without DK Rolls) Problem The Status LED is not lit.