
Online User's Guide (PDF)


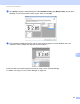


Table Of Contents
- Online User’s Guide RJ-3050/3050Ai RJ-3150/3150Ai
- Introduction
- IMPORTANT NOTE
- Table of Contents
- Section I: Basic Operations
- 1 Setting Up the Printer
- General Description
- Using the Rechargeable Li-ion Battery
- Recharging the Rechargeable Li-ion Battery
- While Installed in the Printer
- Connecting to an AC Power Outlet (Optional)
- Connecting to a DC Power Outlet (Optional)
- Using the Battery Charger (Optional)
- Using the Cradle (Optional)
- Stopping Rechargeable Li-ion Battery Charging
- Tips on Using the Rechargeable Li-ion Battery
- Installing the Clock Battery (RJ-3150/3150Ai Only)
- Turning the Printer On or Off
- Inserting the RD Roll
- Removing the RD Roll
- Attaching the Belt Clip
- Installing the Printer Driver and the Software
- Uninstalling the Printer Driver
- Connecting the Computer and Printer
- LCD Display (RJ-3150/3150Ai Only)
- 2 Using the Printer
- 3 Printer Setting Tool
- 4 Other Functions
- 5 Printing Labels Using P-touch Template (RJ-3150/3150Ai Only)
- 6 Maintaining the Printer
- 7 Reference
- 8 Troubleshooting
- 9 Technical Information
- 1 Setting Up the Printer
- Section II: Software
- 10 How to Use P-touch Editor
- 11 How to Use P-touch Transfer Manager & P-touch Library
- 12 Transferring Label Templates with P-touch Transfer Express
- Preparing P-touch Transfer Express
- Transferring the Label Template to P-Touch Transfer Manager
- Saving the Label Template as a Transfer Package File (.pdz)
- Distributing the Transfer Package File (.pdz) and P-Touch Transfer Express to the User
- Transferring the Transfer Package File (.pdz) to Brother Printer
- 13 How to update P-touch Software
- Section III: Wireless network

How to Use P-touch Editor
133
10
Setting the Text and Order for Displaying on the LCD Display 10
Using P-touch Editor, the text displayed on the LCD display and its display order can be set.
a In P-touch Editor, open the label layout to be edited.
b Select the text box for text to be displayed on the LCD display, right-click it, and then click [Properties]
to display the [Text Properties] dialog box. In the [Object Name] box on the [Expanded] tab, set the
desired number (for example, “Text1”, “Text2” or “Text3”). The text will be displayed on the LCD display
in the order of the set numbers.
To set that text not be displayed on the LCD display, select the [Text Cannot Be Edited] check box on
the [Expanded] tab.