
User Manual
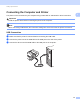
Table Of Contents
- Online User’s Guide RJ-3050/RJ-3150
- Introduction
- IMPORTANT NOTE
- Table of Contents
- Basic Operations
- 1 Setting Up the Printer
- General Description
- Using the Rechargeable Li-ion Battery
- Recharging the Rechargeable Li-ion Battery
- While Installed in the Printer
- Connecting to an AC Power Socket (Optional)
- Connecting to a DC Power Socket (Optional)
- Using the Battery Charger (Optional)
- Using the Cradle (Optional)
- Stopping Rechargeable Li-ion Battery Charging
- Tips on Using the Rechargeable Li-ion Battery
- Installing the Clock Battery (RJ-3150 Only)
- Turning the Printer On or Off
- Setting the RD Roll
- Removing the RD Roll
- Attaching the Belt Clip
- Installing the Printer Driver and the Software
- Uninstalling the Printer Driver
- Connecting the Computer and Printer
- LCD Display (RJ-3150 Only)
- 2 Using the Printer
- 3 Printer Setting Tool
- 4 Other Functions
- 5 Printing Labels Using P-touch Template (RJ-3150 Only)
- 6 Maintaining the Printer
- 7 Reference
- 8 Troubleshooting
- 9 Technical Information
- 1 Setting Up the Printer
- Software
- 10 How to Use P-touch Editor
- 11 How to Use P-touch Transfer Manager & P-touch Library
- 12 Transferring Label Templates with P-touch Transfer Express
- Preparing P-touch Transfer Express
- Transferring the Label Template to P-Touch Transfer Manager
- Saving the Label Template as a Transfer Package File (.pdz)
- Distributing the Transfer Package File (.pdz) and P-Touch Transfer Express to the User
- Transferring the Transfer Package File (.pdz) to Brother Printer
- How to update P-touch Software
- Wireless network
- 14 Introduction
- 15 Changing Your Printer’s Network Settings
- 16 Configuring Your Printer for a Wireless Network
- 17 Web Based Management
- 18 Troubleshooting
- 19 Appendix A
- 20 Appendix B
- 21 Appendix C

Setting Up the Printer
22
1
Uninstalling the Printer Driver 1
Read "RJ-XXXX" in the following steps as your model name.
Windows Vista
®
/ Windows Server
®
2008 1
a Press and hold the (Power) button to turn off the Brother machine.
b Click the Start button - [Control Panel] - [Hardware and Sound] - [Printers].
c Select the [Brother RJ-XXXXX], and click [Delete this printer] or right click on the icon, and then click
[Delete].
d In the [Printers] window, right-click and select [Run as administrator] - [Server Properties…].
If the authorisation confirmation dialog box is displayed, click [Continue].
If the [User Account Control] dialog box is displayed, enter the password and click [OK]. The [Print
Server Properties] window will be displayed.
e Click the [Drivers] tab and choose [Brother RJ-XXXXX]. Then, click [Remove...].
f Select [Remove driver and driver package] and click [OK]. Follow the on-screen instructions.
g Close the [Print Server Properties] window.
The printer driver has been uninstalled.
Windows
®
7 / Windows Server
®
2008 R2 1
a Press and hold the (Power) button to turn off the Brother machine.
b Click the Start button - [Devices and Printers].
c Select [Brother RJ-XXXXX], and click [Remove device] or right-click on the icon, and then click
[Remove device].
If a User Account Control message displayed, type in the password, and then click [Yes].
d Select [Fax] or [Microsoft XPS Document Writer] in the [Devices and Printers] window, and then click
[Print server properties], which appeared in the menu bar.
e Click the [Drivers] tab, and then click [Change Driver Settings]. If a User Account Control message
displayed, type in the password, and then click [Yes]. Choose [Brother RJ-XXXXX], and then click
[Remove...].
f Select [Remove driver and driver package], and then click [OK]. Follow the on-screen instructions.
g Close the [Print Server Properties] window.
The printer driver has been uninstalled.