
User Manual
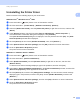
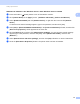
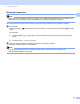
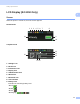
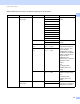
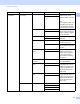
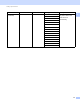
Table Of Contents
- Online User’s Guide RJ-3050/RJ-3150
- Introduction
- IMPORTANT NOTE
- Table of Contents
- Basic Operations
- 1 Setting Up the Printer
- General Description
- Using the Rechargeable Li-ion Battery
- Recharging the Rechargeable Li-ion Battery
- While Installed in the Printer
- Connecting to an AC Power Socket (Optional)
- Connecting to a DC Power Socket (Optional)
- Using the Battery Charger (Optional)
- Using the Cradle (Optional)
- Stopping Rechargeable Li-ion Battery Charging
- Tips on Using the Rechargeable Li-ion Battery
- Installing the Clock Battery (RJ-3150 Only)
- Turning the Printer On or Off
- Setting the RD Roll
- Removing the RD Roll
- Attaching the Belt Clip
- Installing the Printer Driver and the Software
- Uninstalling the Printer Driver
- Connecting the Computer and Printer
- LCD Display (RJ-3150 Only)
- 2 Using the Printer
- 3 Printer Setting Tool
- 4 Other Functions
- 5 Printing Labels Using P-touch Template (RJ-3150 Only)
- 6 Maintaining the Printer
- 7 Reference
- 8 Troubleshooting
- 9 Technical Information
- 1 Setting Up the Printer
- Software
- 10 How to Use P-touch Editor
- 11 How to Use P-touch Transfer Manager & P-touch Library
- 12 Transferring Label Templates with P-touch Transfer Express
- Preparing P-touch Transfer Express
- Transferring the Label Template to P-Touch Transfer Manager
- Saving the Label Template as a Transfer Package File (.pdz)
- Distributing the Transfer Package File (.pdz) and P-Touch Transfer Express to the User
- Transferring the Transfer Package File (.pdz) to Brother Printer
- How to update P-touch Software
- Wireless network
- 14 Introduction
- 15 Changing Your Printer’s Network Settings
- 16 Configuring Your Printer for a Wireless Network
- 17 Web Based Management
- 18 Troubleshooting
- 19 Appendix A
- 20 Appendix B
- 21 Appendix C

Setting Up the Printer
29
1
With the buttons on the printer, the following settings can be specified:
Menu Title Sub title Settings Description
Settings Printer
Settings
Print Density -5 Adjust the printer’s printing
density.
-4
-3
-2
-1
0
+1
+2
+3
+4
+5
Exit Position Tear Select the media output
location.
Peel
Print Adjust
(X)
*.** inch
(or *.** mm)
Adjust the position of the
reference point (point of
origin for printing). This
corrects printing
misalignments resulting
from differences in printer
models or from the fixed
margins of some
applications. The
reference point cannot be
adjusted for raster
printing.
Note
The display varies
according to the unit
setting.
Print Adjust
(Y)
*.** inch
(or *.** mm)
Tear Adjust *.** inch
(or *.** mm)
Adjust the tear bar tear off
position for paper media.
Note
The display varies
according to the unit
setting.
Beeper
Settings
On Select whether the printer
beeps when an operation
panel button is pressed.
Off