
User Manual
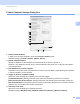
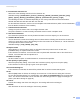
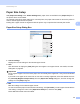
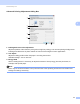
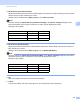
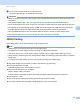
Table Of Contents
- Online User’s Guide RJ-3050/RJ-3150
- Introduction
- IMPORTANT NOTE
- Table of Contents
- Basic Operations
- 1 Setting Up the Printer
- General Description
- Using the Rechargeable Li-ion Battery
- Recharging the Rechargeable Li-ion Battery
- While Installed in the Printer
- Connecting to an AC Power Socket (Optional)
- Connecting to a DC Power Socket (Optional)
- Using the Battery Charger (Optional)
- Using the Cradle (Optional)
- Stopping Rechargeable Li-ion Battery Charging
- Tips on Using the Rechargeable Li-ion Battery
- Installing the Clock Battery (RJ-3150 Only)
- Turning the Printer On or Off
- Setting the RD Roll
- Removing the RD Roll
- Attaching the Belt Clip
- Installing the Printer Driver and the Software
- Uninstalling the Printer Driver
- Connecting the Computer and Printer
- LCD Display (RJ-3150 Only)
- 2 Using the Printer
- 3 Printer Setting Tool
- 4 Other Functions
- 5 Printing Labels Using P-touch Template (RJ-3150 Only)
- 6 Maintaining the Printer
- 7 Reference
- 8 Troubleshooting
- 9 Technical Information
- 1 Setting Up the Printer
- Software
- 10 How to Use P-touch Editor
- 11 How to Use P-touch Transfer Manager & P-touch Library
- 12 Transferring Label Templates with P-touch Transfer Express
- Preparing P-touch Transfer Express
- Transferring the Label Template to P-Touch Transfer Manager
- Saving the Label Template as a Transfer Package File (.pdz)
- Distributing the Transfer Package File (.pdz) and P-Touch Transfer Express to the User
- Transferring the Transfer Package File (.pdz) to Brother Printer
- How to update P-touch Software
- Wireless network
- 14 Introduction
- 15 Changing Your Printer’s Network Settings
- 16 Configuring Your Printer for a Wireless Network
- 17 Web Based Management
- 18 Troubleshooting
- 19 Appendix A
- 20 Appendix B
- 21 Appendix C

Printer Setting Tool
88
3
4 Media Sensor (Transmissive/Gap)
Adjust the precision with which the transmissive/gap sensor detects the gaps (spacing) for die-cut labels
and the amount of light emitted by the sensor.
Settings can be specified when [Paper Types] is set to [Die-cut Label].
Note
Since the settings for [Media Sensor (Transmissive/Gap)] in the [Device settings] dialog box (see
Sensor Adjustment Tab on page 73) will have an effect, specify appropriate values.
Example of the settings:
5 Media Sensor (Reflective/Bar)
Adjust the precision with which the reflective/black mark sensor detects black marks and the amount of
light emitted by the sensor.
Settings can be specified when [Paper Types] is set to [Media With Marks].
Note
Since the settings for [Media Sensor (Reflective/Bar)] in the [Device settings] dialog box (see Sensor
Adjustment Tab on page 73) will have an effect, specify appropriate values.
Example of the settings:
6OK
Saves the settings and returns to the previous dialog box.
7 Cancel
Cancels the settings and closes the dialog box. The settings will remain unchanged.
Setting EX1 Setting EX2
Device settings +2 -2
Paper Size Setup +2 +2
Actual effect 4 0
Setting EX1 Setting EX2
Device settings +2 -2
Paper Size Setup +2 +2
Actual effect 4 0