
Instruction Manual for Stamp Starter Kit
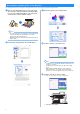

Table Of Contents

3
For detailed instructions on using the cutting machine, refer to the Operation Manual supplied with it.
a Remove clear vinyl backing from one side of the stamp
sheet. Place the stamp sheet with the remaining backing
face up on the standard tack adhesive mat. At that time,
stretch the sheet so that no bubbles remain.
Note
• For best results, place the stamp sheet on the mat with the
clear vinyl backing face up. Backing is not needed
between the mat and stamp sheet.
• Bubbles between the stamp sheet and the backing do not
affect cutting.
b Download the stamp pattern from CanvasWorkspace.
c Retrieve the pattern on the cutting machine.
d Touch the "Test" key to perform test cut.
Note
• Cut patterns to a size that fits within the acrylic block (3" x
4"(75 mm x 100 mm)).
• Cut patterns at least 5 mm from the edge of the stamp
sheet.
• When arranging multiple patterns, set the number of
“Pattern Interval” to “3” or higher from setting. If their
spacing is too small, the patterns may not be cleanly cut.
e Touch the "Start" key to start test cutting.
• Arrange the test pattern to avoid the stamp pattern.
a Auto Blade Holder (Black)
Retrieving the Stamp Pattern on the Machine
1