
User Manual
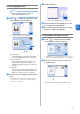
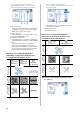
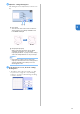

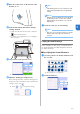
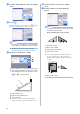
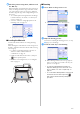

Table Of Contents
- Terms of Use
- INTRODUCTION
- IMPORTANT NOTICE
- IMPORTANT SAFETY INSTRUCTIONS
- FEATURES
- Chapter 1 GETTING STARTED
- Chapter 2 BASIC OPERATIONS
- Chapter 3 ADVANCED OPERATIONS
- CUTTING AND EDITING FUNCTIONS
- Pattern Editing Functions
- Pattern Editing Functions - Multiple Patterns
- Mat Layout Screen
- Layout Editing Functions
- Object Editing Screen
- Undoing an Operation
- Grouping/Ungrouping Patterns
- Welding (Merging the Outlines of Multiple Patterns)
- Aligning Patterns
- Auto Layout Functions
- Scanning a Background Image
- Character Input Functions
- MEMORY FUNCTIONS
- Retrieving Embroidery Data for Cutting (Compatible Models Only)
- DRAWING FUNCTIONS
- CUTTING AND EDITING FUNCTIONS
- Chapter 4 SCANNING FUNCTIONS
- Chapter 5 APPENDIX
- INDEX

61
3
d Adjust the cutting/drawing lines.
After making the desired adjustments, touch the “Set”
key.
a Smoothing
Smooths out curves and corners in the lines.
Select from the four settings available: OFF,
Low, Middle and High.
b Grouping/Ungrouping
When ungrouped, the parts can be edited
separately. For details, see “Grouping/
Ungrouping Patterns” on page 44. The setting
cannot be changed if there is only one shape.
Memo
• If the pattern contains unnecessary parts,
ungroup it. This allows the unnecessary parts to
easily be deleted in the mat layout screen,
which appears next.
e In the mat layout screen, check the cutting/
drawing lines.
• The pattern can be edited. For details, see “Mat
Layout Screen” on page 41 or “Layout Editing
Functions” on page 42. After finishing all editing,
touch the “OK” key.
ba
OFF Middle