
User Manual
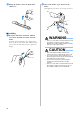
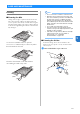
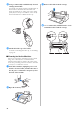
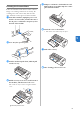
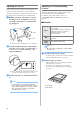

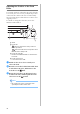
Table Of Contents
- Terms of Use
- INTRODUCTION
- IMPORTANT NOTICE
- IMPORTANT SAFETY INSTRUCTIONS
- FEATURES
- Chapter 1 GETTING STARTED
- Chapter 2 BASIC OPERATIONS
- Chapter 3 ADVANCED OPERATIONS
- CUTTING AND EDITING FUNCTIONS
- Pattern Editing Functions
- Pattern Editing Functions - Multiple Patterns
- Mat Layout Screen
- Layout Editing Functions
- Object Editing Screen
- Undoing an Operation
- Grouping/Ungrouping Patterns
- Welding (Merging the Outlines of Multiple Patterns)
- Aligning Patterns
- Auto Layout Functions
- Scanning a Background Image
- Character Input Functions
- MEMORY FUNCTIONS
- Retrieving Embroidery Data for Cutting (Compatible Models Only)
- DRAWING FUNCTIONS
- CUTTING AND EDITING FUNCTIONS
- Chapter 4 SCANNING FUNCTIONS
- Chapter 5 APPENDIX
- INDEX

88
c Pull up the holder to leave the blade in the
rubber area.
■ Installing
a Grasp the shaft of the new blade, and then
insert it into the blade slot in the end of the
holder.
The blade shaft is held in place by a magnet in the
holder. Slowly insert the blade shaft, and then slowly
release it after the shaft snaps into place against the
magnet.
b Twist on the holder cap to attach it to the
holder.
Fully tighten the cap until it can no longer be turned.
WARNING
• This is not a toy and is not intended to be used
by children. In order to prevent choking
hazards, do not allow infants/children to put the
protective cap in their mouths.
CAUTION
• After removing the blade holder from the
machine, be sure to attach the protective cap.
• Do not press the tip of the holder with your
hand or fingers because the tip of the blade will
extend and may result in injuries.
• Please remove protective cap from blade
holder before placing it into the machine
carriage.
• This is not a toy and is not intended to be used
by children. In order to prevent injury, do not
allow infants/children to touch the blade.