C D5 ValueKitBorder Cover 111-001 XC7125-001 0307 Printed in Japan M Y K
Before You Start/Avant de commencer/Bevor Sie beginnen/ Voordat u begint/Antes de comenzar/Prima di iniziare/はじめに • Refer to the operation manual for detailed instruction. Also, there are differences in the keys and screens depending on the display language. In this guide, English screens are used for basic explanations. • Pour les instructions détaillées, voir le mode d’emploi. Par ailleurs, il y a des différences dans les touches et les écrans en fonction de la langue d’affichage.
English : Contents Before You Start ................................... 1 What You Can Do with Border Embroidery....................................... 4 Accessories .......................................... 6 Selecting Patterns ................................ 8 Editing Border Embroidery ............... 13 Border embroidery edit screen ...................... 13 Key Functions ................................................ 15 Ending Editing ...............................................
Nederlands : Inhoudsopgave Italiano : Sommario Voordat u begint ................................... 1 Prima di iniziare .................................... 1 Wat u kunt doen met randen borduren .............................. 5 Cosa è possibile fare con la funzione di ricamo dei bordi .......... 5 Accessoires .......................................... 7 Patronen kiezen .................................... 8 Accessori .............................................. 7 Selezione dei motivi ..............
What You Can Do with Border Embroidery After the machine software is upgraded to version 4.00 or later, you can use the Border Frame Kit to embroider patterns repeatedly. In addition to edit functions such as the ability to enlarge or reduce patterns and rotate them one degree at a time, you can sew the same pattern repeatedly and adjust the spacing between each repeated part. You can sew in a thread mark that serves as a guide to where the next pattern in a series should be added.
Wat u kunt doen met randen borduren Nadat een upgrade van de software voor de machine is uitgevoerd naar versie 4.00 of later, kunt u de randen borduur set gebruiken om borduurpatronen herhaaldelijk te borduren. In aanvulling op diverse bewerkingsfuncties, zoals de mogelijkheid om patronen te vergroten of verkleinen of deze graad voor graad te verdraaien, kunt u ook hetzelfde patroon herhaaldelijk naaien en de afstand tussen de herhaalde gedeelten afstellen.
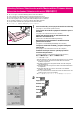
Accessories 1 2 Check that all of the following accessories are present, and that none are damaged. 1 Border embroidery frame Sewing Area: 18 cm (H) ✕ 10 cm (W) 2 Embroidery sheet 3 Border pattern floppy disk / Pattern list 51 border pattern types are stored on the disk. An individual and continuous pattern is stored for most types. Use the individual patterns when putting space between the each pattern or when deciding the number of repetitions to be sewn.
Accessoires Controleer of de volgende accessoires zijn bijgeleverd en deze niet beschadigd zijn. 1 Randen borduurraam Naaigebied: 18 cm (H) ✕ 10 cm (B) 2 Borduur sheet 3 Floppydisk met borduurpatronen/ patroonlijst Op deze disk zijn 51 borderpatroontypen opgeslagen. Voor de meeste typen is er een individueel en een continu patroon. Gebruik de individuele patronen wanneer u een bepaalde afstand tussen de patronen wilt hebben of wanneer u het aantal herhalingen zelf wilt bepalen.
Selecting Patterns/Sélection des motifs/Muster wählen/Patronen kiezen/ Selección de diseños/Selezione dei motivi/模様の選び方 ● ● ● ● ● ● Two or more types of border embroidery patterns cannot be combined. Vous ne pouvez pas combiner plusieurs motifs de broderie de bord à la fois. Es ist unmöglich, zwei oder mehr Typen von Bordüren-Stickmustern zu kombinieren. Het is niet mogelijk om twee of meer typen randen borduurpatronen te combineren. No se pueden combinar dos o más tipos de diseños de bordado de bordes.
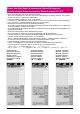
3 Press . The border pattern can be selected when Appuyez sur is pressed. . Vous pouvez sélectionner le motif de bord en appuyant sur Drücken Sie . Das Bordürenmuster kann gewählt werden, wenn Druk op gedrückt ist. . Het borderpatroon kan gekozen worden wanneer Pulse is ingedrukt. . El diseño de bordes podrá seleccionarse cuando se pulse Premere . . . Dopo avere premuto , è possibile selezionare il motivo del ricamo.
5 Press . Here you can select a pattern stored on the included floppy disk. ● If a pattern is displayed in light gray, it cannot be selected. ● Wait until the patterns are displayed. Appuyez sur . Vous pouvez maintenant sélectionner l'un des motifs mémorisés sur la disquette. ● Si le motif s'affiche en gris, vous ne pouvez pas le sélectionner. ● Attendez que les motifs s'affichent. Drücken Sie . Hier können Sie ein Muster wählen, das auf der beigelegten Diskette gespeichert ist.
7 After making your selection, Press . Après avoir effectué la sélection, appuyez sur . Nachdem Sie die Wahl getroffen haben, drücken Sie Druk op nadat u uw keuze hebt gemaakt. Después de seleccionar lo que quiera, pulse Dopo avere effettuato la selezione, premere 選んだら . . . を押します。 Caution If the floppy disk in use is not write protected, pressing and will delete pattern data from the floppy disk.
The border embroidery edit screen will be displayed. L'écran d'édition de broderie de bord s'affiche. Die Bordürenstickerei-Editier-Anzeige erscheint automatisch. Het bewerkingsscherm voor randen borduren wordt weergegeven. Se visualizará la pantalla de edición de bordado de bordes. Appare così la videata di modifica del ricamo dei bordo.
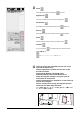
Editing Border Embroidery/Edition de broderie de bord/Bordürenstickeren bearbeiten/ Bewerken van randen borduren/Edición de bordado de bordes/Modifica del ricamo dei bordi/ ボーダー刺しゅうの編集 Border embroidery edit screen/Ecran d'édition de broderie de bord/Bordürenstickerei-Editier-Anzeige/ Bewerkingsscherm voor randen borduren/Pantalla de edición de bordado de bordes/ Videata di modifica del ricamo dei bordi/ボーダー刺しゅう編集画面 1 6 3 4 2 5 1 Shows the overall size 3 Shows the number of repetitions and the spacin
7 Rotate key Touche de pivotement Drehungstaste Rotatietoets Tecla de giro Tasto Ruota 回転キー 8 Repeat key Touche de répétition Wiederholen-Taste Herhalingstoets Tecla de repetición Tasto Ripeti 7 D 8 9 E C F 繰り返しキー 9 Spacing key Touche d'espacement Abstand-Taste Afstandtoets Tecla de espaciamiento Tasto distanza B A 0 間隔キー 0 Size key Touche de taille Größen-Auswahltaste Groottetoets Tecla de tamaño Tasto Dimensioni 7 D 8 大きさキー A Horizontal mirror image key Touche d'image en miroir horizo
Key Functions/Fonction des touches/Tastenfunktionen/Functie van de toetsen/ Funciones claves/Funzione dei tasti/キーのはたらき Rotates the pattern. Fait pivoter le motif. Dreht das Muster. Draait het patroon. Gira el diseño. Ruota il motivo. 模様を回転します。 Press . Appuyez sur . Drücken Sie . Druk op Pulse Premere . . . を押します。 Rotates the pattern 90 degrees in the direction of the arrow each time you press the key.
1 Overall size Taille d'ensemble Gesamtgröße Totale grootte Tamaño general Dimensione totale 全体の大きさ 1 2 Shows the current degree of rotation. Indique le degré de rotation actuel. Zeigt den aktuellen Drehungsgrad. Toont de huidige rotatiehoek. Muestra el grado de giro actual.
Repeatedly sews the pattern within the sewing area of the border frame. ● Repeated sewing might not be possible for some patterns, depending on the pattern size. Coud le motif de façon répétée au sein de la zone de couture du cadre de broderie de bord. ● La couture répétée peut ne pas être possible avec tous les motifs, selon la taille du motif. Näht wiederholt das Muster innerhalb des Nähbereichs für den Bordüren-Rahmen.
Decreases the number of patterns to one. Ramène le nombre de motifs à une unité. Verringert die Anzahl der Muster auf eines. Stelt het aantal patronen terug op één. Reduce el número de diseños a uno. Diminuisce di una unità il numero di motivi. 模様数を1に戻す Closes the repeat screen. Ferme l'écran de répétition. Schließt die Wiederholen-Anzeige. Sluit het herhalingsscherm. Cierra la pantalla de repetición. Chiude lo schermo di ripetizione. 繰り返し終了 Adjusts the spacing between each pattern.
Increases the spacing. Decreases the spacing. Augmente l'espace. Diminue l'espacement. Vergrößert den Abstand. Verkleinert den Abstand. Vergroot de afstand. Verkleint de afstand. Aumenta el espacio. Reduce el espacio. Aumenta la distanza. Riduce la distanza. 間隔を開ける 間隔を詰める Returns the spacing to 0.0 cm. Ramène l'espacement à 0,0 cm. Stellt den Abstand auf 0,0 cm zurück. Stelt de afstand terug op 0,0 cm. Retorna el espacio a 0,0 cm. Riporta la distanza a 0,0 cm. 間隔を0.
Increases or decreases the size of the pattern. Augmente ou diminue la taille du motif. Steigert oder senkt die Größe des Musters. Vergroot of verkleint de afmeting van het patroon. Aumenta o reduce el tamaño del diseño. Ingrandisce o riduce la dimensione del motivo. 模様の大きさを拡大・縮小します。 Press . Appuyez sur . Drücken Sie . . Druk op Pulse Premere . . を押します。 Enlarges proportionately Reduces proportionately Augmente proportionnellement. Diminue proportionnellement.
Returns to the original size. Ramène à l'écran d'origine. Zurückstellen auf Originalgröße. Terugkeren naar de oorspronkelijke grootte. Retorna al tamaño original. Ripristina la dimensione originale. もとの大きさに戻す Closes the size screen. Ferme l'écran de taille. Die Größen-Anzeige schließen. Sluit het groottescherm. Cierra la pantalla de tamaño. Chiude lo schermo della dimensione. 大きさ終了 ● Some of patterns cannot be enlarged or reduced, depending on the size, and so on.
Creates a horizontal mirror image of the pattern. Crée une image en miroir horizontale du motif. Erzeugt ein horizontales Spiegelbild des Musters. Creërt een horizontaal spiegelbeeld van het patroon. Crea una imagen espejo horizontal del diseño. Crea l'immagine speculare orizzontale del motivo. 模様を左右に反転します。 Press . Appuyez sur . Drücken Sie . . Druk op . Pulse Premere . を押します。 Pressing again will return to the original pattern. vous ramènera au motif d'origine.
By sewing a thread mark, you can easily align patterns when sewing a series. When sewing is finished on a pattern, a thread mark in the shape of an arrow will be sewn using the final thread. When sewing a series of patterns, use the point of this arrow for positioning the following designs to be sewn. En cousant un repère de fil, vous pourrez aligner les motifs en toute facilité lorsque vous cousez des séries.
Fadenmarkierungen können an acht Stellen für jedes Muster genäht werden. ● Beim wiederholten Nähen individueller Muster können Fadenmarkierungen nur um den Umfang des Musters herum genäht werden. ● Fadenmarkierungen sind auf Nähen unten in der Mitte des letzten Musters eingestellt. Löschen Sie diese Einstellung, wenn Sie keine Fadenmarkierung nähen wollen. ● Sie können nicht Fadenmarkierungen an Stellen nähen, die in Hellgrau angezeigt werden.
Changes the thread colors in the embroidery. Modifie les couleurs des fils dans la broderie. Ändert die Garnfarben in der Stickerei. Wijzigt de draadkleuren in het borduurwerk. Cambia los colores de hilo en el bordado. Modifica i colori dei fili per il ricamo. 刺しゅうの糸色を変更します。 Press . Appuyez sur . Drücken Sie . Druk op . . Pulse Premere . を押します。 Selects the color to change. Sélectionne la couleur à modifier. Wählt die zu ändernde Farbe. Selecteert de kleur die veranderd moet worden.
Selects the pattern for editing. Moves the red frame. Sélectionne le motif à modifier. Déplace le cadre rouge. Wählt das Muster zum Bearbeiten. Bewegt den roten Rahmen. Selecteert het patroon dat bewerkt moet worden. Verplaatst het rode kader. Selecciona el diseño a editar. Mueve el cuadro rojo. Seleziona il motivo per eseguirne la modifica. Muove il telaio rosso. 編集対象の模様を選択します。 赤枠が移動します。 Deletes the pattern selected with the red frame. Efface le motif sélectionné avec le cadre rouge.
Ending Editing/Fin de Edition/Beenden der Bearbeitung/Bewerken beëindigen/ Finalización de la edición/Termine delle modifiche/編集が終わったら 1 Press on the edit screen. à l'écran d'édition. Appuyez sur Drücken Sie dieTaste Druk op Pulse Premere in der Editier-Anzeige, van het bewerkingsscherm. en la pantalla de edición. sullo schermo di modifica. 編集画面で を押します。 to display the screen at left. pour afficher l'écran de gauche. um die links gezeigte anzeige abzurufen.
2 To begin embroidery, press ● Press . again to return to the edit screen. Pour commencer la broderie, appuyez sur ● Appuyez à nouveau sur pour revenir à l'écran d'édition. Zum Starten der Stickeren drücken Sie ● Drücken Sie Druk op . erneut, um zur Editier-Anzeige zurückzustellen. om te beginnen met borduren. ● Druk nog een keer op om terug te keren naar het bewerkingsscherm. Para comenzar a bordar, pulse ● Pulse . . otra vez para volver a la pantalla de edición.
Border Embroidery Sewing Screen/Ecran de couture de broderie de bord/Bordürenstickerei-Nähen-Anzeige/ Naaischerm voor randen borduren/Pantalla de cosido de bordado de bordes/ Schermo di cucitura del ricamo dei bordi/ボーダー刺しゅう縫製画面 3 2 4 1 6 5 7 8 1 2 9 Automatic thread cutting key Automatic thread cutting is preset for embroidery. The machine will automatically sew reinforcement stitches and cut the threads at the end of sewing.
3 4 5 Starting point key Aligns the needle start position to the upper left/upper center/upper right. Use this key to align the needle with the pattern position. Touche position de démarrage Aligne la position de début de l'aiguille en haut à gauche/ en haut au centre/en haut à droite. Utilisez cette touche pour aligner l'aiguille sur la position du motif. Startpunkt-Taste Richtet die Nadelstartposition nach oben links/oben Mitte/oben rechts aus.
8 9 Thread tension key Shows the thread tension for the selected pattern. Touche de tension de fil Indique la tension de fil pour le motif sélectionné. Fadenspannungstaste Zeigt die Fadenspannung für das gewählte Muster. Draadspanningstoets Toont de draadspanning voor het gekozen patroon. Tecla de tensión del hilo Muestra la tensión del hilo para el diseño seleccionado. Tasto Tensione filo Mostra la tensione del filo relativa al motivo selezionato.
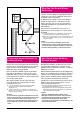
Sewing Border Embroidery/Couture de broderie de bord/Nähen von Bordürenstickerei/ Randen borduursel naaien/Cosido de bordado de bordes/Cucitura di ricami per bordi/ ボーダー刺しゅうのぬい方 To insure neatly finished border embroidery, be sure to use a stabilizer material. Pour obtenir une finition propre avec une broderie de bord, utilisez un tissu dorsal (matériau stabilisateur). Um eine sauber fertiggestellte Bordürenstickerei zu gewährleisten, verwenden Sie immer ein Unterlagenmaterial.
3 Use a chalk pen to draw a center line on the fabric in the center of the area you want to embroider. Avec une craie de couturier, tracez une ligne centrale sur le tissu au centre de la zone que vous voulez broder. Verwenden Sie einen Kreidestift, um eine Kreuz in auf dem Stoff in der Mitte des zu bestickenden Bereichs zu markieren. Maak met een krijtpotlood een kruis op de stof in het midden van de plaats waar u wilt borduren.
Allentare la vite di regolazione sul telaio per ricamo esterno.Porre il tessuto sul telaio esterno, quindi inserire il telaio interno, fissando il tessuto tra i due telai. Assicurarsi di allineare il del telaio interno al del telaio esterno.
Let op In sommige gevallen is het mogelijk dat de automatische naaldinrijg-voorziening niet gebruikt kan worden aan de linkerkant van de borduurring. (Zie het ✽ gedeelte in de afbeelding.) Gebruik de automatische naaldinrijgvoorziening niet op dit gedeelte. Dit om beschadigingen te voorkomen.
9 Press , and check that the embroidery area is not shifted. Appuyez sur , et vérifiez que la zone de broderie ne s'est pas décalée. Drücken Sie , und prüfen Sie, ob der Stickbereich nicht verschoben ist. en controleer of het borduurgebied niet Druk op verschoven is. Pulse , y compruebe que el área de bordado no se haya movido. Premere sia spostata. ed accertarsi che l'area di ricamo non si を押し、刺しゅうする範囲がずれていないか確認します。 Caution Do not lower the needle while the border frame is moving.
11 Remove the border embroidery frame from the machine. Retirez le cadre de bord de la machine. Entfernen Sie den Bordüren-Stickrahmen von der Maschine abnehmen. Moet u het randen borduurraam uit de machine verwijeren. Quite el bastidor de bordes de la máquina. Rimuovere dalla macchina stessa il telaio per bordi. ミシンからボーダー枠をはずします。 12 Reposition the fabric aligning the lines as the same way of the steps 4 to 7 on pages 33 to 35 and replace the inner frame.
Senken Sie die Nidel in den Pfeilpunkt der Nähmarkierung, und prüfen Sie die Nähstartposition. Bei jedem Drücken von wird die Nadelposition in der Reihenfolge oben Mitte → oben rechts → oben links weitergeschaltet. Sie können prüfen, ob die Nadel in dieser Position abgesenkt wird. Verwenden Sie die Pfeiltasten, um die Nadelposition in den Punkt der Nähmarkierung abzusenken. Sie können das Handrad drehen, um zu prüfen, ob die Nadel in diesen Punkt abgesenkt wird.
Sewing individual patterns repeatedly/Couture répétée de motifs individuels/ Wiederholtes Nähen individueller Muster/Individuele patronen herhaaldelijk naaien/ Cosido de diseños individuales repetidamente/Cucitura ripetuta di motivi individuali/ 単独模様を繰り返しぬう When sewing individual patterns repeatedly, you can have the needle proceed to the same color in the next pattern by using .
2 Press . Appuyez sur . Drücken Sie . . Druk up . Pulse Premere . を押します。 3 Press the Start/Stop key. The machine sews the first color of the second pattern. When sewing finishes, the machine stops. Then, will be highlighted. Appuyez sur la touche Marche/Arrêt. La machine coud la première couleur du second motif. Lorsque la couture est terminée, la machine s'arrête. Puis surbrillance. se met en Drücken Sie die Start-/Stopptaste. Die Maschine näht die erste Farbe des zweiten Musters.
4 Press . Appuyez sur . Drücken Sie . . Druk up . Pulse Premere . を押します。 5 Press the Start/Stop key. The machine sews the first color of the third pattern. When sewing finishes, the machine stops. Then, will be highlighted. Appuyez sur la touche Marche/Arrêt. La machine coud la première couleur du troisième motif. Lorsque la couture est terminée, la machine s'arrête. Puis se met en surbrillance. Drücken Sie die Start-/Stopptaste. Die Maschine näht die erste Farbe des dritten Musters.
6 Press , the needle moves to the second color in the first pattern. Thread the machine with the second color. Appuyez sur ; l'aiguille avance à la seconde couleur du premier motif. Enfilez la machine avec du fil de la seconde couleur. , und die Nadel bewegt sich zur zweiten Drücken Sie Farbe im ersten Muster. Befädeln Sie die Maschine mit der zweiten Farbe. . De naald beweegt naar de tweede kleur in Druk op het eerste patroon. Rijg de draad van de tweede kleur in de machine.
C D5 ValueKitBorder Cover 111-001 XC7125-001 0307 Printed in Japan M Y K