
User Manual
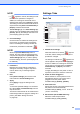
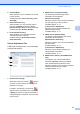
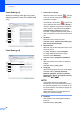
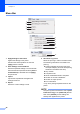
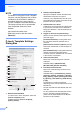

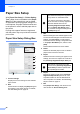
Table Of Contents
- USER’S GUIDE TD-2020 TD-2120N TD-2130N
- Introduction
- Table of Contents
- 1 Getting Started
- 2 Printing
- 3 Printer Setting Tool
- 4 Other Functions
- 5 Maintaining the Printer
- 6 Indicators
- 7 Troubleshooting
- 8 Specifications
- 9 Using the RJ25 to DB9M Serial Adapter (Optional:PA-SCA-001)
- 10 Using the Touch Panel Display (Optional:PA-TDU-001) (TD-2120N/2130N only)
- General Description
- LCD
- Touch Panel
- Printing With the Touch Panel Display
- Touch Panel Display Settings
- Creating a Label Layout
- Transferring the Label Layout to the Printer
- Printing the Label
- Label Layouts on the Printer (Checking, Deleting and Log)
- Replacing the Time/Date Battery
- Frequently Asked Questions
- Product Specifications
- 11 Using the WLAN Interface (Optional:PA-WI-001) (TD-2120N/2130N only)
- 12 Using the Bluetooth Interface (Optional:PA-BI-001) (TD-2120N/2130N only)
- 13 Using the Label Peeler (Optional:PA-LP-001) (TD-2120N/2130N only)
- 14 Using the Rechargeable Li-ion Battery/Battery Base (Optional:PA-BT-4000LI/PA-BB- 001) (TD-2120N/2130N only)
- brother UK ENG

Printer Setting Tool
39
3
7 LCD Contrast
Select the LCD display contrast.
Available settings: -2–+2
8Beeper
Select whether the printer beeps when a touch
panel key is pressed.
Available settings: [On], [Off]
9 Disable Edit
Select whether or not label layouts can be
edited.
Available settings: [On], [Off]
10 Lock Settings
Select whether or not settings selected by
pressing [ ] (settings key) on the touch panel
display can be changed.
Available settings: [On], [Off]
11 Admin Password
Set a password for accessing basic settings
specified by pressing [ ] (admin key) on the
touch panel display. Set a 4-digit password. If
the [Display the password on-screen] check
box is selected, specified passwords will be
displayed in computer windows.
12 Set Clock
Set the date and time for the touch panel
display.
In order to specify the time settings, the touch
panel display must be attached.
13 Current Date/Time
Click to retrieve the current date and time from
the computer and display them.
14 Date Format
Select the date format for the clock.
15 Time Format
Select the time format for the clock.
16 Confirm Print
Select whether a message appears before
printing so that the number of copies can be
confirmed.
Available settings: [On], [Off]
17 Default Print#
Specify the default number of copies that
appears when printing.
Available settings: 1–999