
Owner's Manual


15
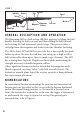
position. The rifle is now
completely assembled and may
be operated normally.
REMOVING THE BOLT
1 Place the “safety” in the
on safe position.
2 Press the bolt lock override
button and rotate the bolt
handle upward.
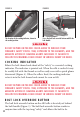
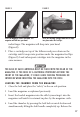
3 The bolt stop is the
horizontal bar on the left
side of the receiver (Figure 7).
Press inward on the front of the bolt stop and carefully draw the
bolt to the rear and out of the receiver.
WHEN REMOVING THE BOLT FROM THE RECEIVER, TAKE CARE TO PREVENT
THE COCKING INDICATOR FROM STRIKING AND DAMAGING THE COMB OF
THE STOCK.
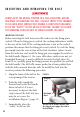
AMMUNITION
DISCHARGING FIREARMS IN POORLY VENTILATED AREAS, CLEANING
FIREARMS OR HANDLING AMMUNITION MAY RESULT IN EXPOSURE TO
LEAD AND OTHER SUBSTANCES KNOWN TO CAUSE BIRTH DEFECTS,
REPRODUCTIVE HARM AND OTHER SERIOUS PHYSICAL INJURY. HAVE
ADEQUATE VENTILATION AT ALL TIMES. WASH HANDS THOROUGHLY
AFTER EXPOSURE.
DO NOT USE AMMUNITION OTHER THAN WHAT IS INSCRIBED ON THE
RIGHT SIDE OF THE BARREL. EXAMINE EVERY CARTRIDGE YOU PUT IN
YOUR FIREARM.
FIGURE 7
Press the front of the bolt stop to insert or
remove the bolt.