
Owner's Manual


28
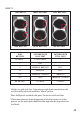
DROP AT COMB ADJUSTMENT
1 Place the “safety” in the on safe position. Open the action and
make sure the shotgun is completely unloaded.
2 Remove the comb by inserting a
7
/64" Allen wrench into the holes
found on the right side of the buttstock. Turn the wrench
counterclockwise to loosen the Allen screws.
3 With the Allen screws loose, lift the comb from the stock.
4 If the comb of your shotgun is removed through holes in the
buttstock, your shotgun included shims (20 were provided) to
obtain the correct comb height. Add or remove an equal number
of shims to each post to adjust drop at comb. A maximum of 10
(
5
/8" total height) of shims can be stacked per post.
5 Once the comb height is adjusted, return the comb to your
shotgun and carefully secure it to the buttstock by tightening the
two Allen screws in the side of the buttstock or comb. Do not
overtighten the screws. If cast has not been set, do not install the
comb. Leave the Allen screws loose and read the directions under
“Cast Adjustment.”
IMPORTANT: The posts must be inserted in the buttstock or comb a
minimum of
3
/8".
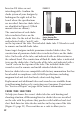
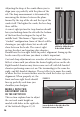
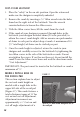
MODELS WITH A HOLE IN
THE RECOIL PAD
This section explains how to adjust
the cast and comb height on
models with a single hole in the
upper left side of the recoil pad
(Figure 17). This comb features a
total adjustment range of ¼" for
cast on and cast off adjustment.
Adjustment increments are
approximately
1
/16". Cast on and
cast off angle adjustments of a
FIGURE 17
Insert a
7
/
64" Allen wrench through the hole in
the recoil pad.