
Owner's Manual
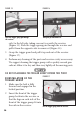
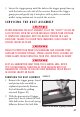

3 Lower the trigger group until the hole in the trigger group lines up
with the holes on each side of the receiver. Reinsert the trigger
group pin and gently tap it into place with a plastic or wooden
mallet, using caution not to scratch the receiver.
SERVICING THE BOLT ASSEMBLY
BEFORE REMOVING THE BOLT ASSEMBLY, PLACE THE “SAFETY” IN THE ON
SAFE POSITION. OPEN THE ACTION AND MAKE CERTAIN YOUR SHOTGUN
IS COMPLETELY UNLOADED. KEEP THE MUZZLE POINTED IN A SAFE
DIRECTION. FAILURE TO FOLLOW THESE WARNINGS COULD RESULT IN
SERIOUS INJURY OR DEATH.
WEAR EYE PROTECTION WHEN DISASSEMBLING AND CLEANING YOUR
SHOTGUN TO PREVENT SPRINGS, SPRING-LOADED PARTS, SOLVENTS OR
OTHER AGENTS FROM CONTACTING YOUR EYES, RESULTING IN INJURY.
KEEP ALL AMMUNITION AWAY FROM THE CLEANING AREA. NEVER
TEST THE MECHANICAL FUNCTION OF YOUR SHOTGUN WITH LIVE
AMMUNITION. FAILURE TO FOLLOW THESE WARNINGS COULD RESULT
IN SERIOUS INJURY OR DEATH.
REMOVING THE BOLT ASSEMBLY
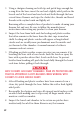
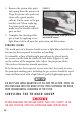
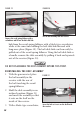
1 Remove the trigger group, barrel
and piston tube assembly as
explained previously. Remove
the bolt handle by pulling
outward (Figure 18).
2 With the gun inverted (trigger
guard up), locate where the bolt
slide link enters the recoil spring
follower. Extract the bolt slide
37
FIGURE 18
Remove the bolt handle by pulling it outward.