
Installation Guide


• After installation, turn the heating system back on immediately. The finished floor surface must not exceed 85°F (29°C)
throughout the life of the floor.
• Radiant heating systems normally create dry heat that can lower interior humidity levels. It may be necessary to add humidity
with humidifiers to maintain the recommended levels (35-55%) and prevent damage to the wood floor.
• The flooring should be end-glued over radiant heat to reduce longitudinal shrinkage. Apply a bead of the recommended wood
glue to the groove end then insert the tongue. Wipe excess adhesive away immediately.
Tools & Accessories Needed
(All Installation Methods)
• Broom • Tape measure • Hammer • Chalk line & chalk • Hand saw or jamb saw
• Recommended hardwood flooring cleaner • Electric power saw • Eye protection • Recommended wood glue
• Moisture Meter (wood, concrete or both) • Transition and wall moldings • NIOSH-designated dust mask
(Add for Glue-Down Installations)
• Recommended adhesive and adhesive
remover
• 1/4˝ x 1/2˝ x 3/16˝ (6 mm x 13 mm x 8
mm) V-Notch trowel (Figure 2)
• 3M Scotch-Blue
™
2080 tape
• Recommended wood glue for floors
exceeding 3-1/4˝ (9.5 cm) in width
•
Armstrong VapArrest S-135 Professional
Moisture Retardant System on concrete (if
needed). Use with urethane adhesive only.
(Add for Mechanically Fastened/Staple-Down Installations)
• PowerNail 20FS & PowerNail 2000 • Stanley Bostitch 2025K & Stanley Bostitch LHF 97125
• 1˝ Staples/fasteners (minimum) • 20 gauge fasteners • Compressor and hose
• Nylon/Plastic tapping block • In-line regulator
• Recommended wood glue for floors exceeding 3-1/4˝ (9.5 cm) in width
(Add for Floating Installations)
• Recommended underlayment • Pull bar • Tapping block • Recommended wood glue
III. SUBFLOOR / UNDERLAYMENT REQUIREMENTS
Recommended Subfloor/Underlayment Surfaces
(Glue Down and Floating Installations Only)
• Concrete • Ceramic Tile, Terrazzo, Slate & Marble • Acoustic cork
(All Installation Methods)
• Wood subfloors • Wood structural panels and underlayment • Fully adhered existing wood floors
• Fully adhered vinyl sheet, resilient tile, cork flooring and linoleum
Concrete
(Glue Down and Floating Installations Only)
The flooring can be glued directly to concrete with a minimum compressive strength of 3000 PSI. Do not install over a concrete
sealer or painted concrete. If present, remove by grinding or sanding. Do not install over slick, heavily troweled or burnished
concrete. Roughen the surface as necessary by sanding or grinding. Use an appropriate NIOSH-designated dust mask. Floating
floors can be installed over any structurally sound concrete.
Concrete Moisture Tests
All concrete subfloors should be tested, and results documented, for
moisture content. Visual checks may not be reliable. Test several areas,
especially near exterior walls and walls containing plumbing. Acceptable test
methods for subfloor moisture content include:
• Tramex Concrete Moisture Encounter Meter: (Figure 3) Moisture
readings should not exceed 4.5 on the upper scale. (Figure 3 shows an
unacceptable reading of over 4.5.)
• Polyfilm Test: Apply 3´ x 3´ (1 m x 1 m) pieces of polyethylene film
to the subfloor and leave in place for 24 hours. Assure all edges are
completely sealed with water resistant tape. Darkened concrete or
condensation on film indicates presence of moisture and requires
additional measurements with a Calcium Chloride or RH test.
NOTE: The following tests are required in commercial applications.
Either or both tests are acceptable. If both tests are conducted then both tests must pass.
•
Calcium Chloride Test (ASTM F 1869): The maximum moisture transfer must not exceed 3 lbs./1000 ft.
2
in 24 hrs. with this test.
• RH Levels in Concrete Using In-situ Probes (ASTM F 2170) should not exceed 75%.
“DRY” CONCRETE, AS DEFINED BY THESE TESTS CAN BE WET AT OTHER TIMES OF THE YEAR. THESE TESTS DO NOT
GUARANTEE A DRY SLAB. ALL NEW CONSTRUCTION CONCRETE SLABS SHOULD HAVE A MINIMUM OF 10 MIL POLY FILM
MOISTURE BARRIER BETWEEN THE GROUND AND THE CONCRETE.
Moisture Retardant Systems
If excessive moisture is present or anticipated, use Armstrong VapArrestTM S-135 Professional Moisture Retardant System,
Armstrong Summit adhesive or inexpensive sheet vinyl to reduce vapor intrusion.
NOTE: DO NOT use Armstrong Proconnect
TM
Professional Hardwood Flooring Adhesive when using Armstrong VapArrest S-135
Professional Moisture Retardant System or sheet vinyl as a moisture retardant. Use only Armstrong
®
Equalizer
TM
.
• Armstrong VapArrest S-135: Apply the materials after all subfloor preparation is complete. Follow the instructions on the
VapArrest S-135 label. Allow 8-24 hours curing time before application of the hardwood flooring.
• Armstrong Summit adhesive: Apply the adhesive using the Summit trowel that is included in every pail. Flooring can be
installed immediately after applying the adhesive.
• Sheet vinyl: An inexpensive sheet vinyl or “slip-sheet” (felt-backed with vinyl wear layer) may be installed. Use a premium
grade, alkali resistant adhesive and a full spread application system to properly bond the vinyl to the subfloor. Follow the
sheet vinyl manufacturer’s instructions for installation procedures. A bond test may be required as an adhesion test. Install
several small areas (3´ x 3’) (1 m x 1 m) and allow the vinyl to set for 72 hours. Remove the vinyl. If the backing remains
attached to the concrete, the subfloor should be acceptable for sheet vinyl installation. Install the sheet vinyl and allow the
adhesive to cure for 24 hours prior to beginning installation. Degloss as necessary to create an adequate adhesive bond.
Always check for adequate adhesive bond.
Acoustic Concrete
(Glue Down and Floating Installations Only)
Acoustic concrete normally contains large quantities of gypsum that may inhibit the adhesive’s capability to properly bond.
Acoustic concrete must be primed with the concrete manufacturer’s recommended primer/surface hardener. Test the concrete
by scraping the surface with a nail or other sharp object. If the concrete powders or crumbles, it is not sound and suitable for
direct application of hardwood flooring and may require the use of a floating sub-floor system. Always check for adequate
adhesive bond. The concrete must have a minimum compressive strength of 2000 PSI.
Ceramic, Terrazzo, Slate & Marble
(Glue Down and Floating Installations Only)
All grout joints and broken corners that exceed 3/16˝ (5 mm) must be filled with a cementitious leveling compound such as
Armstrong S-194 Patch, Underlayment & Embossing Leveler with S-195 Underlayment Additive. The surface should be cleaned
and abraded to create a good bonding surface for the adhesive. Loose tiles must be re-adhered to the subfloor or filled as above.
Remove all sealers and surface treatments. Always check for adequate adhesive bond.
Acoustic Cork Underlayment
(Glue Down and Floating Installations Only)
The flooring can be glued or floated directly over full-spread, permanently bonded acoustic cork. The cork should have a density
of no less than 11.4 lb./cubic foot. The cork, in general, should be pure cork combined with a polyurethane or resin binder.
Install cork in accordance with cork manufacturer’s recommendations. Always check for adequate adhesive bond. When floating
floors over cork DO NOT use foam underlayment.
Wood Subfloors and Underlayment
(All Installation Methods)
General: The wood subflooring materials must not exceed 13% moisture content. Using a reliable wood moisture meter, measure
moisture content of both the subfloor and the hardwood flooring to determine proper moisture content. The difference between
the moisture content of the wood subfloor and the hardwood flooring must not exceed 4%. When installing parallel to the
floor joists it may be necessary to stiffen the subfloor system by installing an additional minimum of 3/8˝ (9.5 mm) approved
underlayment. Applicable standards and recommendations of the construction and materials industries must be met or exceeded.
NOTE: As flooring manufacturers, we are unable to evaluate each engineered system. Spacing and spans, as well as their engineering
methods, are the responsibility of the builder, engineer, architect or consumer who is better able to evaluate the expected result
based on site-related conditions and performance. The general information provided below describes common, non-engineered
joist/subfloor systems. Engineered flooring systems may allow for wider joist spacing and thinner subflooring materials.
Option 1: When wider joist spacing of 19.2˝ or greater is used, additional plywood subfloor material must be added to reduce
movement and deflection.
Option 2: In addition to the use of mechanical fasteners, assisted glue applications should be used. The glue should be a
premium grade urethane construction adhesive applied in a serpentine pattern to the back of each board. Then follow the
recommended fastening pattern.
Option 3: With wider spacing of 19.2˝ apply a bead of Armstrong EverSeal to the bottom of the end and side groove. This
will lock the tongue and groove together eliminating movement that may contribute to noise. Then follow the recommended
fastening pattern with a staple or cleat.
Our products will not be warranted against cracking and popping associated with a staple down or nail down installations. With
wider joist spacing of 19.2˝ or greater please follow one of the above methods to reduce noise associated with a mechanically
fastened installation.
Wood Structural Panel Subfloors and Underlayment
(All Installation Methods)
Structural panels/underlayment must be installed sealed side down. When used as a subfloor, allow 1/8˝ (3 mm) expansion
space between each panel. If spacing is inadequate, cut in with a circular saw. Do not cut in expansion space on tongue and
groove panels.
2
• Plywood: Must be minimum CDX grade (exposure 1) and meet US Voluntary Product Standard PS1 performance standard or
Canadian performance standard CAN/CSA 0325-0-92. The preferred thickness is 3/4˝ (19 mm) as a subfloor [minimum 5/8˝
(16 mm)] or 3/8˝ (9.5 mm) as underlayment.
• Oriented Strand Board (OSB): Conforming to US Voluntary Product Standard PS2 or Canadian performance standard CAN/
CSA 0325-0-92 construction sheathing. Check underside of panel for codes. When used as a subfloor, the panels must be
tongue and groove and installed sealed side down. Minimum thickness to be 23/32˝ (18 mm) thick when used as a subfloor
or 3/8˝ (9.5 mm) as underlayment.
• Waferboard and Chipboard: Conforming to US Voluntary Product Standard PS2 or Canadian performance standard
CAN/CSA 0325-0-92. Must be 3/4˝ (19 mm) thick when used as a subfloor and 3/8˝ (9.5 mm) thick when used as an
underlayment.
• Particleboard: Must be a minimum 40-lb. density, stamped underlayment grade and 3/4˝ (19 mm) thick.
Solid Wood Subfloors
(All Installation Methods)
• Minimum 3/4˝ (19 mm) thick with a maximum width of 6˝ (15 cm) installed at a 45° angle to the floor joists.
• Group 1 dense softwood (Pine, Larch, Douglas Fir, etc.) No. 2 common, kiln dried with all board ends bearing on joists.
• For glue down applications add 3/8˝ (9.5 mm) approved underlayment.
Existing Wood Flooring
(All Installation Methods)
• Existing engineered flooring must be well bonded/fastened. When gluing over existing wood flooring of any thickness, the
finishing materials must be abraded or removed to foster an adequate adhesive bond. When flooring is to be mechanically
fastened, the existing engineered wood flooring must be a minimum of 3/8˝ (9.5 mm) thick installed over approved wood/
wood composite underlayment that has been properly fastened. When installing over engineered flooring that is glued to
concrete, the minimum thickness of that flooring must be 1/2˝ (13 mm) to allow for the length of the fastener.
• Existing solid wood flooring that exceeds 6˝ (15 mm) in width must be covered with 3/8˝ (9.5 mm) approved underlayment
and fastened as required. Do not install over solid flooring attached directly to the concrete.
Existing Wood Flooring
(All Installation Methods, see notes below)
(Glue-Down Installations)
DO NOT use Armstrong ProConnect Professional Hardwood Flooring Adhesive when installing over these surfaces. Use only
Armstrong Equalizer Premium Urethane Adhesive or Summit All-In-One Adhesive
• Make certain the floor covering materials are well bonded to the subfloor/underlayment with full spread adhesive and are no
more than two layers thick, not to exceed 3/16˝ (5 mm).
• With approved wood/wood composite subfloors, if vinyl or tiles are loose, broken, or in poor condition, install a 3/8˝ (9.5
mm) approved underlayment directly over the flooring materials.
• Clean the flooring materials as necessary to create a good adhesive bond . If a maintenance material is present on the floor
covering or a gloss is present, de-gloss with a flooring pad and a commercially available stripper, then rinse completely. Allow
ample drying time. (NOTE: Do not sand any resilient products. They may contain asbestos fibers, which may be harmful.)
• Cork floors must have all sealers and surface treatments removed before installation begins. Always check for adequate
adhesive bond.
(Mechanically Fastened/Staple-Down Installations)
• Do not install over floors that exceed one layer, as the thickness of the flooring materials will prevent an adequate mechanical
bond.
• Make certain that the subflooring materials meet minimum requirements.
• Some tile products may be too brittle for staple penetration. Always test an area for breakage before proceeding.
IV. INSTALLING THE FLOOR
General Installation Tips
(Glue Down and Floating Installations Only)
NOTE: When installing UNFINISHED engineered flooring, allow a minimum
of 72 hours adhesive curing time before applying seals, stains and finishes to
unfinished flooring. Test the moisture content of the wood in accordance with
the stain/finish manufacturer’s recommendations.
• Do not staple or mechanically fasten products that exceed 6˝ (13 cm) in
width.
• Floor should be installed from several cartons at the same time to ensure
good color and shade mixture.
• When possible, preselect and set aside boards that blend best with all
horizontally mounted moldings used to assure a uniform final appearance.
Install these boards adjoining the moldings.
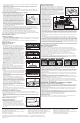
• Be attentive to staggering the ends of the boards at least 4˝-6˝
(10-15 cm) when possible, in adjacent rows (Figure 4). This will help ensure a more favorable overall appearance of the floor.
• When installing engineered products of uniform length, begin the rows with starter boards cut to various lengths. Avoid
staggering the rows uniformly to prevent stair-stepping. Boards cut from the opposite end of the row may be used for the
next starter boards.
• Always allow a minimum 1/4˝ (6 mm) expansion around all vertical obstructions. Allow 1/2˝ (13 mm) for floating floors.
NOTE: (For Glue-Down Installation) When installing products wider than 3 1/4˝ (8 cm), apply a bead of recommended wood
glue to all of the end grooves prior to installing into the adhesive. (For Staple Down Installation) When installing products wider
than 3 1/4˝ (8 cm) but not to exceed 5˝ (13 cm), apply a bead of recommended wood glue to all of the end grooves prior to
stapling down.
STEP 1: Doorway and Wall Preparation
(All Installation Methods)
Undercut door casings and jambs. Remove any existing base, shoe molding
or doorway thresholds. These items can be replaced after installation. All door
casings and jambs should be undercut to avoid difficult scribe cuts (Figure 5).
STEP 2: Establish a Starting Point
(All Installation Methods)
• Installation parallel to the longest wall is recommended for best visual
effects, however, the floor should be installed perpendicular to the flooring
joists unless the subfloor has been reinforced to reduce subfloor sagging.
• When possible, always begin the layout or installation from the straightest
wall, generally an outside wall.
• In at least two places, at least 18˝ (46 cm) from the corner, measure out
equal distance from the starting wall (Figure 6) and snap a chalk line.
The measurement must be the sum of the width of the flooring plus an
additional 3/8˝ (9.5 mm) to allow for 1/4˝ (6 mm) expansion space and the
width of the tongue. Allow 1/2˝ (13 mm) expansion when installing floating
floors.
STEP 3: Installing First & Second Rows
(Mechanically Fastened/Staple-Down Installations)
• Use the longest, straightest boards available for the first two rows. For
random and alternate width products, use the widest plank for the first row.
Align tongue of first row on chalk line. The groove should be facing the
starting wall. Pre-drill 1/2˝ (13 mm) from back (groove) edge, 1˝-2˝ (2.5-5
cm) from each end, and at 6˝ (15 cm) intervals when possible (Figure 7).
Fasten using 4 or 6d finishing nails or 1˝ (2.5 cm) pneumatic finish nails/
brads. Countersink the nails.
• Pre-drill and blind-nail at a 45° angle through the tongue of the first row
every 1˝-2˝ (2.5-5 cm) from the ends and spaced in 3˝-4˝ (7.6-10 cm)
intervals. Countersink nails to ensure flush engagement of groove with the
following row(s). Continue blind nailing using this method with following
rows until stapler can be used. Alternatively use a pneumatic finish nailer
and install nails/brads at the same intervals with a minimum length of 1˝
(2.5 cm).
• End-joints of adjacent rows should be staggered a minimum of 4˝-6˝
(10-15 cm) when possible, to ensure a more favorable overall appearance
(Figure 4).
STEP 4: Installing the Floor
(Mechanically Fastened/Staple-Down Installations)
• Always use the recommended stapler for the specific product being
installed (see “Installation Applications”). Use a minimum 1˝ (2.5 cm) staple
recommended by the stapler manufacturer, 1˝-2˝ (2.5-5 cm) from the ends
spaced at 3˝-4˝ (8-10 cm) intervals. Continue to Step 5.
•
Set compressor at 70 PSI. If tongue damage occurs, lower air pressure
(Figure 8).
•
Fasten several sacrificial boards to the floor. At least two boards, stapled side
by side, must be used to indicate proper machine adjustments.
•
Check for surface damage, air pressure setting, tongue damage, edge
blistering, etc. before proceeding. Make all adjustments and corrections
before installation begins. Once proper adjustments have been made, remove
and destroy the boards.
•
Install the remainder of the floor working from several cartons.
•
The last 1-2 rows will need to be face-nailed when clearance does not
permit blind nailing with a stapler or a brad nailer. Pre-drill and face-nail or
pneumatically nail on the tongue side, following the nailing pattern used for the first row.
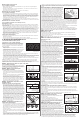
Figure 4
Preferred Alignment
Too Low Too High Correct
Figure 8
Wood Plank
Figure 3
Figure 6
Figure 7
face nail every
6ʺ (15 cm)
1st row 1st row
2nd row
blind nail into
tongue every
3–4ʺ (8-10 cm)
tongue
chalk line
Figure 5
Figure 2