
Installation Guide

INSTALLATION INSTRUCTIONS
3/8˝ & 1/2˝
(10 mm and 13 mm)
ENGINEERED PRODUCTS
FOR STAPLE-DOWN, MECHANICALLY FASTENED,
FLOATING AND GLUE-DOWN APPLICATIONS
RECOMMENDED ADHESIVES: Armstrong ProConnect Flooring Adhesive, Armstrong Equalizer urethane adhesive,
Armstrong Summit
™
RECOMMENDED ADHESIVE REMOVER: Low Odor Mineral Spirits
RECOMMENDED CLEANER: Bruce Hardwood & Laminate Floor Cleaner or Armstrong Hardwood & Laminate Floor
Cleaner
RECOMMENDED UNDERLAYMENT (Floating installation system only): Quiet Comfort Premium or Quiet Comfort
RECOMMENDED WOOD GLUE (Floating installation and joint gluing): Armstrong EverSeal
™
Adhesive
Note: All species of hand-scraped products (such as American Scrape, Century Farm, Legacy Manor, Artestian Hand
Tooled & Rural Living) can be stapled down with 20 gauge staples (1˝ minimum length). Birch, Hickory, Maple and
Pecan hand-scraped products can be stapled down using the recommended fastening machines.
For Products wider than 5˝: In addition to the use of mechanical fasteners, assisted glue applications should be used.
The glue should be a premium grade urethane construction adhesive applied in a serpentine pattern to the back of each
board. Then follow the recommended fastening pattern.
For complete warranty information call 1 800 233 3823 or visit www.armstrong.com/hardwoodinstallationguides.
Subfloor Conditions
• CLEAN – Subfloor must be free of wax, paint, oil, sealers, adhesives and other debris.
• LEVEL/FLAT – Within 3/16˝ in 10´ (5 mm in 3 m) and/or 1/8˝ in 6´ (3 mm in 2 m). Sand high areas or joints. If the floor is
to be glued down, fill low areas with a latex additive cementitious leveling compound of 3,000-PSI minimum compressive
strength such as Armstrong S-194 Patch, Underlayment & Embossing Leveler with S-195 Underlayment Additive. Follow the
instructions of the leveling compound manufacturer, but make certain the leveling compounds are completely DRY before
beginning installation. When mechanically fastening the floor down, flatten low spots with a maximum of 6 layers of 15#
builders felt, plywood or shims (not leveling compounds). Leveling materials must provide a structurally sound subfloor that
does not affect the holding power of the fastener.
• DRY – Check and document moisture content of the subfloor using the appropriate moisture test. Concrete subfloors must
be a minimum of 30 days old before testing begins.
• STRUCTURALLY SOUND – Nail or screw any areas that are loose or squeak. Wood panels should exhibit an adequate
fastening pattern, glued/screwed or nailed as system requires, using an acceptable nailing pattern. Typical: 6˝ (15 cm) along
bearing edges and 12˝ (31 cm) along intermediate supports. Flatten edge swell as necessary. Replace any water-damaged,
swollen or delaminated subflooring or underlayments.
• Avoid subfloors with excessive vertical movement. Optimum performance of hardwood floor covering products occurs when
there is little horizontal or vertical movement of the subfloor. If the subfloor has excessive vertical movement (deflection)
before installation of the flooring, it is likely it will do so after installation of the flooring is complete.
Subfloors with Radiant Heat
NOTE: Always make certain the product selected is recommended for this type application. The following products are not
recommended to be installed over radiant heat subfloors: Armstrong Global Exotics System must be operational and heated for
at least 7 days prior to beginning the installation.
• Use an incremental control strategy that brings the floor through temperature changes gradually which may include an
external thermostat.
• Turn off heat and let subfloor cool down to room temperature 3-4 hours prior to starting the job.
•
BEFORE installation begins, ascertain that the heating system is designed and controlled for wood flooring and that the circuit
does not include other floor covering types. Failure to do so may cause excessive heat damage and shrinkage. NOTE: Refer to
radiant heat system manufacturer’s precautions for staple down installation. Beware of stapling through radiant tubing or mesh.
• After installation, turn the heating system back on immediately. The finished floor surface must not exceed 85°F (29°C)
throughout the life of the floor.
• Radiant heating systems normally create dry heat that can lower interior humidity levels. It may be necessary to add humidity
with humidifiers to maintain the recommended levels (35-55%) and prevent damage to the wood floor.
• The flooring should be end-glued over radiant heat to reduce longitudinal shrinkage. Apply a bead of the recommended wood
glue to the groove end then insert the tongue. Wipe excess adhesive away immediately.
Tools & Accessories Needed
(All Installation Methods)
• Broom • Tape measure • Hammer • Chalk line & chalk • Hand saw or jamb saw
• Recommended hardwood flooring cleaner • Electric power saw • Eye protection • Recommended wood glue
• Moisture Meter (wood, concrete or both) • Transition and wall moldings • NIOSH-designated dust mask
(Add for Glue-Down Installations)
• Recommended adhesive and adhesive
remover
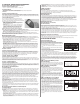
• 1/4˝ x 1/2˝ x 3/16˝ (6 mm x 13 mm x 8 mm)
V-Notch trowel (Figure 2)
• 3M Scotch-Blue
™
2080 tape
• Recommended wood glue for floors
exceeding 3-1/4˝ (9.5 cm) in width
•
Armstrong VapArrest S-135 Professional
Moisture Retardant System on concrete (if
needed). Use with urethane adhesive only.
(Add for Mechanically Fastened/Staple-Down Installations)
• PowerNail 20FS & PowerNail 2000 • Stanley Bostitch 2025K & Stanley Bostitch LHF 97125
• 1˝ Staples/fasteners (minimum) • 20 gauge fasteners • Compressor and hose
• Nylon/Plastic tapping block • In-line regulator
• Recommended wood glue for floors exceeding 3-1/4˝ (9.5 cm) in width
(Add for Floating Installations)
• Recommended underlayment • Pull bar • Tapping block • Recommended wood glue
I. GENERAL INFORMATION
Owner/Installer Responsibility
Beautiful hardwood floors are a product of nature and therefore, not perfect. Our hardwood floors are manufactured in
accordance with accepted industry standards, which permit grading deficiencies not to exceed 5%. These grading deficiencies
may be of a manufacturing or natural type. When flooring is ordered, 5% must be added to the actual square footage needed for
cutting and grading allowance (10% for diagonal installations).
• The owner/installer assumes all responsibility for final inspection of product quality. Inspection of all flooring should be done
prior to installation. Carefully examine flooring for color, finish and quality before installing it. If material is not acceptable, do
not install it and contact the seller immediately.
• Prior to installation of any hardwood flooring product, the owner/installer must determine that the job-site environment and
the sub-surfaces involved meet or exceed all applicable standards. Recommendations of the construction and materials
industries, as well as local codes, must be followed. These instructions recommend that the construction and subfloor be
clean, dry, stiff, structurally sound and flat. The manufacturer declines any responsibility for job failure resulting from, or
associated with, subfloor and substrates or job-site environmental deficiencies.
• Prior to installation, the owner/installer has final inspection responsibility as to grade, manufacture and factory finish. The
installer must use reasonable selectivity and hold out or cut off pieces with deficiencies, whatever the cause. Should an
individual piece be doubtful as to grade, manufacture or factory finish, the installer should not use the piece.
• Use of stain, filler or putty stick for touch-up and appropriate products for correcting subfloor voids is accepted as part of
normal installation procedures.
1
WARNING:
EXISTING IN-PLACE RESILIENT FLOOR COVERING AND ASPHALTIC
ADHESIVES. DO NOT SAND, DRY SWEEP, DRY SCRAPE, DRILL, SAW, BEADBLAST, OR
MECHANICALLY CHIP OR PULVERIZE EXISTING RESILIENT FLOORING, BACKING, LINING
FELT, ASPHALTIC “CUTBACK” ADHESIVE, OR OTHER ADHESIVE.
These existing in-place products may contain asbestos fibers and/or crystalline silica.
Avoid creating dust. Inhalation of such dust is a cancer and respiratory tract hazard.
Smoking by individuals exposed to asbestos fibers greatly increases the risk of serious bodily harm.
Unless positively certain that the existing in-place product is a non-asbestos-containing material, you must
presume it contains asbestos. Regulations may require that the material be tested to determine asbestos
content and may govern removal and disposal of material.
See current edition of the Resilient Floor Covering Institute (RFCI) publication Recommended Work Practices
for Removal of Resilient Floor Coverings for instructions on removing all resilient floor covering structures or
contact your retailer or Armstrong World Industries, Inc. 1 800 233 3823.
The floor covering or adhesive in this package does NOT contain asbestos.
ATTENTION INSTALLERS
CAUTION: WOOD DUST
Sawing, sanding and machining wood products can produce wood dust. Airborne wood dust
can cause respiratory, eye and skin irritation. The International Agency for Research on Cancer
(IARC) has classified wood dust as a nasal carcinogen in humans.
Precautionary Measures: If power tools are used, they should be equipped with a dust collector. If high dust
levels are encountered, use an appropriate NIOSH-designated dust mask. Avoid dust contact with eye and skin.
First Aid Measures in Case of Irritation: In case of irritation, flush eyes or skin with water for at least 15 minutes.
If you have any technical or installation questions, or to request a Material Safety Data Sheet,
please call 1 800 233 3823 or visit www.floorexpert.com, our technical website.
MINNESOTA RESIDENTIAL FORMALDEHYDE REGULATION: IMPORTANT HEALTH NOTICE THESE
BUILDING MATERIALS EMIT FORMALDEHYDE, EYE, NOSE, AND THROAT IRRITATION, HEADACHE, NAUSEA AND A
VARIETY OF ASTHMA-LIKE SYMPTOMS, INCLUDING SHORTNESS OF BREATH, HAVE BEEN REPORTED AS A RESULT OF
FORMALDEHYDE EXPOSURE. ELDERLY PERSONS AND YOUNG CHILDREN, AS WELL AS ANYONE WITH A HISTORY OF
ASTHMA, ALLERGIES, OR LUNG PROBLEMS, MAY BE AT GREATER RISK. RESEARCH IS CONTINUING ON THE POSSIBLE
LONG-TERM EFFECTS OF EXPOSURE TO FORMALDEHYDE. REDUCED VENTILATION MAY ALLOW FORMALDEHYDE AND
OTHER CONTAMINANTS TO ACCUMULATE IN THE INDOOR AIR. HIGH INDOOR TEMPERATURES AND HUMIDITY RAISE
FORMALDEHYDE LEVELS. WHEN A HOME IS TO BE LOCATED IN AREAS SUBJECT TO EXTREME SUMMER TEMPERATURES,
AN AIR-CONDITIONING SYSTEM CAN BE USED TO CONTROL INDOOR TEMPERATURE LEVELS. OTHER MEANS OF
CONTROLLED MECHANICAL VENTILATION CAN BE USED TO REDUCE LEVELS OF FORMALDEHYDE AND OTHER INDOOR
AIR CONTAMINANTS. IF YOU HAVE ANY QUESTIONS REGARDING THE HEALTH EFFECTS OF FORMALDEHYDE, CONSULT
YOUR DOCTOR OR LOCAL HEALTH DEPARTMENT.
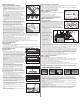
Do not staple down products that exceed 6˝ in width or
Pecan, Maple, Northshore
®
, or Hickory Products
Soil Line
2nd Floor
(above ground level)
1st Floor
(ground level)
Basement
(below ground level)
Figure 1
II. PREPARATION
Storage and Handling
• Handle and unload with care. Store in a dry place being sure to provide at least a four-inch air space under cartons which are
stored upon “on-grade” concrete floors. Flooring should not be delivered until the building has been enclosed with windows
doors are in place, and cement work, plastering and all other “wet” work is completed and dry.
• Although it is not necessary to acclimate engineered flooring it is best to store it in the environment in which it is expected to
perform prior to installation. Check adhesive label for adhesive storage limitations.
Job-Site Conditions
• The building should be enclosed with all outside doors and windows in place. All concrete, masonry, framing members,
drywall, paint and other “wet” work should be thoroughly dry. The wall coverings should be in place and the painting
completed, except for the final coat on the base molding. When possible, delay installation of base molding until flooring
installation is complete. Basements and crawl spaces must be dry and well ventilated.
• Exterior grading should be complete with surface drainage, offering a minimum drop
of 3˝ in 10´ (7.6 cm in 3.05 m) to direct flow of water away from the structure. All
gutters and downspouts should be in place.
• Engineered flooring may be installed below-, on- or above-grade level. Do not install
in full bathrooms.
• Crawl spaces must be a minimum of 18˝ (46 cm) from the ground to the underside
of the joists. A ground cover of 6-20 mil black polyethylene film is essential as a
vapor barrier with joints lapped 6˝ (15 cm) and sealed with moisture resistant tape.
The crawl space should have perimeter venting equal to a minimum of 1.5% of the
crawl space square footage. These vents should be properly located to foster cross
ventilation (Figure 1).
• Where necessary, local regulations prevail.
• Permanent air conditioning and heating systems should be in place and operating.
The installation site should have a consistent room temperature of 60-80°F (16-
27°C) and humidity of 35-55% for 14 days prior to and during installation and until
occupied.
Figure 2