
Installation Guide
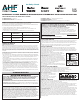

3
• Be sure to place a spacer between the marking pen and “scribe” piece of board. This adds the 1/4˝ (6.35 cm).
General Information for Glue-Down Installations
NOTE: DO NOT INSTALL FLOORING USING RUBBER MALLETS. STRIKING THE SURFACE WITH A RUBBER MALLET
MAY “BURN” THE FINISH CAUSING IRREPAIRABLE DAMAGE.
• Maximum adhesive working times: 50- 60 minutes-When not in use, keep the adhesive container tightly closed to
prevent thickening. Thickening will cause difficulty in spreading the adhesive. Bruce
®
Summit Select – 50 minutes
• Open times and curing times of ALL adhesives vary dependent upon subfloor porosity, air movement, humidity and
room temperature. Urethane adhesive has a shortened working time in high humidity environments. In areas of low
humidity, open time will be longer with urethane adhesives and shorter with some adhesives. Adjust the amount of
adhesive spread on the subfloor accordingly. The adhesive should not be applied if subfloor or room temperature is
below 60°F (16°C). WORKING TIME WILL VARY DEPENDING ON JOB SITE CONDITIONS.
• Hold trowel at a minimum 45° angle (Figure 13) firmly against the
subfloor to obtain a 50-60 ft.
2
(4-5.5 m
2
) per gallon spread rate (20-
30 ft.
2
per gallon for Bruce
®
Summit Select spread with listed trowels)
The trowel will leave ridges of adhesive and very little adhesive
between the ridges. This method will allow you to still see the chalk
lines between the ridges and provide the recommended spread rate.
• For additional application instructions, follow the recommendations
on the adhesive container.
• Proper ventilation within the room to mitigate fumes. An electric fan is
helpful. Position the fan so it does not blow directly on the adhesive.
STEP 3: Spread the Adhesive
(Glue-Down Installations)
• Spread sufficient amounts of the recommended adhesive with the
recommended trowel (Figure 2) in an area that can be covered in 60
minutes (see adhesive information).
• If necessary, nail a sacrificial row with 1˝ (2.5 cm) nails on the dry side
of your chalk line to help hold the first row in place.
NOTE: Avoid installing on the surface of the flooring. If necessary,
distribute weight using a kneeler board.
STEP 4: Installing the Floor
(Glue-Down Installations)
(Figure 14-19)
• Use the longest, straightest boards available for the first two rows.
For random and alternate width products, use the widest plank for the
first row. The first row of planks should be installed with the edge of
the groove lined up on the chalk line. The tongue should be facing the
starting wall. The first row must be aligned and seated in the adhesive,
as all additional rows will be pushed back to this original row. Remove
tongue to allow for expansion space, if necessary, on the row adjoining
the wall.
• When installing pieces, engage the end-joint first, as close to the side
(long) tongue and groove as possible, then slide together tightly to
engage the side (long) joint tongue and groove. To avoid adhesive
bleed-through and memory pull-back, avoid sliding pieces through the
adhesive as much as possible when placing them in position.
• During the installation occasionally remove a piece of flooring from the
subfloor and inspect the back for proper adhesive transfer. Adequate
adhesive transfer is necessary to ensure sufficient holding strength.
• If the adhesive skins over and fails to transfer, remove and spread new
adhesive to achieve proper bonding.
NOTE: Clean adhesive from the surface of the floor frequently, using the
recommended adhesive cleaner. Urethane adhesives become extremely
difficult to remove when cured. Do not use 3M Scotch-Blue™ 2080 Tape
before adhesive is removed from the surface. Use clean towels, changed
frequently, to prevent haze and adhesive residue.
• Check for a tight fit between all edges and ends of each plank. End-
joints of adjacent rows should be staggered 4˝-6˝ (10-15 cm) when
possible, to ensure a more favorable overall appearance (Figure 17).
• It may be necessary to align the product with a cut-off piece of scrap as
shown (Figure 19 - Keep scrap angle low to avoid edge damage).
• To eliminate minor shifting or gapping of product during installation,
use 3M Scotch-Blue™ 2080 Tape to hold the planks together. After
installation is complete, remove all of the 3M Scotch-Blue™ 2080 Tape
from the surface of the newly installed flooring. Do not let the tape
remain on the flooring longer than 24 hours. Avoid the use of masking
or duct tape, which leaves an adhesive residue and may damage the
finish.
• If necessary, use weights to flatten boards with bows until adhesive
cures, in order to prevent hollow spots. Boards that cannot be flattened
should be cut in length to reduce the bow, or not used.
• Roll and cross roll the floor with a 75-100lb. roller within one hour of
the installation and again two hours to ensure proper transfer of the
adhesive.
• Be sure not to spread adhesive too far ahead of your work area (Figure
18).
• Complete the installation using this same technique for the remainder
of the floor.
• Avoid heavy foot traffic on the floor for at least 24 hours. Lift the
furniture or fixtures back into place after 24 hours.
Installing Under a Door Jamb
(All Installations)
• Installations of locking engineered floors under moldings, such as a
door jamb, may require that the top lip of the groove on the end be
reduced in size.
• Using a small plane or knife plane, shave off the ledge of the groove.
• After the groove edge has been trimmed, place the board into place
and tighten with a pull bar to test for fit. The installer must be certain
that the proper expansion space is maintained and the flooring is not
pinched.
• If fit is incorrect, trim as necessary. Remove any wax from the end
joint so you will get good adhesion.
• Place a bead of recommended wood glue on the bottom lip of the
groove.
• Reinsert the tongue into the groove and tighten the board with a
pull bar. Hold the board in place with painter’s tape (3M Scotch-Blue
™
2080 Tape) until the glue is dry. Do not use
masking tape or duct tape, as the finish may be damaged.
Scotch-Blue is a trademark of 3M.
All other trademarks are owned by AHF, LLC, or its subsidiaries or affiliates. © 2020 AHF, LLC.
AHF Products, 3840 Hempland Road, Mountville, PA 17554
WF-1256-1120
Installing in Kitchens or Bathrooms
• Prolonged exposure (greater than 36 hours) to water could
damage the hardwood flooring. Installation and maintenance
recommendations should be closely followed to prevent water from
contacting the core material of the flooring.
• Full bathroom installations require folding the underlayment up the
wall 2˝ (5 cm). Cut the underlayment even with the top of flooring
after installation.
• Joint integrity is integral to moisture resistance. Avoid excessive joint
flexing during installation.
• All perimeter expansion zones must be completely filled with 100%
silicone caulk following the manufacturer’s recommendations. When
applying caulk, it is helpful to first apply a strip of painter’s tape (3M
Scotch-Blue
™
2080 Tape) parallel to and approximately 1/32˝ (.79
mm) from the edge of the hardwood (Fig. 20). Then fill the expansion zone with caulk, remove the excess with a
plastic scraper or putty knife and remove the tape.
• Molding may be used along a straight tub or shower base (Fig. 21). The expansion zone should be filled with 100%
silicone caulk and the molding seated in the caulk while it is still wet. The joint between the molding and the tub or
shower base should also be caulked.
• If molding is not an option, a normal 1/4” (6.35 mm) expansion zone may be used at the tub and then completely
filled with 100% silicone caulk.
• The toilet should be removed before installing the flooring. Allow a 1/2” (6.35 mm) expansion zone between the
flooring edge and the toilet flange. Completely seal the zone with 100% silicone caulk.
Completing the Installation
(All Installations)
• Remove all wedges and tape if used.
• Clean floor with the recommended hardwood flooring cleaner.
• If drywall dust is present, thoroughly vacuum prior to using the recommended cleaner.
• Trim all underlayment and install, or re-install, all base and/or quarter round moldings. Nail moldings into the wall,
not the floor. Inspect the floor, filling all minor gaps with the appropriate blended filler.
• If the floor is to be covered, use a breathable material such as cardboard. Do not cover with plastic.
• Leave warranty and floor care information with the owner. Advise them of the product name and code number of the
flooring they purchased.
• To prevent surface damage, avoid rolling heavy furniture and appliances on the floor. Use plywood, hardboard or
appliance lifts if necessary. Use protective casters/caster cups or felt pads on the legs of furniture to prevent damage
to the flooring.
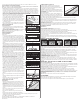
TRANSITION AND WALL MOLDINGS
• Reducer Strip: A teardrop shaped molding used around fireplaces, doorways, as a room divider, or as a transition
between hardwood flooring and adjacent thinner floor coverings. Fasten down with adhesive, small nails or double-
faced tape.
• Threshold: A molding undercut for use against sliding door tracks, fireplaces, carpet, ceramic tile, or existing
thresholds to allow for expansion space and to provide a smooth transition in height difference. Fasten to subfloor
with adhesive and/or nails through the heel. Predrill nail holes to prevent splitting.
• Stair Nosing: A molding undercut for use as a stair landings trim, elevated floor perimeters, and stair steps. Fasten
down firmly with adhesive and nails or screws. Predrill nail holes to prevent splitting.
• Quarter Round: A molding used to cover expansion space next to baseboards, case goods, and stair steps. Predrill
and nail to the vertical surface, not into the floor.
• Combination Base and Shoe: A molding used when a base is desired. Used to cover expansion space between the
floor and the wall. Predrill and nail into the wall, not the floor.
• T-Molding: A molding used as a transition piece from one rigid flooring to another of similar height or to gain
expansion spaces. Fasten at the heel in the center of the molding. Additional rigid support may need to be added to
the heel of the molding dependent upon the thickness of the goods covered. Do not use this molding as a transition
to carpet.
INSTALLERS – ADVISE YOUR CUSTOMER OF THE FOLLOWING
Seasons: Heating and Non-heating
Recognizing that hardwood floor dimensions will be slightly affected by varying levels of humidity within your building,
care should be taken to control humidity levels within the 30-50% range. To protect your investment and to assure that
your floors provide lasting satisfaction, we have provided our recommendations below.
• Heating Season (Dry): A humidifier is recommended to prevent excessive shrinkage in hardwood floors due to low
humidity levels. Wood stoves and electric heat tend to create very dry conditions.
• Non-Heating Season (Humid, Wet): Proper humidity levels can be maintained by use of an air conditioner,
dehumidifier, or by turning on your heating system periodically during the summer months. Avoid excessive
exposure to water from tracking during periods of inclement weather. Do not obstruct in any way the expansion joint
around the perimeter of your floor.
Damage caused by failing to maintain the proper humidity levels is not manufacturing related and will void the
floor’s warranty.
NOTE: Final inspection by the end-user should occur from a standing position.
FLOOR REPAIR
• Minor damage can be repaired with a Bruce
®
touch-up kit or acrylic wood filler. Major damage will require board
replacement, which can be done by a professional floor installer.
• Instructions for the board replacement can be found at www.hardwoodexpert.com, our technical website.
Reducer Strip Threshold Stair Nosing Quarter Round T-Molding
Figure 13
Figure 14
chalk line
work area - adhesive
Figure 15
chalk line
work area - adhesive
groove side
2 31
Figure 18
1 2 3
10 11 12
13
4 5 6
7 8 9
Figure 19
Figure 17
Figure 16
Figure 21
Figure 20