
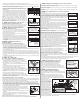
Installation Guide


•
Polyfilm Test: Apply 3′×3′ (1 m × 1 m) pieces of polyethylene film to the subfloor
and leave in place for 24 hours. Assure all edges are completely sealed with water-
resistant tape. Darkened concrete or condensation on film indicates presence of
m
oisture and requires additional measurements with the Tramex Meter, Calcium
Chloride or RH test.
NOTE: The following tests are required in commercial applications. Either or both tests
a
re acceptable.
• Calcium Chloride Test (ASTM F 1869): The maximum moisture transfer must not
e
xceed 3 lbs./1000 ft.
2
i
n 24 hrs. with this test.
• RH Levels in Concrete Using In-situ Probes (ASTM F 2170-02) should not exceed 75%.
“DRY” CONCRETE AS DEFINED BY THESE TESTS CAN BE WET AT OTHER TIMES OF THE YEAR. THESE TESTS DO NOT
GUARANTEE A DRY SLAB. ALL NEW CONSTRUCTION CONCRETE SLABS SHOULD HAVE A MINIMUM OF 10 MIL POLY FILM
M
OISTURE BARRIER BETWEEN THE GROUND AND THE CONCRETE.
Moisture Retardant Systems
If excessive moisture is present or anticipated, use Armstrong VapArrest S-135 Professional Moisture Retardant System or
inexpensive sheet vinyl to reduce vapor intrusion.
NOTE: DO NOT use Armstrong ProConnect™ Professional Hardwood Flooring Adhesive when using Armstrong VapArrest S-135
Professional Moisture Retardant System or sheet vinyl as a moisture retardant. Use only Bruce Equalizer™, Armstrong 57 , Robbins
®
F
usionLock™ or Armstrong EverLAST™ Premium Urethane Adhesive.
• Armstrong VapArrest S-135: Apply the materials after all subfloor preparation is complete. Follow the instructions on the VapArrest
S
-135 label. Allow 8 –24 hours curing time before application of the hardwood flooring.
• Sheet vinyl: An inexpensive sheet vinyl or “slip-sheet” (felt-backed with vinyl wear layer) may be installed. Use a premium grade,
a
lkali-resistant adhesive and a full-spread application system to properly bond the vinyl to the subfloor. Follow the sheet vinyl
manufacturer’s instructions for installation procedures. A bond test may be required as an adhesion test. Install several small areas
(3′ x 3′) (1 m x 1 m) and allow the vinyl to set for 72 hours. Remove the vinyl. If the backing remains attached to the concrete, the
subfloor should be acceptable for sheet vinyl installation. Install the sheet vinyl and allow the adhesive to cure for 24 hours prior
t
o beginning installation. Degloss as necessary to create an adequate adhesive bond. Always check for adequate adhesive bond.
Acoustic Concrete (Glue-Down or Floating Installations Only)
Acoustic concrete normally contains large quantities of gypsum that may inhibit the adhesive’s capability to properly bond. Acoustic
concrete must be primed with the concrete manufacturer’s recommended primer/surface hardener. Test the concrete by scraping the
s
urface with a nail or other sharp object. If the concrete powders or crumbles, it is not sound and suitable for direct application of
hardwood flooring and may require the use of a floating sub-floor system. Always check for adequate adhesive bond. The concrete
must have a minimum compressive strength of 2000 PSI.
C
eramic, Terrazzo, Slate & Marble (Glue-Down or Floating Only)
A
ll grout joints and broken corners that exceed 3/16″ (5 mm) must be filled with a cementitious leveling compound such as
Armstrong S-194 Patch, Underlayment & Embossing Leveler with S-195 Underlayment Additive. The surface should be cleaned and
abraded to create a good bonding surface for the adhesive. Loose tiles must be re-adhered to the subfloor or filled as above. Remove
a
ll sealers and surface treatments. Always check for adequate adhesive bond.
A
coustic Cork Underlayment (Glue-Down or Floating Only)
The flooring can be glued or floated directly over full-spread, permanently bonded acoustic cork. The cork should have a density of
no less than 11.4 lb./cubic foot. The cork, in general, should be pure cork combined with a polyurethane or resin binder. Install cork
i
n accordance with cork manufacturer’s recommendations. Always check for adequate adhesive bond. When floating floors over cork
DO NOT use foam underlayment.
Wood Subfloors and Underlayment (All Installation Methods)
G
eneral: The wood subflooring materials must not exceed 13% moisture content. Using a realiable wood moisture meter, measure
moisture content of both the subfloor and the hardwood flooring to determine proper moisture content. The difference between the
moisture content of the wood subfloor and the hardwood flooring must not exceed 4%. When installing parallel to the floor joists it
m
ay be necessary to stiffen the subfloor system by installing an additional minimum of 3/8″ (9.5 mm) approved underlayment.
Applicable standards and recommendations of the construction and materials industries must be met or exceeded.
NOTE: As flooring manufacturers, we are unable to evaluate each engineered system. Spacing and spans, as well as their engineering
methods, are the responsibility of the builder, engineer, architect or consumer, who is better able to evaluate the expected result based
on site-related conditions and performance. The general information provided below describes common, non-engineered
joist/subfloor systems. Engineered flooring systems may allow for wider joist spacing and thinner subflooring materials.
Wood Structural Panel Subfloors and Underlayment (All Installation Methods)
Structural panels/underlayment must be installed sealed side down. When used as a subfloor allow 1/8″ (3 mm) expansion space
between each panel. If spacing is inadequate, cut in with a circular saw. Do not cut in expansion space on tongue and groove panels.
• Plywood: Must be minimum CDX grade (exposure 1) and meet US Voluntary Product Standard PS1 performance standard or
Canadian performance standard CAN/CSA 0325-0-92. The preferred thickness is 3/4″ (19 mm) as a subfloor [minimum 5/8″
(16 mm)] or 3/8″ (9.5 mm) as underlayment.
• Oriented Strand Board (OSB): Conforming to US Voluntary Product Standard PS2 or Canadian performance standard CAN/CSA
0325-0-92 construction sheathing. Check underside of panel for codes. When used as a subfloor, the panels must be tongue and
groove and installed sealed side down. Minimum thickness to be 23/32″ (18 mm) thick when used as a subfloor or 3/8″ (9.5 mm)
as underlayment.
• Waferboard and Chipboard: Conforming to US Voluntary Product Standard PS2 or Canadian performance standard CAN/CSA
0325-0-92. Must be 3/4″ (19 mm) thick when used as a subfloor and 3/8″ (9.5 mm) thick when used as an underlayment.
• Particleboard: Must be a minimum 40-lb. density, stamped underlayment grade and 3/4″ (19 mm) thick.
Solid Wood Subfloors (All Installation Methods)
• Minimum 3/4″ (19 mm) thick with a maximum width of 6″ (15 cm) installed at a 45˚ angle to the floor joists.
• Group 1 dense softwood (Pine, Larch, Douglas Fir, etc.) No. 2 common, kiln dried with all board ends bearing on joists.
• For glue-down applications add 3/8″ (9.5 mm) approved underlayment.
Existing Wood Flooring (All Installation Methods)
• Existing engineered flooring must be well bonded/fastened. When gluing over existing wood flooring of any thickness, the
finishing materials must be abraded or removed to foster an adequate adhesive bond. When flooring is to be mechanically
fastened, the existing engineered wood flooring must be a minimum of 3/8″ (9.5 mm) thick installed over approved wood/wood
composite underlayment that has been properly fastened. When installing over engineered flooring that is glued to concrete, the
minimum thickness of that flooring must be 1/2″ (13 mm) to allow for the length of the fastener.
• Existing solid wood flooring that exceeds 6″ (15 mm) in width must be covered with 3/8″ (9.5 mm) approved underlayment and
fastened as required. Do not install over solid flooring attached directly to the concrete.
Vinyl, Resilient Tile, Cork Flooring and Linoleum
(All Installation Methods, see notes below)
(Glue-Down Installations)
DO NOT use Armstrong ProConnect Professional Hardwood Flooring Adhesive when installing over these surfaces. Use only Bruce
Equalizer, Armstrong 57, Robbins FusionLock or Armstrong EverLAST Premium Urethane Adhesive.
• Make sure the floor covering materials are well bonded to the subfloor/underlayment with full-spread adhesive and are no more
than two layers thick, not to exceed 3/16″ (5 mm).
• With approved wood/wood composite subfloors, if vinyl or tiles are loose, broken, or in poor condition, install a 3/8″ (9.5 mm)
approved underlayment directly over the flooring materials.
• Clean the flooring materials as necessary to create a good adhesive bond. If a maintenance material is present on the floor covering
or a gloss is present, de-gloss with a flooring pad and a commercially available stripper, then rinse completely. Allow ample drying
time. (NOTE: Do not sand any resilient products. They may contain asbestos fibers, which may be harmful.)
• Cork floors must have all sealers and surface treatments removed before installation begins. Always check for adequate adhesive bond.
2
Tools & Accessories Needed (All Installation Methods)
• Broom • Tape measure • Hammer • Chalk line & chalk • Hand saw or jamb saw
• Recommended hardwood flooring cleaner • Electric power saw • Eye protection • Recommended wood glue
• Moisture Meter (wood, concrete or both) • Transition and wall moldings • NIOSH-designated dust mask
(Add for Glue-Down Installations)
• Recommended adhesive and adhesive remover
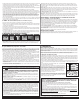
• 1/4″×1/2″×3/16″ (6 mm × 13 mm × 5 mm) V-Notch
trowel (Figure 2)
• 3M Scotch-Blue™ 2080 tape
• Recommended wood glue for floors exceeding 3-1/4″
(9.5 cm) in width
• Armstrong VapArrest™ S-135 Professional Moisture Retardant System on concrete (if needed).
Use with urethane adhesive only.
(Add for Mechanically Fastened/Staple-Down Installations)
• Stanley-Bostitch “FloorRunner”, Senco SLS20HF or equivalent • 1″ Staples/fasteners (minimum) • Compressor and hose
• Nylon/Plastic tapping block • In-line regulator • Recommended wood glue for floors exceeding 3-1/4″ (9.5 cm) in width
(Add for Floating Installations)
• Recommended underlayment • Pull bar • Tapping block • Recommended wood glue
III. SUBFLOOR/UNDERLAYMENT REQUIREMENTS
Recommended Subfloor/Underlayment Surfaces
(Glue Down and Floating Installations Only)
• Concrete • Ceramic Tile, Terrazzo, Slate & Marble • Acoustic cork
(All Installation Methods)
• Wood subfloors • Wood structural panels and underlayment • Fully adhered existing wood floors
• Fully adhered vinyl sheet, resilient tile, cork flooring and linoleum
Concrete (Glue-Down and Floating Installations Only)
The flooring can be glued directly to concrete with a minimum compressive strength of 3000 PSI. Do not install over a concrete
sealer or painted concrete. If present, remove by grinding or sanding. Do not install over slick, heavily troweled or burnished
concrete. Roughen the surface as necessary by sanding or grinding. Use an appropriate NIOSH-designated dust mask. Floating floors
can be installed over any structurally sound concrete.
Concrete Moisture Tests
All concrete subfloors should be tested, and results documented, for moisture content. Visual checks may not be reliable. Test several
areas, especially near exterior walls and walls containing plumbing. Acceptable test methods for subfloor moisture content include:
• A 3% Phenolphthalein in Anhydrous Alcohol Solution: Chip the concrete at least 1/4″ (6 mm) deep (do not apply directly to the
concrete surface) and apply several drops of the solution to the chipped area. If any color change occurs, further testing is required.
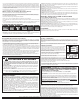
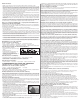
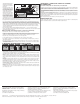
• Tramex Concrete Moisture Encounter Meter (Figure 3): Moisture readings should not exceed 4.5 on the upper scale. (Figure 3 shows
an unacceptable reading of over 4.5.)
Figure 2
F
igure 3
S
ubfloors with Radiant Heat
(
Not acceptable for 5/16
″ E
ngineered Installations)
NOTE: Always make certain the product selected is recommended for this type application. The following products are not
recommended to be installed over radiant heat subfloors: Armstrong
®
Global Exotics™, Bruce
®
Kempas Plank, Merbau™ Plank,
N
ewcastle™ Plank, Coastal Woodlands
®
.
• System must be operational and heated for at least 7 days prior to beginning the installation.
•
Use an incremental control strategy that brings the floor through temperature changes gradually, which may include an external thermostat.
• Turn off heat and let subfloor cool down to room temperature 3 –4 hours prior to starting the job.
•
BEFORE installation begins, ascertain that the heating system is designed and controlled for wood flooring and that the circuit does
not include other floor covering types. Failure to do so may cause excessive heat damage and shrinkage. NOTE: Refer to radiant
heat system manufacturer’s precautions for staple-down installation. Beware of stapling through radiant tubing or mesh.
•
After installation, turn the heating system back on immediately. The finished floor surface must not exceed 85°F (29°C) throughout
the life of the floor.
• Radiant heating systems normally create dry heat that can lower interior humidity levels. It may be necessary to add humidity with
humidifiers to maintain the recommended levels (35–55%) and prevent damage to the wood floor.
• The flooring should be end-glued over radiant heat to reduce longitudinal shrinkage. Apply a bead of the recommended wood glue
to the groove end, then insert the tongue. Wipe excess adhesive away immediately.
W
ARNING:
EXISTING IN-PLACE RESILIENT FLOOR COVERING AND ASPHALTIC ADHESIVES.
DO NOT SAND, DRY SWEEP, DRY SCRAPE, DRILL, SAW, BEADBLAST, OR MECHANICALLY CHIP OR
P
ULVERIZE EXISTING RESILIENT FLOORING, BACKING, LINING FELT, ASPHALTIC “CUTBACK”
ADHESIVE, OR OTHER ADHESIVE.
T
hese existing in-place products may contain asbestos fibers and/or crystalline silica.
Avoid creating dust. Inhalation of such dust is a cancer and respiratory tract hazard.
Smoking by individuals exposed to asbestos fibers greatly increases the risk of serious bodily harm.
Unless positively certain that the existing in-place product is a non-asbestos-containing material, you must presume it
contains asbestos. Regulations may require that the material be tested to determine asbestos content and may govern
removal and disposal of material.
See current edition of the Resilient Floor Covering Institute (RFCI) publication Recommended Work Practices for
Removal of Resilient Floor Coverings for instructions on removing all resilient floor covering structures or contact your
r
etailer or Armstrong World Industries, Inc. 1 800 233 3823.
The floor covering or adhesive in this package does NOT contain asbestos.
Subfloor Conditions
• CLEAN—Subfloor must be free of wax, paint, oil, sealers, adhesives and other debris.
• LEVEL/FLAT—Within 3/16″ in 10′ (5 mm in 3 m) and/or 1/8″ in 6′ (3 mm in 2 m). Sand high areas or joints. If the floor is to be
g
lued down, fill low areas with a latex additive cementitious leveling compound of 3,000-PSI minimum compressive strength such
as Armstrong S-194 Patch, Underlayment & Embossing Leveler with S-195 Underlayment Additive. Follow the instructions of the
leveling compound manufacturer but make certain that the leveling compounds are completely DRY before beginning installation.
W
hen mechanically fastening the floor down, flatten low spots with a maximum of 6 layers of 15# builders felt, plywood or shims
(not leveling compounds). Leveling materials must provide a structurally sound subfloor that does not affect the holding power of
the fastener.
• DRY—Check and document moisture content of the subfloor using the appropriate moisture test. Concrete subfloors must be a
minimum of 30 days old before testing begins.
• STRUCTURALLY SOUND—Nail or screw any areas that are loose or squeak. Wood panels should exhibit an adequate fastening
pattern, glued/screwed or nailed as system requires, using an acceptable nailing pattern. Typical: 6″ (15 cm) along bearing edges
and 12″ (31 cm) along intermediate supports. Flatten edge swell as necessary. Replace any water-damaged, swollen or
d
elaminated subflooring or underlayments.
Avoid subfloors with excessive vertical movement. Optimum performance of hardwood floor covering products occurs when there
i
s little horizontal or vertical movement of the subfloor. If the subfloor has excessive vertical movement (deflection) before installation
of the flooring, it is likely it will do so after installation of the flooring is complete.
• Where necessary, local regulations prevail.
•
Permanent air conditioning and heating systems should be in place and operational. The installation site should have a consistent room
temperature of 60 –80°F (16–27°C) and humidity of 35–55% for 14 days prior to and during installation and until occupied.