
Installation Guide

Installation:
NOTE: The subfloor must be thoroughly free from dust and debris. If the subfloor is dusty this may affect the
product performance.
NOTE: Stagger end joints by 6˝. Cut pieces at the ends of rows should be 8˝ long or longer.
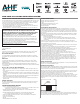
Position the first plank so that groove edge is facing you. Install the product from left to right in the room.
See Figure 2 for position of initial plank in the room.
Starting Wall
Fig. 2 – Left corner of starting wall.
Occasionally, it may be necessary to install backwards. This may be done by sliding the grooves under the
tongues and working them right to left, but this is more difficult.
Install First Row
1. Inspect each piece prior to installation for damaged planks.
2. To minimize pattern repeats, always pull from at least 3 cartons while installing.
3. Lay first row of boards with tongue side facing the wall.
4. If the starting wall is crooked, trace the contour of the wall on the first row of planks and trim as needed.
5. Use spacers along all sides that butt up against walls to maintain 1/4˝ (6.35 mm) expansion zone.
6. Lay pieces from left to right. Lock the end joints by aligning the end tongue with the end groove of the
previous board then tapping the joints together with a soft rubber mallet.
7. When measuring the last piece in the row, subtract 1/4˝ (6.35 mm) from the end of the board to maintain
expansion zone.
8. Cut decorative side up if using a hand saw or decorative side down if using a power saw to minimize
chipping. A utility knife may also be used.
9. If the cut-off piece from the first row is 8˝ (20.32 mm) or longer, use it to start the second row. If it is less
than 8˝ (20.32 mm), cut a full board in half and use that.
Install Remaining Rows
1. Continue laying planks, one row at a time and staggering the end joints.
2. Install the long edge of the first board in the second row at an angle to the board in the first row. Press flat
to subfloor to lock into place. A scrap piece of material can be used as a tapping block to ensure the long
edge is properly engaged.
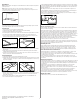
3. Angle the long edge of the next board in the second row to lock into the first row (fig. 5) while positioning
the short end of the board over the groove from the previous board. Lock and fold, then tap into place
using a rubber mallet. (fig. 6).
4. Follow the order described above to continue laying the boards in the second and additional rows.
5. Use of a rubber mallet maybe necessary to tighten joints.
2
Continue installing planks.Maintain a random appearance by offsetting the end joints by at least 6˝. Always
be certain that the planks are fully engaged. If slight gapping is noticed, place a cut piece of flooring (bridge
piece) in the side groove that spans the ends of two adjacent planks within a row. Then tap the side of the
plank with a tapping block.
When fitting in areas such as door casings it may be necessary to use a flat pull bar to engage the lock.
Continue installing the remaining rows in similar fashion. For planks, maintain the 6˝ minimum staggered
end joints between rows and maintain the 1/4˝ gap at perimeter and vertical objects.
If planks need to be disengaged it is crucial to slide them apart (fig. 7) in order to maintain the integrity of
the lock. If this is not done properly the lock can break.
Optional - Glue Down Procedure:
If a full spread glue, down installation is desired, use Bruce
®
TuffLink
™
adhesive. Follow the manufacturer’s
instructions for adhesive application.
Apply a sufficient amount of Bruce
®
TuffLink
™
adhesive using the recommended trowel at the starting wall
in an area that can be covered within the working time of the adhesive. Be sure not to spread adhesive too
far ahead of your work area. Begin laying planks in the adhesive after the recommended open time of the
adhesive and install row by row using the same locking installation described above including the cut pieces
at the perimeter until half of the installation is complete. Stagger the end joints by at least 6˝ (15.2 cm).
Continue applying adhesive in the same fashion being careful not to spread too far beyond the working area.
Allow the adhesive to dry-to-touch and complete the installation of planks in similar fashion.
After the planks are installed, immediately roll the entire floor with a 100 lb. roller. Use a hand roller in
confined areas where the large floor roller will not reach, such as under toe kicks.
The planks may be walked on immediately; however, the floor should not be exposed to heavy rolling load
traffic for 72 hours after the installation. Use pieces of hardboard or underlayment panels to protect the floor
when moving heavy furniture and appliances back into the room.
Finishing the Job:
Replace molding or wall base, allowing slight clearance between the molding and the planks. Nail the
molding to the wall surface, not through the flooring. At doorways and at other areas where the flooring
planks may meet other flooring surfaces, it is preferable to use a “T - molding , or similar, to cover the
exposed edge but not pinch the planks. Leave a small gap between the planks and the adjoining surface.
Proactive Protection for Your Floor:
• When moving appliances or heavy furniture it is always wise to lay a plywood panel, or similar, on your
floor and “walk” the item across it. This protects your floor from scuffing, gouging and tears.
• Use floor protectors under furniture to reduce indentation. As a general rule of thumb, the heavier the item,
the wider the floor protector needed.
• Place a walk-off mat at outside entrances to reduce the amount of dirt brought into your home. We
strongly recommend mats without a latex or rubber backing since these backings can cause permanent
discoloration.
Caring for Your Floor:
• Sweep or vacuum regularly, to remove loose dirt which can scratch your floor. Note: We do not recommend
vacuums that have a beater bar since it can visibly damage your flooring surface. Additionally, we do not
recommend electric brooms with hard plastic bottoms with no padding as use may result in discoloration
and deglossing.
• Wipe up spills as soon as possible. Never use highly abrasive scrubbing tools on any resilient floor.
• Wash your floor regularly with a vinyl floor cleaner such as Bruce Multi Surface Floor Cleaner.
• Do NOT use detergents, abrasive cleaners, or “mop and shine” products. These products may leave a dull
film on your floor.
• Over time, if the shine on your floor begins to dull, apply a low gloss floor finish for resilient floors to
restore the appearance of rigid core flooring. Do NOT use paste wax or solvent based polishes.
• Vinyl flooring, like other types of smooth floors, can become slippery when wet. Allow time for floor to dry
after washing. Immediately wipe up wet areas from spills, foreign substance, or wet feet.
Repair Procedure:
For detailed repairs, please log on to AHF Products www.hardwoodexpert.com.
All trademarks are owned by AHF, LLC, or its subsidiaries or affiliates. © 2022 AHF, LLC.
AHF Products, 3840 Hempland Road, Mountville, PA 17554
WF-1255-822
Fig. 3 Fig. 4
Fig. 5 Fig. 6
Fig. 7