
Installation Guide


11/11/2016
www.floorexpert.com/knowledgeArticlePrint?KBArticleType=Installation&KBArticleName=InstallationInstructions5168mmSolidStripPlankFloori…
http://www.floorexpert.com/knowledgeArticlePrint?KBArticleType=Installation&KBArticleName=InstallationInstructions5168mmSolidStripPlankFloori…
11/13
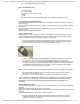
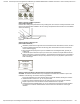
Figure9
Holdthetrowelataminimum45degreeangle(Figure9)firmlyagainstthesubfloortoobtaina
50–60ft.
2
(45.5m
2
)pergallonspreadrate.Thetrowelwillleaveridgesofadhesiveandvery
littleadhesivebetweentheridges.Thiswillallowyoutostillseethechalklinesbetweenthe
ridgesandprovidetherecommendedspreadrate.
Avoidinstallingfromthesurfaceoftheflooring.Ifnecessary,distributeweightusingakneeler
board.
Cleantheadhesivefromthesurfaceofthefloorfrequently.Donotusebluetapebeforethe
adhesiveisremoved.Useacleantowel,changingfrequentlytopreventhazing.
N OTE:DONOTINSTALLFLOORINGUSINGRUBBERMALLETS.STRIKINGTHESURFACEWITHA
RUBBERMALLETMAY“BURN”THEFINISHCAUSINGIRREPARABLEDAMAGE.
STEP3:SpreadtheAdhesive(GlueDownInstallations)
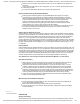
Spreadsufficientamountsofrecommendedadhesivewiththerecommendedtrowel(Figure2)
inanareathatcanbecoveredin30–60minutes.(SeeAdhesiveInformation.)
Ifnecessary,nailasacrificialrowwith1″(2.5cm)nailsonthedrysideofyourchalklinetohelp
holdthefirstrowinplace.
N OTE:Avoidinstallingonthesurfaceoftheflooring.Ifnecessary,distributeweightusingakneelerboard.
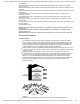
STEP4:InstallingtheFloor
(GlueDownInstallations )
(Figures10a–10d)
Usethelongest,straightestboardsavailableforthefirsttworows.Thefirstrowofthehardwood
flooringshouldbeinstalledwiththeedgeofthegroovelineduponthechalkline.Thetongue
shouldbefacingthestartingwall.Thefirstrowmustbealignedandseatedintheadhesiveas
alladditionalrowswillbepushedbacktothisoriginalrow.Removethetonguetoallowfor
expansionspace,ifnecessary,ontherowadjoiningthewall.
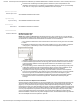
Wheninstallingpieces,engagetheendjointfirst,asclosetotheside(long)tongueandgroove
aspossible,thenslidetogethertightlytoengagetheside(long)jointtongueandgroove.To
avoidadhesivebleedthroughandmemorypullback,avoidslidingpiecesthroughthe
adhesiveasmuchaspossiblewhenplacingtheminposition.
Duringtheinstallation,occasionallyremoveapieceofflooringfromthesubfloorandinspectthe
backforproperadhesivetransfer.Adequateadhesivetransferisnecessarytoensuresufficient
holdingstrength.Iftheadhesiveskinsoverandfailstotransfer,removeandspreadnew
adhesivetoachieveproperbonding.
Foradditionalapplicationinstructions,followtherecommendationsontheadhesivecontainer.
Whennotinuse,keeptheadhesivecontainertightlyclosedtopreventthickening.Thickening
willcausedifficultyinspreadingtheadhesive.Properventilationwithintheroommustbe
provided.
N OTE:Cleanadhesivefromthesurfaceofthefloorfrequently,usingtherecommendedadhesivecleaner.
Urethaneadhesivesbecomeextremelydifficulttoremovewhencured.Donotuse3MScotchBlue™
2080Tapebeforeadhesiveisremovedfromthesurface.Usecleantowels,changedfrequently,to
preventhazeandadhesiveresidue.