
Installation Guide


11/11/2016
www.floorexpert.com/knowledgeArticlePrint?KBArticleType=Installation&KBArticleName=InstallationInstructions5168mmSolidStripPlankFloori…
http://www.floorexpert.com/knowledgeArticlePrint?KBArticleType=Installation&KBArticleName=InstallationInstructions5168mmSolidStripPlankFloorin…
8/13
Permanentairconditioningandheatingsystemsshouldbeinplaceandoperational.The
installationsiteshouldhaveaconsistentroomtemperatureof60–80°F(16–27°C)andhumidity
of35–55%for14dayspriortoandduringinstallationanduntiloccupied.
AdhesiveOpenTime
SeeInstallationMethodssectionbelow.
Layout&Fitting
SeeInstallationMethodssectionbelow.
Seam/Grout
Noadditionalinformationforthisfield.
nstallationMethods
INSTALLINGTHEFLOOR
GeneralInstallationTips
N OTE:WheninstallingUNFINISHEDsolidhardwoodflooring,allowaminimumof72hoursadhesive
curingtimebeforeapplyingseals,stainsandfinishestounfinishedflooring.Testthemoisturecontentof
thehardwoodinaccordancewiththestain/finishmanufacturer’srecommendations.
Floorshouldbeinstalledfromseveralcartonsatthesametimetoensuregoodcolorandshade
mixture.
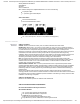
Beattentivetostaggeringtheendsoftheboardsatleast6″(15cm),whenpossible,inadjacent
rows(Figure4).Thiswillhelpensureamorefavorableoverallappearanceofthefloor.
Installationparalleltothelongestwallisrecommendedforbestvisualeffects,however,thefloor
shouldbeinstalledperpendiculartotheflooringjoistsunlessthesubfloorhasbeenreinforced
toincludesubfloorstiffness.Findtheappropriatesubfloorfromthe“SubfloorType”sectionin
theseinstructions.
Theuniquemillingprocesscreatesbuiltinexpansionnaturally.Thisspecialtongueandgroove
configurationisdesignedtoleavesmallexpansiongapsinthefloorduringinstallation.Avoid
usingtappingblocks,machinesorsystemsthateliminatethisbuiltinexpansion.
Largespansinareasofhighhumiditymayrequiretheadditionofinternalorfieldexpansion.
Thiscanbeaccomplishedbyusingspacers,suchassmallwashers,every10–20rowsinserted
abovethetongueandremovedafterseveraladjoiningrowshavebeenstapledorglued.
Whenpossible,preselectandsetasideboardsthatblendbestwithallhorizontallymounted
moldingsusedtoassureauniformfinalappearance.Installtheseboardsadjoiningthe
moldings.
GeneralInformationforStapleDownInsta llations
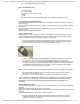
Improperpressuresettingsandfailuretouseproperadapterscancauseseveredamagetotheflooring.
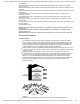
Thecorrectfasteningmachineandairpressuresettingwillproperlysetthestapleinthenailpocket
(Figure5).Lowairpressuresmayfailtoproperlysetthestapleanddamagetheadjoiningboards.Air
pressuressettoohighmaycausedamagetothetongue,preventinginstallationofadjoiningboardsand
causeblistersonthefaceoftheflooring.Makecertainthecompressorhasaregulatorinlinewiththeair
hoseforproperadjustment.Setpressureat70PSItobeginwithandadjustuntilproperstaplesetting
occurs.UseastaplerdesignedforthethicknessoftheproductbeinginstalledsuchastheStanley
BostitchSX150BHForotherslisted.Anywaterdamaged,swollen,ordelaminatedsubflooringmaterials
willnotholdstaplesandmustberepairedorreplaced.
AdhesiveOpenTime
Layout&Fitting
Seams/Grout
InstallationMet hods