
Installation Guide


11/11/2016
www.floorexpert.com/knowledgeArticlePrint?KBArticleType=Installation&KBArticleName=InstallationInstructions5168mmSolidStripPlankFloori…
http://www.floorexpert.com/knowledgeArticlePrint?KBArticleType=Installation&KBArticleName=InstallationInstructions5168mmSolidStripPlankFloorin…
9/13
STEP1:DoorwayandWallPr eparation
(A llInstallationMethods)
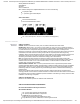
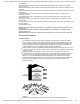
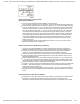
Undercutdoorcasingsandjambs.Removeanyexistingbase,shoemold,ordoorwaythresholds.These
itemscanbereplacedafterinstallation.Alldoorcasingsandjambsshouldbeundercuttoavoiddifficult
scribecuts(Figure6).
Figure#6
STEP2:EstablishaStartingPoint
(A llInstallationMethods)
Installationparalleltothelongestwallisrecommendedforbestvisualeffects,however,thefloor
shouldbeinstalledperpendiculartotheflooringjoistsunlesssubfloorhasbeenreinforcedto
reducesubfloorsagging.
Whenpossible,alwaysbeginthelayoutorinstallationfromthestraightestwall,generallyan
outsidewall.
Inatleasttwoplacesatleast18″(46cm)fromthecorner,measureoutequaldistancefromthe
startingwall(Figure7)andsnapachalkline.Themeasurementmustbethesumofthewidthof
theflooringplusanadditional7/8″(22mm)toallowfor3/4″(19mm)expansionspaceandthe
widthofthetongue.
STEP3:InstallingtheMoistureRetardantBarrier(StapleDownInstallations)
C AUTION :Themoistureretardantbarriermaybeslipperyandunstablewhenwalkedonpriortothe
installationoftheflooring.Useextremecareduringinstallation.
Rolloutthematerialsinthesamedirectiontheflooringwillbeinstalled,allowingthemoisture
retardantbarriertoextend3″–4″(8–10cm)upthewalls.
Positionthemoistureretardantbarriersothechalklinescanbeseenthroughthismaterial.
Stapleortapeatthecornerstoholdthemoistureretardantbarrierinposition.
Overlapthemoistureretardantbarrier6″(15cm)atalljointsandpolytapetheseamstogether.
Thefirstpieceofmoistureretardantbarrierwillbesecuredwhenthefirstrowofflooringis
installed.