
Installation Guide

11/11/2016
www.floorexpert.com/knowledgeArticlePrint?KBArticleType=Installation&KBArticleName=InstallationInstructions5168mmSolidStripPlankFloori…
http://www.floorexpert.com/knowledgeArticlePrint?KBArticleType=Installation&KBArticleName=InstallationInstructions5168mmSolidStripPlankFloori…
10/13
STEP4:InstallingFirstandSecondRows
(StapleD ownInstallations)
Usethelongest,straightestboardsavailableforthefirsttworows.
Alignthetongueofthefirstrowonthechalkline.Thegrooveshouldbefacingthestartingwall.
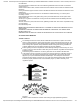
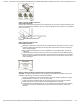
Useapneumaticbradnailertofacenailthegrooveside1/2″(13mm)fromtheedgeofthewall
at6″(15cm)intervalsand1″–2″(2.5–5cm)fromeachend,thenfacenailata45
0
angledown
throughthenailing“pocket”ontopofthetongue(Figure8).ORpredrillthenailholes1/2″(13
mm)fromtheback(groove)edge,1″–2″(2.5–5cm)fromeachend,andat6″(15cm)intervals.
Predrillatthesameintervalsata45
o
angledownthroughthenailing“pocket”ontopofthe
tongue(Figure8).Facenailthegroovesidewherepredrilled.Whencomplete,blindnailata
45
0
anglethroughthetongueofthefirstrow.Fastenusing4or6dnails.Countersinknailsto
ensureflushengagementofthegroove.Avoidbruisingthehardwoodbyusinganailsetto
countersinkthenails.Continueblindnailingusingthismethodwithfollowingrowsuntilthe
staplercanbeused.
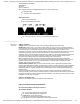
Endjointsofadjacentrowsshouldbestaggeredaminimumof6″(15cm)toensureamore
favorableoverallappearance.(Figure4)
STEP5:InstallingtheFloor(StapleDownInstallations)
Usingoneoftheapprovedstapleguns,setthecompressoraspreviouslyrecommended.
Fastenasacrificialboardtothefloor.Checkforsurfacedamage,airpressuresetting,tongue
damage,etc.beforeproceeding.Makealladjustmentsandcorrectionsbeforeinstallation
begins.Onceproperadjustmentshavebeenmade,removeanddestroytheboard.
Installthefloorfromseveralcartonsatthesametimetoensuregoodcolorandshademixture.
Endjointsofadjacentrowsshouldbestaggered6″(15cm)whenpossibletoensureamore
favorableoverallappearance.
Begininstallationwithseveralrowsatatime,fasteningeachboard3″–4″(8–10cm)apartand
1″–2″(2.55cm)fromtheends(toavoidsplitting)withaminimumofthreefastenersperboard.
Tightenboardsasnecessarytoreducegapsbeforefastening.(SeeGeneralInstallationTips.)
Installtheremainderofthefloorworkingfromseveralcartons.
Thelast1–2rowswillneedtobefacenailedwhereclearancedoesnotpermitblindnailingwith
astaplerorbradnailer.Bradnailorpredrillandfacenailonthetonguesidefollowingthe
nailingpatternusedforthefirstrow.
Ripfinalrowtofitandfacenail.Ifthefinalrowislessthan1″(2.5cm)inwidth,itshouldfirstbe
edgegluedtothepreviousUNINSTALLEDrowandthetwojoinedunitsshouldbefacenailed
asone.
GeneralInformationforGlueDownInstallations
Workingtimewillvarydependingonthejobsiteconditions.Opentimesandcuringtimesofall
adhesivesvarydependentuponsubfloorporosity,airmovement,humidityandroom
temperature.Urethaneadhesivehasashortenedworkingtimeinhighhumidityenvironments.