
Installation guide


Appendix A – Using the Troubleshooting Screens 97
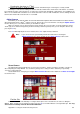
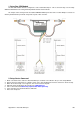
Manually Moving a Pin
If a pin is incorrectly detected repeatedly when doing the Automatic procedure, then it may be necessary to
manually specify the Pin Position Indicator. The real cause of this is most likely due to poor lighting in the pit area.
Consider swapping fluorescent tubes to white, high brightness tubes known as Triphosphorus.
If this is not immediately practical, then you can manually set a pin position. To do this, press the number for
the desired pin. (Press 0 for the 10 pin) In this example, the 8 pin is green to show that it has been selected. Once
selected, move the Pin Position Indicator by pressing the W for Up, A for Left, S for Right & Z for Down until the
Indicator Dot is in the middle of the head of the pin.
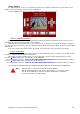
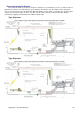
Changing Brightness Levels
The brightness level indicator is shown in the top right corner of the screen and acts as an electronic iris for the
camera. Press the L button to make the image lighter and press the D button to make the image darker. Press the N
button to set the brightness back to the default level.
This adjustment is pre-set and should only need to be changed if the image is excessively bright or dark. If the
image is too dark, a pin that is standing may not be bright enough to be above the brightness threshold, therefore the
Duo will think the pin has been knocked down. If the image is too light, then a pin that has been knocked over could
still be detected because the pit is too bright.
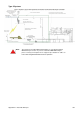
Specify the type of Camera
Press the C button to enter the Score Camera Setup
screen. This screen allows to you specify what type and
model of score camera is present by pressing the S button
repeatedly until the desired camera type is highlighted.
Note: This setting is correctly set in the
factory and shouldn’t need to be
changed, unless on the advice
of your Computer Score support
representative.