YTL-015-691 22 Ton Log Splitter Brute is a trademark of Briggs & Stratton Power Products Group, LLC and is used under license. \ Instruction & Assembly SAVE THESE INSTRUCTIONS FOR FUTURE REFERENCE REV061316
Table of Contents General Warnings and Rules………………………………………………...3 Hazard Signal Word Definitions……………………………………………...4 Controls and Features Identification………………………………………...5 Component Parts……………………………………………………………...6 Assembly Instructions………………………………………………………...7 Operation Instructions……………………………………………………….12 Maintenance and Storage…………………………………………………..15 Troubleshooting………………………………………………………….......16 Specification………………………………………………………………….17 Parts Drawing & Parts List…………………………………………………..
GENERAL WARNINGS READ and UNDERSTAND this manual completely before using 22 Ton Log Splitter. Operator must read and understand all safety and warning information, operating instructions, maintenance and storage instructions before operating this equipment. Failure to properly operate and maintain the log splitter could result in serious injury to the operator or bystanders. Operation Warnings Do not at any time carry passengers, sit or stand on the log splitter.
Hazard Signal Word Definitions This is the safety alert symbol. It is used to alert you to potential personal injury hazards. Obey all safety messages that follow this symbol to avoid possible injury or death. DANGER DANGER indicates an imminently hazardous situation which, if not avoided, will result in death or serious injury. WARNING WARNING indicates a potentially hazardous situation which, if not avoided, could result in death or serious injury.
Controls and Features Identification Read this owner’s manual before operating the equipment. Familiarize yourself with the location and function of the controls and features. Save this manual for future reference. 1) 7” Wedge- Features wedge wings and tapered ends making splitting easier. 2) Beam–8.5” wide. 3) Oil Tank 4) Tires- Maximum rated towing speed is 45 MPH.
WARNING Read and follow all instructions for assembly and operation. Failure to properly assemble this equipment could result in serious injury to the user or bystanders, or cause equipment damage. Engine Shipped Without Oil. Before starting engine, fill with SAE 10W-30 motor oil. See engine manual for engine oil capacity. Hydraulic Oil Tank is Shipped Without Oil. When adding oil verify the oil level reads 1 from the top of hydraulic oil tank if marking is not shown fill to the neck.
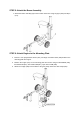
Assembly Instructions STEP 1: Wheel Assembly 1. Attach the wheels (#4) to the oil tank axle secure using flat washer Ø20 (#6), thin hex slotted nut M20 (#8) and cotter pin Ø4x36 (#5). Place plastic cover which in the blue bag on the axle cap then install the axle cap (#7) on the end using rubber hammer. WARNING: After tightening the slotted nut, loosen nut 1/4 of a turn so the tire will rotate freely. Failure to loosen the nut may cause excessive bearing and tire wear. STEP 2: Attach Tow Bar 1.
STEP 3: Attach Tow Bar to the Oil Tank 1. Attach the tow bar to the oil tank and secure using hex bolt M12x35 (#35), flat washer Ø12 (#20) and lock nut M12 (#25). STEP 4: Attach Cylinder 1. Remove the cylinder cover, then attach cylinder to the beam, and connect the wedge assembly, using hex bolt M12X65 (#24) and lock nut M12 (#25). 2. Attach cylinder cover (#9) using lock washer Ø10 (#72), flat washer Ø10 (#22) and hex bolt M10x20 (#23).
STEP 5: Attach the Beam Assembly 1. Attach the beam assembly (#3) to the tow bar and secure using hinge pin (#50) and R pin (#71). STEP 6: Attach Engine to the Mounting Plate 1. Place the four polyurethane blocks (#12) and large flat washer Ø10 (#58) between the mounting plate and engine. 2. Position the engine (#11) on the mounting plate and secure using hex bolt M8x65 (#36), flat washer Ø8 (#37), lock washer Ø8 (#57), nylon lock nut M8 (#38). 3.
STEP7: Attach the Hydraulic Hose 1. Attach the hydraulic hose(#39) to the oil outlet connector of gear pump, put in O ring Ø11.2x2.4 (#32) 2. Attach hydraulic hose (#42) to connector of the outer oil filter, put in O ringØ17x2.5 (#33). Note: Tighten hydraulic hose connector between torque of 80-90N·m After the assembling finished, please keep the elbow from the reversing pipe in vertical position. STEP 8: Add Engine Oil 1. Make sure the log splitter is on a level surface. 2.
DANGER Log splitter engine exhaust contains carbon monoxide, a colorless, odorless, poison gas. Breathing carbon monoxide will cause nausea, dizziness, fainting or death. If you start to feel dizzy or weak, get to fresh air immediately. Operate log splitter outdoors only in a well ventilated area. DO NOT operate the log splitter inside any building, enclosure or compartment. DO NOT allow exhaust fumes to enter a confined area through windows, doors, vents or other openings.
Operation Instructions WARNING Before operating or using the log splitter, review the instructions below and all safety information. Failure to follow these instructions may result in property damage or injury to the operator or bystanders. WARNING ALWAYS use the log splitter for its intended use. ONLY use the log splitter to split wood logs, length wise with the grain. NEVER modify, alter or change the log splitter in anyway, modifications will void the warranty.
6. The log splitter must have at least seven feet of clearance from combustible material. It needs to be on a dry and level surface with good footing. Do not work on mud, ice, brush or snow. When using the log splitter the work zone must be maintained at all times. NOTE: Serious accidents can happen when other people are allowed inside the work zone. Keep everyone else outside the work zone while operating the control lever. 7.
11. Load a log onto the beam against the endplate (Max Log Length-24”) 12. Make sure hands are clear from the wedge and crush hazard areas. CRUSH WARNING Wedge can cut through skin and break bones. Keep both hands away from wedge and beam slide. Serious accidents can happen when other people are allowed inside the work zone. Keep everyone else out of the work zone while operating control lever. DONOT wear loose clothing. It can get tangled in moving parts of log splitter.
Maintenance and Storage CAUTION Improper maintenance and storage of the log splitter may void your warranty. MAINTENANCE Before performing maintenance, the log splitter must be placed in maintenance mode. Turn off the engine and move the control lever forward and backwards to relieve the hydraulic pressure. After performing any maintenance, make sure all guards, shields and safety features are put back in place before operating the log splitter.
Troubleshooting Problem Cylinder rod will not move SOLUTION: A,D,E,H,J Slow cylinder rod speed when extending or SOLUTION: A,B,C,H,I,K,L retracting Wood will not split or splits extremely slowly SOLUTION: A,B,C,F,I,K Engine bogs down during splitting SOLUTION: G,L Engine stalls under low load condition SOLUTION: D,E,L,M Cause Solution A-Insufficient oil to pump Check oil level in reservoir B-Air in oil Check oil level in reservoir C-Excessive pump inlet vacuum Check pump inlet hose for blockage
Specifications Ram Force……………………………………………………………….22 Ton Cycle Time………………………………………………………………13 Sec Wedge Size…………………………………………………..7” Harden Steel Gear Pump……………………………………………………………..2-Stage Hydraulic Oil……………………….AW32, AW46 & Universal Hydraulic Oil Amount of Hydraulic Fluid…………………………………………..6.5Gallon Max. Log Length…………………………………………………………….24” Hydraulic Cylinder……………………………………………………..4” x 23” Max. Pressure………………………………………………………..3600 PSI Max. Flow……………………………………………………………..11GPM Wheel Size………………………………………………………....
Parts Drawing & Parts List - 18 -
Parts Drawing & Parts List Drawing No. Ref# 1 Description LSM22A-02000 Oil Tank 2 LSM22A-05000 Tow Bar B 1 3 LSM22A-01000 Beam 1 4 LSP25-14000 Wheel 2 5 9404-04036-DX Cotter Pin Ø4x36 2 6 9301-20000-DX Flat Washer Ø20 2 7 LSP25-00009-DX Axle Cap 2 8 LSP25-00020-FH Hex Slotted Thin Nut M20 2 9 LSM22A-00001 Cylinder Cover 1 10 LSM22A-04000 Wedge Slide 1 11 LSP25-10001 6.5HP Engine 1 12 LSP25-00025 Polyurethane Block 4 13 9901-16*2.5 O Ring Ø16x2.
Ref# 40 Drawing No.
Limited Warranty Warranty For one year from the date of purchase YTL International will replace for the original purchaser, or repair the log splitter. The warranty will not apply to any unit which was not assembled correctly, misused, overloaded or which has been used or operated contrary to our instructions, or which has been repaired or altered by anyone other than an authorized representative.