Copyright 1997 Bryant Heating and Cooling Systems Form: OM17-25 Replaces: OM17-22 Printed in the U.S.A. 9-98 Catalog No. 13TS-TA11 7310 West Morris Street, Indianapolis, IN 46231 Manufacturer reserves the right to discontinue, or change at any time, specifications or designs without notice and without incurring obligations. COMFORT CONTROL Thermidistat Control™ Homeowner’s Guide Simple, Energy Efficient Control.
Copyright 1997 Bryant Heating and Cooling Systems Form: OM17-25 Replaces: OM17-22 Printed in the U.S.A. 9-98 Catalog No. 13TS-TA11 7310 West Morris Street, Indianapolis, IN 46231 Manufacturer reserves the right to discontinue, or change at any time, specifications or designs without notice and without incurring obligations. COMFORT CONTROL Thermidistat Control™ Homeowner’s Guide Simple, Energy Efficient Control.
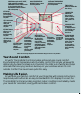
MODE button selects OFF, HEAT, COOL and AUTO operation. EMERGENCY HEAT (EHEAT) mode is also included when the thermidistat control is installed with a heat pump. ROOM TEMPERATURE DISPLAYS shows current room temperature. OUTDOOR TEMPERATURE DISPLAYS shows the outdoor temperature. SET DHUM button allows you to change dehumidification set point. TIME OF DAY DISPLAY exhibits the time of day.
TABLE OF CONTENTS SETTING UP THE THERMIDISTAT CONTROL Setting your indoor temperature set points ...1 Setting the current time ................................2 Setting the mode operation ..........................3 Setting the fan operation ..............................5 Setting the humidification set point ..............6 Setting the dehumidification set point . .........9 Setting the “cool to dehumidify” function ..10 OPERATING THE THERMIDISTAT CONTROL Checking current temperature ....................
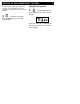
SETTING UP THE THERMIDISTAT CONTROL 1 Setting your temperature set points Setting the desired heating set point 1 3 Press the END button to exit. Press the SET HEAT button. Setting the desired cooling set point 1 Press the SET COOL button. The word HEAT flashes on the display. 2 Press the UP or DOWN button until the correct heating set point is displayed. The word COOL flashes on the display.
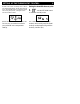
SETTING UP THE THERMIDISTAT CONTROL 2 Setting the current time 2 Press the UP or DOWN button until the correct cooling set point is displayed. 3 1 Press the SET TIME button. Press the END button to exit. NOTE: Your COOL setting must be at least 2° higher than your HEAT setting. Your Thermidistat Control will automatically change your previously set temperature to maintain that 2° difference. The word TIME flashes on the display. 2 Press the UP or DOWN button until the correct time is displayed.
SETTING UP THE THERMIDISTAT CONTROL the proper time, press and hold the UP or DOWN button. Be sure that AM or PM is properly selected. 3 When the correct time appears on the display, press the END button. NOTE: If you choose not to press the END button, the word TIME will stop flashing after 15 seconds. 3 NOTE: If you live in a Daylight Savings Time area, you may advance the time 1 hour in the spring by simultaneously pressing the SET TIME button and the UP button.
SETTING UP THE THERMIDISTAT CONTROL 4 2 When the MODE button is pressed, the words OFF, HEAT, COOL, and AUTO will rotate on the display. If you have a heat pump, the display will show OFF, HEAT, COOL, AUTO, and EHEAT.
SETTING UP THE THERMIDISTAT CONTROL NOTE: In AUTO mode, your system will heat OR cool as needed to reach your temperature settings. AUTO mode may be disabled. 3 Setting the fan operation 1 Press the FAN button to switch between ON and AUTO fan settings. Continue to press the MODE button until you reach the desired setting. When the ON mode is selected, the fan runs continuously for improved air circulation.
SETTING UP THE THERMIDISTAT CONTROL 6 NOTE: If the indoor humidity level is above the dehumidify setting, the fan will shut off for 5 minutes after the air conditioner shuts off. During this period, a triangle next to the word ON will flash. Setting the humidification set point When the AUTO mode is selected, the fan runs only as needed to maintain your preferred indoor temperature settings.
SETTING UP THE THERMIDISTAT CONTROL 7 2 3 Or, to turn humidification off, press the MODE button until “OF” appears on the display. (See suggested settings on page 27.) NOTE: With the FAN indicator displayed, you will realize maximum humidification, but the air may feel cold because the heat With the humidify indicator (hu) displayed, press the UP or DOWN button to adjust the humidify set point. Humidity levels can be set from 10% to 45%. Press the MODE button to select between: a.
SETTING UP THE THERMIDISTAT CONTROL source is not always on. Without the FAN indicator displayed, you will conserve water and electricity with adequate humidification. b. AUTO indicator displayed — humidify setting automatically changes according to outdoor weather. This reduces the chance of moisture buildup on windows in colder weather. NOTE: This feature requires the use of an outdoor air temperature sensor. 8 c. AUTO and FAN displayed — combines the features of a and b. d.
SETTING UP THE THERMIDISTAT CONTROL e. Humidify setting only displayed — humidify setting does not change according to outdoor temperature. 9 Setting the dehumidification set point NOTE: This function is for use with variable-speed equipment only. 1 Press the SET DHUM button to enter the dehumidify mode. 4 Press the END button to exit the humidify mode. The current indoor humidity (large number) and dehumidify set point (small number) are displayed along with the dehumidify indicator (dhu).
SETTING UP THE THERMIDISTAT CONTROL 2 With the dehumidify indicator (dhu) displayed, press the UP or DOWN button to adjust the dehumidify set point. Dehumidify levels can be set from 50% to 90%. Or, to turn dehumidification off, press the MODE button until “OF” appears on the display. (See suggested settings on page 26.) 3 10 Press the END button to exit.
SETTING UP THE THERMIDISTAT CONTROL 1 Press the SET DHUM button. “dhu” is displayed. 11 3 Press the MODE button until the COOL icon is displayed. 2 Press the UP or DOWN button to raise or lower the dehumidify set point. Dehumidification can be set from 50% to 90%. 4 Press the END button to exit.
OPERATING THE THERMIDISTAT CONTROL Checking current temperature The Thermidistat Control will display the current temperature. To view your current temperature set points, press the UP or DOWN button once. The heating and cooling set points will be displayed. 12 Checking the outdoor temperature and indoor humidity 1 2 Press the UP and DOWN buttons simultaneously. The outdoor temperature will appear on the display. Then, the indoor humidity will be displayed.
OPERATING THE THERMIDISTAT CONTROL NOTE: If 2 dashes (--) appear, your Thermidistat Control does not include the outdoor air temperature sensor or the sensor is not working properly. Check with your dealer if you are unsure. The current indoor humidity (large number) is displayed along with the humidify set point (small number). Checking current humidification and dehumidification set points 1 Press the SET HUM button. 13 2 Press the END button.
OPERATING THE THERMIDISTAT CONTROL 14 Clean filter feature 3 Press the SET DHUM button. The current indoor humidity (large number) is displayed along with the dehumidify set point (small number). Your Thermidistat Control reminds you when it’s time to change or clean your filter by displaying the CLEAN FILTER indicator. 1 4 Press the END button. Press the VACATION and END buttons simultaneously after you have changed or cleaned your filter to restart the timer.
OPERATING THE THERMIDISTAT CONTROL Vacation feature setup The vacation feature allows a separate set of temperature and humidity set points to be stored for vacation and recalled with a single button press. The vacation feature is preprogrammed for you with vacation settings for temperature and humidity. (Heat 60°, cool 85°, hu 10%, dhu 75%) If these are okay, skip ahead to “vacation feature operation.” If you wish to enter new settings, continue with this section.
OPERATING THE THERMIDISTAT CONTROL 2 To change the cooling set point: 3 16 To change the heating set point: a.) Press the SET COOL button. COOL will flash on the display. a.) Press the SET HEAT button. HEAT will flash on the display. b.) Press the UP or DOWN button to adjust the setting. b.) Press the UP or DOWN button to adjust the setting. c.) Press the END button to end. c.) Press the END button to end.
OPERATING THE THERMIDISTAT CONTROL 4 To change the dehumidification set point: a.) Press the SET DHUM button. The “dhu” indicator will be displayed. b.) Press the UP or DOWN button to adjust the setting. 17 c.) Press the MODE button to choose the dehumidification mode. c.) Press the END button to end.
OPERATING THE THERMIDISTAT CONTROL 5 To change the humidification set point: a.) Press the SET HUM button. The “hu” indicator will be displayed. 18 c.) Press the MODE button to turn the humidification feature off (OF). c.) Press the END button to end. NOTE: In dehumidify, you may enter a set point, choose “COOL” to dehumidify, or turn dehumidification off (OF). In humidify, you may enter a setting or turn humidification off (OF). b.) Press the UP or DOWN button to adjust the setting.
OPERATING THE THERMIDISTAT CONTROL Vacation feature operation 1 Press the VACATION button when you are ready to leave. Be sure you have properly selected the mode (HEAT, COOL, AUTO). The OUT indicator is displayed, and your system will automatically follow your vacation temperature and humidity settings. 2 Press the VACATION button when you return to resume normal operation.
AUTO CHANGEOVER Your Thermidistat Control provides complete, automatic control over heating and cooling with auto changeover. Auto changeover means your system will automatically heat or cool as needed to maintain your temperature set points. Auto changeover makes life easier because you no longer have to manually switch the thermostat between heating or cooling operation.
21 WHAT IF… AUXILIARY HEAT indicator is displayed… The AUXILIARY HEAT indicator appears on the heat pump version of the Thermidistat Control only. It is displayed when your system is operating on auxiliary heat. NOTE: This indicator does not reflect a problem with your system. CLEAN FILTER indicator is displayed… The CLEAN FILTER indicator tells you when to clean or replace your system’s air filter.
22 WHAT IF… OUT Indicator is displayed… EQUIPMENT ON Indicator is displayed… The OUT indicator reminds you that your system is in vacation mode. This function automatically adjusts the temperature and humidity settings to levels appropriate for when you’re away. Press the VACATION button to resume normal system operation. When the cooling equipment is operating, the word COOL preceded by a small triangle is displayed below the cooling set point.
23 WHAT IF… You have a power outage… You have a system error message… An internal power source eliminates the need to re-enter your settings into the Thermidistat Control after power outages. The comfort settings you have entered will be maintained indefinitely. The clock will run for 8 hours.
WARRANTY This Thermidistat Control includes a 1-year limited warranty. For detailed warranty information, please refer to the All Product Limited Warranty Card included in your information packet. This Thermidistat Control is also eligible for manufacturer’s extended system warranties. Ask your dealer for details on extended warranties for longer-term protection.
COMMON TERMS AND WHERE TO FIND THEM 25 Auxiliary Heat ......................Pg. 21 Clean Filter ..........................Pg. 14 Most heat pump systems require a supplemental heating source, called auxiliary heat, to maintain your comfort when outdoor temperatures fall significantly. Your Thermidistat Control lets you know when your home is being warmed with supplemental heat. Your system’s air filter will require regular cleaning to reduce the dirt and dust in the system and your indoor air.
COMMON TERMS AND WHERE TO FIND THEM 26 Dehumidification Set Point ....Pg. 9 Emergency Heat .....................Pg. 4 The amount of moisture to be removed from your home. You can check your actual humidity level and your desired dehumidification set point by pressing the SET DHUM button. This indicates that auxiliary heat is being used without the heat pump. Suggested settings: 50% – 60% suggested depending on installation, area of the country, and your heating & cooling equipment.
COMMON TERMS AND WHERE TO FIND THEM 27 Fan .........................................Pg. 5 Humidification Set Point ........Pg. 6 Your system’s fan can run continuously or only as called for during heating or cooling. Continuous operation helps with air circulation and cleaning. Automatic operation provides energy savings. Press the FAN button to make your choice. The amount of moisture desired in your home to be supplied by the humidifier.
COMMON TERMS AND WHERE TO FIND THEM 28 Mode .................................Pgs. 3-5 Outdoor Temperature ...........Pg. 12 Mode refers to the type of operation your system is set up to perform. Mode settings include: OFF, HEAT, COOL, and AUTO. Heat pump systems also include EMERGENCY HEAT (EHEAT). Your Thermidistat Control not only measures the indoor temperature, but it may also be equipped to measure and display the outdoor temperature as well.
COMMON TERMS AND WHERE TO FIND THEM 29 Power Outage ........................Pg. 22 Reset Filter ..............................Pg. 14 Complete loss of electricity. Your Thermidistat Control has an internal power source that allows the clock to continue to run for 8 hours or more without electricity. Settings are stored indefinitely without the aid of batteries. The reset filter function turns off the CLEAN FILTER indicator and restarts the timer.
COMMON TERMS AND WHERE TO FIND THEM 30 Set Time .....................................Pg. 2 Temperature Set Points ...........Pg. 1 This function allows you to set the proper time. Press the SET TIME button to activate. These are the desired heating and cooling set points entered into the Thermidistat Control. The actual room temperature will automatically be displayed, but you can check the desired temperature for the current mode by pressing either the UP or DOWN button. Temperature Sensor ..........
COMMON TERMS AND WHERE TO FIND THEM 31 Time .......................................Pg. 2 Up and Down Buttons ...........Pg. 1 The current time is displayed continuously on the display. These buttons are used to set the clock and enter temperature and humidity information.
Copyright 1997 Bryant Heating and Cooling Systems Form: OM17-25 Replaces: OM17-22 Printed in the U.S.A. 9-98 Catalog No. 13TS-TA11 7310 West Morris Street, Indianapolis, IN 46231 Manufacturer reserves the right to discontinue, or change at any time, specifications or designs without notice and without incurring obligations. COMFORT CONTROL Thermidistat Control™ Homeowner’s Guide Simple, Energy Efficient Control.