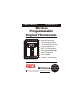
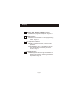
OWNER'S MANUAL TSTATBBPRF01-B Wireless Programmable Digital Thermostat MODE FAN Wireless Operation 7-Day Programmable 4 Time Periods Per Day Programmable Fan Easy To Read Display Thermoglow Backlight Auto Changeover Dual Setpoint 2 Heat, 2 Cool Stages Wireless 2000 by Replacement Components Division Carrier Corporation 2 Stage Heat & Cool or Heat Pump
Table Of Contents FRONT PANEL DISPLAY QUICK START Set the clock and go BASIC OPERATION PROGRAMMING 4 Time Periods ADVANCED SETUP ABOUT ADVANCED OPERATION WARRANTY 2 3 5 6 8 12 16 20 CAUTION Follow P474-1100REC Installation Instructions before proceeding. SET THERMOSTAT TO MODE “OFF” PRIOR TO CHANGING SETTINGS IN SETUP OR RESTORING FACTORY DEFAULTS. TSTATBBPRF01-B FCC ID MUH-T10013 This device complies with Part 15 of the FCC rules.
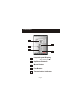
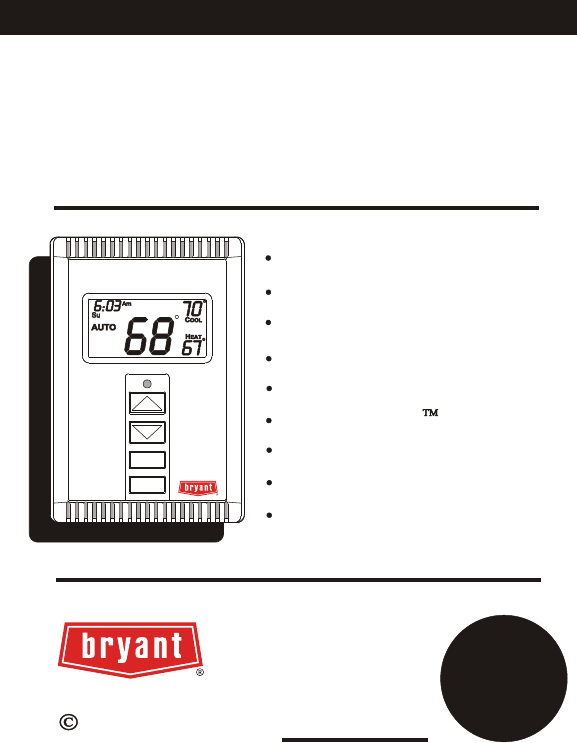
Front Panel 1 5 2 3 FAN 1 Liquid Crystal Display 2 Up/Down Buttons 3 Mode Button 4 Fan Button 5 Transmission Indicator with Thermoglow Page 2 4
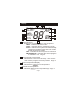
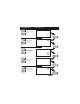
Display 1 2 1 10 : 12:00 SMTWTFS 7 88 Am ProgramOn Setup Locked Pm 88 AUTO OFFNight 6 Morning Day Evening 8 Fan On o COOL 88 HEAT o 4 1 1 4 3 1 Mode Indicators Selects the operation mode of the equipment. HEAT - indicates the heat mode. COOL - indicates the air conditioning mode. AUTO - indicates the system will automatically changeover between heat and cool modes as the temperature varies. OFF - indicates the entire system is turned off.
Display 6 Morning, Day, Evening & Night Indication Indicates the program time period. Page 8-11. 7 Setup Indication Indicates the thermostat is in the programming mode. Page 12. 8 Fan Operation Indication Fan On - indicates constant, continuous fan operation. When Fan On is not lit - indicates the fan will only operate when necessary to heat or to cool. Page 7. 10 Locked Indication Locked appears after the right combination of buttons are pressed, rendering the buttons inoperative. Page 17.
Quick Start Set the Clock and Go MODE FAN : 12:00 Press the Mode button. While holding the Mode, press the Fan button for 2 seconds to enter Setup screens. Am Setup i During Setup & Programming: Pressing the Mode button selects different flashing items. (Represented in dark black) Pressing the Up and Down buttons will modify the flashing selection. Press Setup 2 To adjust the clock or Day use MODE S buttons. Press both Mode and Fan buttons as above to return to normal operation.
Basic Operation Select Mode The HEAT setting indicates the temperature the room has to reach before the furnace will turn on to heat the room. The COOL setting indicates the temperature the room has to reach before the air conditioner will turn on to cool the room. AUTO will automatically select heat or cool based on room temperature demand. Program On will activate the stored timer operation. (Morning, Day, Evening & Night Periods) OFF indicates both heating and air conditioning systems are turned off.
Basic Operation Select Desired Temperature : 12:00 M AUTO 70 Pm 72 o In any mode, adjust the desired Set Temperature with COOL 69 HEAT o buttons. Pressing the up/down buttons in Auto mode will adjust both the heat and cool set temperatures simultaneously. Pressing the up/down buttons in Heat or Cool modes will adjust only the heat or cool set temperature. Fan Operation : 12:00 S Fan On 65 Pm Press FAN 85 o COOL 55 HEAT o Fan On indicates constant fan operation.
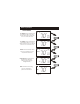
Programming 4 Time Periods (Unit # 1 only) Time period programming is only available on Unit Number 1. MODE Press the Mode button. While holding the Mode, press the Up button for 2 seconds to enter time period programming. Use the back cover Programming Worksheet to help with this section. M Select the day of week (M - S) Press MODE Adjust the start time for Morning. 7M:30 Am Start Morning Press MODE Adjust the cooling setpoint for Morning.
Programming Adjust the start time for Day. 4 Time Periods I0M:30 Am Start Day Press MODE Adjust the cooling setpoint for Day. I0M:30 (35 - 99 ) 75 Am o COOL Day Press MODE Adjust the heating setpoint for Day. (35 - 99 ) I0M:30 75 Am o COOL 73 HEAT o Day Press MODE Adjust the start time for Evening. 5M:30 Pm Start Evening Press MODE Adjust the cooling setpoint for Evening.
Programming Adjust the heating setpoint for Evening. (35 - 99 ) 4 Time Periods 5M:30 75 Pm o COOL 73 HEAT o Evening Press MODE Adjust the start time for Night. I MI :30 Pm Start Night Press MODE Adjust the cooling setpoint for Night.
Programming 4 Time Periods The copy command becomes available after programming the entire previous day. Yes Select Yes or No to copy the previous day’s program to this day. No : 18:no T co py If No is selected: If Yes is selected: Press MODE Selecting Yes, then pressing mode will copy the previous day’s program and then will ask the same copy question again. If yes is selected each time, this routine will repeat.
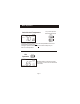
Advanced Setup MODE FAN Press the Mode button. While holding the Mode, press the Fan button for 5 seconds to enter Setup screens. : 12:00 NOTE: Each step # is located at the top right corner of the display for easy reference. Am Setup Adjust the time of day clock. I Press Tip: To change hours quickly, press and hold the Fan button in and press the up or down buttons. MODE Setup Select the day of the week. M 2 Press MODE On Select if thermostat is used in a zoning system.
Advanced Setup Select the House Code number. The receiver must also use this same number for proper operation. Select the Unit ID number. If more than 1 thermostat is used, each will need a different Unit ID number. Hc Un 86 Adjust the deadband from 1 - 6 degrees. Note: Available only on Unit ID #1. Adjust the minimum difference between cooling & heating setpoints. 81f (0 - 6 ) Select the cycles per hour limit. d=cycles per hour limit defeated. d1=d + defeat 5 min. Compressor lockout.
Advanced Setup LI On Setup On Select the display backlight always On, or Off after 8 seconds. Off 9 Press MODE Adjust the programmable fan timer. 0 - 60 minutes. 0:00 = off Note: Available only on Unit ID #1. : 0:00 Setup I0 Press Fan On MODE Setup C f Select thermostat operation in degrees Fahrenheit or Centigrade. F II Press MODE Press the Mode button. While holding in the Mode, press the Fan button for 2 seconds to leave the Setup screens.
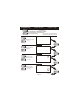
Advanced Setup Advanced Setup Table Step # 1 2 3 4 5 6** 7 8** 9 10** 11 Description Range Time of day clock set Day of the week Zoning Use House Code Unit Number Deadband or Temperature swing Forced minimum difference heat/cool Cycles per hour Thermoglow Backlight Programmable Fan Fahrenheit or Centigrade ** Available on Unit Number 1, only.
About Advanced Features & Operation MEMORY BACKUP - In the event of a power loss, the thermostat will retain the stored program settings without external power or batteries. 2 STAGE OPERATION - The 2nd Stage of heat or cool is turned on when (1) the 1st Stage has been on for a minimum of two minutes, and (2) the temperature spread from the setpoint is equal to or greater than: the setpoint plus the deadband, plus 2 degrees.
About Advanced Features & Operation KEYPAD LOCK - To prevent unauthorized use of the thermostat, the front panel buttons may be disabled. To disable, or ‘lock’ the keypad, press and hold in the Mode button. While holding the Mode button in, press the Up and Down buttons in together. The Locked icon will appear on the display. : 12:00 W Press all 3 for Keypad Lockout MODE ProgramOn Locked 70 Pm 85 o COOL 55 HEAT o To unlock the buttons, again press and hold the Mode button.
About Advanced Features & Operation DUAL SETPOINT BEHAVIOR - The adjustable setpoint range is: 35 - 99 degrees in Fahrenheit and 7 - 35 degrees in Centigrade. When in the modes Heat or Cool, this adjustable range is unhampered. When adjusting any Auto mode, including programming time periods, the thermostat will not allow the Heat setpoint to get closer to the Cool setpoint than the value programmed as the minimum difference in step 7, page 13.
About Advanced Features & Operation FACTORY DEFAULTS - If, for any reason it is desirable to return all stored settings back to the factory default settings, press the Mode button. While holding the Mode button in, press the Down button for 2 sec. All icons will appear. Press and hold in the Fan button until Fd appears. This resets all factory settings. To calibrate room temperature, press the Mode button. While holding the Mode button in, press the Down button for 2 seconds. All icons will appear.
Warranty dp holr aear rofWar wte potoP h One-Y raanty d y v T ffe esirg hcft Apr a Nui unda Cn i Ean O i AtTiwi eora eb tf COeh MPdg Awa Y,as raene ct n de iu sE am dne rnp RtdD tm– b fll tn wohrr s mrneti ts ae nffa sh kiuu mgg iCdas t spr aa; s itee hinol”t l he ea ate ot iei e loar llyeR etyu eco o atcC e npwPeaheed t tau emrr rbano( cr a tui ee.
Programming Worksheet see page 8 DAY PERIOD START TIME COOL HEAT Morning M O N D A Y T U E S D A Y W E D N E S D A Y T H U R S D A Y F R I D A Y S A T U R D A Y S U N D A Y Day Evening Night Morning Copy Mon Tue Day No Evening Yes Night Morning Copy Tue Wed Day No Evening Yes Night Morning Copy Wed Thu Day No Evening Yes Night Morning Copy Thu Fri Day No Evening Yes Night Morning Copy Fri Sat Day No Evening Yes Night Morning Copy Sat Sun Day No Evening Yes Nigh