SP2 PREAMP/PROCESSOR OWNER’S MANUAL
IMPORTANT SAFETY INSTRUCTIONS The lightning flash with arrowhead symbol within an equilateral triangle, is intended to alert the user to the presence of un-insulated “dangerous voltage “ within the product’s enclosure that may be of sufficient magnitude to constitute a risk of electric shock to persons. The exclamation point within an equilateral triangle is intended to alert the user to the presence of important operating and maintenance (servicing) instructions in the literature accompanying the product.
TABLE OF CONTENTS: 1. Safety Instructions & Warranty . . . . . . . . . . . 1 2. Contact information . . . . . . . . . . . . . . . . . . 2 3. Introduction, Accessories and Power . . . . . . . . . 3 4. Front Panel Controls and Indicators . . . . . . . . 4~6 a. Using the Dynamic Range Control . . . . . . . . . 4 5. Rear Panel Input and Output Connections . . . . 7~8 a. Setting the Optical Input Assign . . . . . . . . . . 7 b.
• 7.1 decoding from 2 channel source in DTS Neo-6 Music & Cinema modes • 7.1 surround effects decoding from 2 channel digital sources • 7.1 Surround effects decoding from 2 channel analog sources • 96/24 Stereo decoding • 96/24 DTS 5.1 decoding • 96/24 Matrix surround modes in 5.
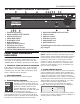
SP2 PREAMP/PROCESSOR SP2 FRONT PANEL CONTROLS & INDICATORS 1: 2: 3: 4: 5: 6: 7: 8: 9: 10: POWER SWITCH (momentary) STANDBY & INFRA-RED ACTIVITY INDICATOR INFRA-RED RECIEVER (sensor) DYNAMIC RANGE CONTROL ALPHA-NUMERIC DISPLAY MENU CONTROL Buttons SOURCE SELECT Buttons & Indicators DIGITAL MODE Switch & Indicator SURROUND MODE Switch & Indicator STEREO & STEREO DOWNMIX MODE Switch & Indicator FRONT PANEL CONTROLS & INDICATORS 1: POWER BUTTON Pressing this push button switch takes the unit in and out of
: MENU CONTROL BUTTONS These three buttons labeled “”, “”, and “SEL” (SELECT) are used to control the menu and setup functions displayed on the LCD. To enter a menu mode, you can press any one of these buttons. This will bring up the main menu. Navigating any menu or submenu is done using the two arrow ( and ) buttons. Once the desired submenu or function is highlighted, pressing “SELECT” will make it the current menu or function.
SP2 PREAMP/PROCESSOR resents different mixing coefficients for the centre and surround channel signals. These will be detected by the SP2 and used to produce the downmix if this mode is selected. 12: “THX” BUTTON This button allows selection of THX post processing modes. The default mode, which is normally Surround-EX, can be selected using the “EX Control” menu.
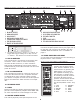
REAR PANEL INPUT & OUTPUT CONNECTIONS are now in the ‘Other Settings’ (Optical/THX) Menu. 2. Move the cursor to the Optical Input (OPT1 or OPT2) you want to change the input assignment for. Hit ‘Select’. (see figure below) 1: BALANCED OUTPUTS 2: UNBALANCED OUTPUTS The SP2 offers both balanced (5.1) and unbalanced (7.1) outputs for power amplifiers or powered loudspeaker systems. The type you select to use will be determined by the input configuration of your amplifiers or self-powered loudspeakers.
SP2 PREAMP/PROCESSOR REAR PANEL INPUT & OUTPUT CONNECTIONS 1: 2: 3: 4: 5: 6: 7: BALANCED OUTPUTS UNBALANCED INPUTS ANALOG INPUTS DIGITAL AUDIO COAXIAL INPUTS TOSLINK DIGITAL AUDIO OPTICAL INPUTS TAPE/RECORDING OUTPUTS REMOTE 12V TRIGGER OUTPUTS 3. To change the source, use the “<” button. To toggle the trigger setting On or Off, use the “>” button. Hit ‘Select’ to exit when finished. 8: Aux IR Receiver The Aux IR Input is a miniature mono phone jack connector.
SP2 Remote Control continued... is available for playback of DTS encoded motion picture soundtracks from DVD or LD sources. Each mode has an optimized bass management setting in accordance with the DTS program material. 1: SOURCE SELECT BUTTONS These buttons are used to select the desired source. TV/SAT, DVD, CD, AUX, VCR, and TAPE function exactly like their corresponding buttons on the SP2 front panel.
SP2 PREAMP/PROCESSOR Works in conjunction with the backlight and tilt switch to determine if backlighting is needed. To enable or disable the backlight in the remote control, follow this procedure: 1. Press CODE button for 5 seconds 2. LED will flash red, then release button 3. Type in 3 digit code 792 = MODE/SAVE/DTS 4. LED will flash again to confirm To send discrete/hidden Code… 1. Press CODE button and release 2. LED will illuminate (Red) 3.
any system which you expect to effectively handle the low frequency dynamics of modern motion picture soundtrack sources such as DVD or HDTV feeds, and many other discrete multi-channel programming sources. If in any doubt choose small, especially if you are using a subwoofer, since this will insure that all the appropriate low frequency information is directed to the subwoofer where it can be most effectively handled. 2: Next move the cursor to “SP”. Hit ‘SELECT’ You are now in the Speaker Menu.
SP2 PREAMP/PROCESSOR overall delay. When using the remote control to enter these selections, press the “SAVE” button before exiting or settings will be lost. 4: Once you have selected the desired crossover frequency, press SELECT to exit this menu and return to the Speaker Config menu. The selected frequencies are common to all speakers defined as ‘SMALL’. Crossover frequency can be set independently for Front, Centre, Surround and Back speakers.
2: Next move the cursor to “LVL”. Hit ‘SELECT’ You are now in the Level Trim Menu. 3: Move the cursor to the speaker(s) you want to change the level for using the arrow keys (L, C, R, RS, LS, RB, LB, SUB). Hit ‘SELECT’. Now you can adjust the Level for the selected speaker using the arrow buttons. 4: Hit ‘SELECT’ when finished, and repeat Step 3 to change the Level Trim for any of the other speakers. menu to make further adjustments if needed.
SP2 PREAMP/PROCESSOR ● ON: DTS-ES Matrix will be forced on for all DTS 5.1 channel input bitstreams, if the back channels are enabled. ● AUTO: DTS-ES Matrix will be decode if the incoming DTS bitstream is flagged as having DTS-ES encoded content, and if the back channels are enabled. Enabling THX Surround EX™ Decoding THX Surround EX™ processing creates back channel material from material contained in the surround channels of Dolby Digital 5.1 bitstreams.
3: Panorama Mode extends the front stereo image to include the surround speakers for an exciting “wrap around” effect with side wall imaging. PLII Music also applies a mild high-frequency shelf filter to the surround channels for a more natural soundfield. Auto-balance is disabled. To change the PLII Music settings: 1: First enter the main menu by pressing on any one of the menu buttons (< - > or SELECT) 2: Next move the cursor to “PLII”. Hit ‘SELECT’; you are now in the ‘PLII Music’ menu.
SP2 PREAMP/PROCESSOR ers. was being performed. Surround Modes: PARTY: The Party (Five-Channel Mono) Mode converts stereo input to a mono signal which is then distributed to the five satellite channels. HALL: This Sound Field Mode emulates a medium or large concert hall. It provides a longer reverberation time than other modes and gives the effect that music is heard at a greater distance from the performers.
SP2 SPECIFICATIONS APPENDIX B: Infra-red remote codes Power OFF . . . . . . . . . . . 000 TV/SAT.............................001 DVD..................................002 CD....................................003 AUX..................................004 VCR..................................005 TAPE . . . . . . . . . . . . . . . . 006 Volume UP . . . . . . . . . . . 007 Volume DOWN . . . . . . . . 008 MUTE (toggle)3 . . . . . . . . 009 TEST.................................010 DIGITAL.......................
SP2 PREAMP/PROCESSOR 18
SUGGESTED SURROUND SPEAKER PLACEMENT 19 SP2-OWNERS-MANUAL-20060112 STP/