User Manual Rider 750
Table of Contents Getting Started ......................4 Brightness ................................. 31 Rider 750 Key Functions .............. 4 Pair Sensors .............................. 32 Reboot Rider ............................... 4 System ...................................... 35 Accessories ................................. 4 Altitude ..................................... 39 Touch Screen ............................... 5 Navigation Settings .................... 40 GUI Display ...........
WARNING Always consult your physican before you begin any training. Please read the details in Warranty and Safety information guide in the package. Australian Consumer Law Our goods come with guarantees that can not be excluded under the New Zealand and Australian Consumer Laws. You are entitled to a replacement or refund for a majory failure and for compensation for any other reasonably forseeable loss or damage.
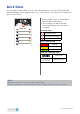
Getting Started This section will guide you through basic preparations before the first use with your Rider 750. Rider 750 Key Functions ) A POWER/LOCK ( x Press to turn the device ON. x Long Press to turn the device OFF. x Press to lock or unlock the screen. ) B LAP ( x When recording, press to mark the lap. A C B D ) C RECORD ( x In Cycling mode, press to start recording. x When recording, press to pause recording and enter the Menu. D PAGE ( ) x In Cycling mode, press to switch meter screen pages.
Touch Screen SSpeed peedd 21.5 Ride Time 01:58:21 Alt. Gain Distance 48.8 42 Gradien ent Gradient k m SSpeed peedd k m h 21.5 Gradient Gradi ient -22 Rid dde TTime me Ride Altitude Altitu uude 06 1155 21 06 2 122 06:15:21 Distance Alt. G Tim Time me 115.7 4 17:21 17:221 AVG S Tripp 1 Gradient -22 18 172 172.5 2 .5 Bike 1 Av Avg vg. Speed Avg. m 0 224.
GUI Display MAX 588 452 243 3S AVG w MAX 185 179 145 CUR AVG 75 b p m AVG MAX 70 96 r p m Average value Inner Rings Current value when using a Speed or a Cadence sensor. Current value when using a Heart Rate Monitor or a Power sensor. The colors will change by different zones, which are based on the settings. Bar Chart for Di2/E-Shifting Gears 2/2 Outer Rings 10/12 Value of the Cassette. Value of the Crankset. 283 126 AVG Di2 Battery 80 2.6 Gear Ratio TSS % MAX 315 0.
Quick Status See key statuses while riding, such as sensor & smartphone connection, GPS signal, and individual battery status of paired sensor ,etc…Users can also see if device is recording at a glance by the flicker. 1. Single-tap the screen on meter page to open the Quick Staus menu. 2. The recording icon will flicker with red and gray flashes while the device is recording.
Status Icons Icon Description GPS Signal Status Icon Description Navigation GPS Off / No Signal (not fixed) Route Weak Signal History Icon Description Sensor Pairing Heart Rate Sensor Active Speed Sensor Active Favorite Cadence Sensor Active Unable GPS Zoom in Combo Sensor Active Power Status Zoom out Electronic Shifting Active Strong Signal Full battery Out of battery Locate Current Position Voice Search Battery Charging Record Search POI Recording Add a PIN Not Recording Move the
Step 1: Charge your Rider 750 Charge the Rider 750 battery for at least 4 hours. Unplug the device when it is fully charged. x You may see the battery icon blinking when the battery is very low. Keep the device plugged in until properly charged. x The temperature suitable for charging battery is 0°C ~ 40°C. Beyond this temperature range, charging will be terminated and the device will draw power from battery. At least 4 Hours Step 2: Turn On Rider 750 Press to turn on the device.
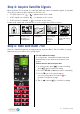
Step 4: Acquire Satellite Signals Once the Rider 750 is turned on, it will automatically search for satellite signals. It may take 30 to 60 seconds to acquire signals for first time use. • The GPS signal Icon ( / ) appears when GPS is fixed. • If GPS signal is not fixed, a icon appears on the screen. • If GPS function is disable, a icon shows on the screen. Please avoid obstructed environments since they might affect GPS reception.
Step 6: Share Your Records Connect Rider 750 to PC a. Connect Rider 750 to PC by using Bryton’s original USB cable. b. The folder will popup automatically or find the “Bryton” disk in the computer. Share Your Tracks to Brytonactive.com 1. Sign up on Brytonactive.com a. Go to https://active.brytonsport.com. b. Register for a new account. 2. Connect to PC Turn on your Rider 750 and connect it to a computer by USB cable. 3. Share Your Records a. Click “+” in the right upper corner. b.
Auto Sync Tracks to Bryton Active App No more uploading tracks manually after riding. Bryton Active App automatically syncs your track after pairing with your GPS device. Sync via BLE a. Scan QR code below to download Bryton Active App or go to Google Play/App Store to search Bryton Active App. Then, log in or create an account. b. Go to Settings > Device Manager > + > Rider 750 to add your GPS device. Rider 750 http://download.brytonsport.com/inst.html c.
Sync via WLAN a. Select > Data Sync, then choose a network to set up connection. Please go to Page39 to see more information of setting WLAN. b. Make sure the Rider 750 is paired with the Bryton Active app and bind your Bryton account before starting data sync. WLAN Choose Network Meeting Room Please pair device with the Bryton Active app to bind the device to your Bryton acount. Home Getyourownwifi c. The device will automatically upload the d.
Firmware Update Update on the Device DATA SYNC Upload Activities 5/5 New firmware is available, update now? 1. Select > Data Sync, then choose a network to set up connection. 2. If there is a new update, the Rider 750 will pop up a message to ask you if you would like to update the firmware. 3. Click to continue. 4. After the new firmware is succefully downloaded, tap to go back to Settings. 5. If the download failed, select to go back to Settings and redo the process.
Course Follow Track Create Track Rider 750 provides 3 ways to create tracks: 1. Plan trip via Bryton Active App. 2. Import routes from 3rd party platforms. 3. Auto sync routes from Strava, Komoot and RideWithGPS. Plan Trips via Bryton Active App 1. In Bryton Active App, select Course > Plan Trip to set a Start point and Destination by tapping on the map or inputing address in left Search Bar. 2. Download the planned trip to My Route by tapping on the icon . 3.
Auto Sync routes from Strava, Komoot, RideWithGPS 1. Enable STRAVA / Komoot / RideWithGPS auto sync in the Course tab to establish a link with the Bryton Active app. 2. Create/modify routes in these platforms and save them as public. 3. Select My Routes and choose a route to download. 4. Press the upper right icon to download the route to your device. 5. In the Main Menu of the device, navigate to Course > Follow Track, find the route and tap on to start following the track.
Workout Create a Workout Rider 750 provides 2 ways to create workout: 1. Plan workout via Bryton Active App. 2. Import workout from 3rd party platforms. Plan workout via Bryton Active App 1. In Bryton Active App, select Course > Plan Workout to plan a training workout by selecting interval types and enter details. 2. Click in the top right to download the workout to the device. 3. You also can download planned workouts by entering My Workout.
Train with a Workout plan Work WORKOUT 001 257 167 80 Duration 00:10:00 2/7 1. Select Course in the home page. 2. Select Workout. 3. You can view all the workouts that you have saved. Delete Workout 1. To delete the workout, click then again select the workout(s) and click to delete. 2. Select to confirm. Start Workout 1. Select the workout you would like to start with. 2. Select to be ready for the workout, then press button to start the workout. Stop Workout 1.
Bryton Test Bryton Test includes test courses to help you evaluate your MHR, LTHR, FTP and MAP. Knowing your MHR, LTHR, FTP and MAP gives you a benchmark of your overall efficiency. It also helps you check progress over time and analyze your exercise intensity. Work 184 163 FTP TEST 2/3 145 Duration 00:20:00 1. Press Course in the home page. 2. Find Bryton Test. 3. Select a test type and start testing. to skip to the next section. 4. Press 5.
Smart Trainer Set up a Trainer Trainer Settings Name Nick’s Smart Trainer Sensor Detail Wheel Size 2096 mm Gear Ratio 2.73 Bike Weight 10.0 kg Calibrate 1. Select Course in the home page. 2. Find Smart Trainer 3. Tap to connect a smart trainer to Rider 750. Edit Information 1. After connected smart trainer to the Rider 750, it will switch to the Smart Trainer page. 2. Go to Trainer Settings to enter Wheel Size,Gear Ratio, and Bike Weight to set up a smart trainer profile. Remove Trainers 1.
Smart Workout Training plans can be built with the Bryton Active App and downloaded directly to the Rider 750. With ANT+ FE-C support, the Rider 750 will communicate with your smart trainer to simulate the resistance from the training plan. Work WORKOUT 001 257 167 80 Duration 00:10:00 Back to Top 2/7 1. Select Course in the home page. 2. Select Smart Trainer > Smart Workout. 3. You can view all the workouts that you have saved. Delete Workout then 1.
Resistance Resistence 1. Select Course in the home page. 2. Select Smart Trainer > Resistance. Start Resistance Workout 1. Adjust resistance level by clicking + / . 2. Select to start training. 3. Resistance training will automatically stop once you start Virtual Ride or when the Smart Trainer lost connection. Power Target Power 205 1. 2. 3. 4. 5. Select Course in the home page. Select Smart Trainer > Power. to set your target value. Select Tap on to start training.
Navigation With connection to the internet, you can use your voice to search for locations on the Rider 750 in over 100 languages. The voice search features offers a faster, more intuitive and more convenient to find addresses or POIs. Voice Serach 200m 200yd :KHUH WR" RELEVANT RESULTS 765 m 964 m Holiday Inn Express Mountain View-S Palo Alto Dinah’s Garden Hotel 1.5 km Americas Best Value Inn Mountain View 1.8 km Super 8 by Wyndham Mountain View 2.
Pin a Location 1. Select Navigation in the home page. Locate Your Current Position 1. Before locating your position, make sure you locate satellite. 2. Tap on to locate your current position. Navigate by Dropping a Pin and manually pin a desired 1. Select spot on the map. 2. Tap and hold on blank space to move the map for accurate location. / to adjust map size. 3. Use 200m 200yd 3LQQHG /RFDWLRQ Back to Top Generate a Route 1. Select to view the direction to your destination. 2.
Navigate on Bryton Active App 1. Pair the Rider 750 with Bryton Active App, select Course > Navigation. 2. Input keywords or address or POI type in the search bar then click . 3. Select a result from the search list. 4. Confirm the location then click Navigate to see the route. 5. Click in the top right to download the route to the device to start the navigation. Note: To see more information of Follow Track, please go to page 13. Change Orientation 1.
Download Maps The Rider 750 comes with preloaded maps of major regions around the world. Rider 750 1. Download the desired map zip file from the official Bryton Website. Please unzip it. Please do not rename the file(s) or change the file extension(s) in the unzipped folder, as this may cause errors to occur. 2. Using the Bryton device’s original USB cable, plug the device into the PC and in the “Bryton” disk, navigate to [Bryton>MAP]. 3.
Results You can view recorded activities on the Rider 750 or delete records to save more storage capacity of the device. View Records 1. Select in the home page. 2. Pick a record to view details. 3. Tap Details or Summary to see different data. Edit Record 1. Select in the home page. 2. Tap on to enter the delete page. 3. Choose the record(s) then tap to delete the record. 4. Press to confirm.
Settings In Settings, you can customize Bike settings, Brightness, Data Sync, Sensors, Notification, System, Altitude, Navigation settings,and Network. You can also find firmware information in this section. In addition, most used device settings are allowed to be personalized via Bryton Active App. Bike Setup Rider 750 supports up to 3 bike profiles, it is easier than ever to customize your device for any type of setup.
Auto Lap: Auto Lap x Auto Lap Trigger Distance Lap At 5 km x x Auto Lap Trigger: You can use the Auto Lap to mark the lap at a particular position automatically. Choose by Distance or Location option to trigger laps counts. Set desired settings or type value by pressing icon. If you select Distance, you need to enter a specific value. If you choose Location, you need to wait for the device to acquire satellite signal to locate your current position.
GPS System Rider 750 has full GNSS (Global Navigation Satellite System) support including GPS, GLONASS (Russia), BDS (China), QZSS (Japan) and Galileo (EU). You can select a suitable GPS Mode according to your location to enhance accuracy or better suit your needs. GPS System Status High Accuracy GPS QZSS Galileo Beidou GPS QZSS Galileo Glonass Normal GPS+QZSS+Galileo Power Saving GPS 1. Select in the home page. 2. Select Bike Settings. 3. Select a bike > GPS System. Enable GPS System 1.
Overview Select Overview to view more details of the bike odometer. 1. Find in the home page. 2. Tap Bike Settings. 3. Select a bike profile > Overview. Trip 1 / 2: Cumulative mileage recorded before you reset it. You are free to use Trip 1 or Trip 2 to record travel distance in a period and reset it. Trip 1 and 2 will show in the same value before you reset one or each of them.
Pair Sensors We suggest that you pair all your sensors with the device beforehead, Rider 750 will scan for nearby active sensors from the sensor pool, making switching between bikes and sensors easier and more convenient than ever. Detected Sensors HR 120345 HR BrytonHR78965 Ride Time 06:15:21 Speed Distance 115 7 21.55 115.7 21 Alt. Gain Gradient Sensor found. 42HR sensor detected: -2 NewSpeed Altitude Avg. ”Bryton123456” Switch connected HR sensor 115.
Manage Sensors via Bryton Active Sensors Add Sensors My Sensors Manage Sensors Heart Rate ANT+ 120311 Cadence BLE 132310 Sunny’s Speed ANT+ Power ANT+ 120345 123456 HR Bryton ANT+ 1000 Heart Rate Status Name Type Sunny’s HR ANT+ ID 120311 Connect 1. Select Settings in the home page. 2. Find Sensors. Add New Sensors 1. Select Add Sensor to add new sensors. 2. Choose any type of sensor that you would like to pair with. 3.
Bike Radar The Rider 750 supports ANT+ Radar after simple pairing. While in the Meter Page, the radar strip will display approaching vehicles, utilizing the Rider 750’s vivid color screen for easy-to-understand vehicle icons and color changes for status. Additionally, audio alerts can be configured with the radar to notify you if an oncoming vehicle passes the distance threshold. Bike radar is connected. Rider’s position Approaching vehicle Safe: No vehicle is detected around.
System In System, you can customize System Settings, Recording Settings, Auto Scroll, Start Remind, File Saving, Memory, ODO, and Data Reset. System Settings You can setup Language, Backlight Duration, Meter Color Mode, Key Tone, Sound, Time/Unit, Auto Lock, and Status Duration. System Settings Language Backlight Duration 30 sec Key Tone Sound Time/Unit 1. Tap in the home page. 2. Select System > System Settings. Language 1. Select your desired language. Backlight Duration 1. Select desired setting. 2.
Recording Settings In Recording Settings, data recording frequency can be customized for higher accuracy / data saving, as well as how data is included depending on user preference. Recording Settings Smart Recording 4 Sec ODO Setup Recorded 1. Select in the home page. 2. Select System > Recording Settings. Smart Recording 1. Set your desired smart recording time. 2. Select to confirm. ODO Setup 1. Select Recorded or All and select to confirm.
Start Remind When the device detects the motion of your bike, a reminder will pop up and ask you if you would like to start recording. You can set the frequency of the reminder. 1. 2. 3. 4. Select in the home page. Find System > Start Remind. Set up desired setting. Select to confirm. File Saving When the feature is enabled, the device will automatically overwrite from your oldest records when memory storage is full. System System Settings 1. Select in the home page. 2. Tap System > File Saving. 3.
Data Reset You can reset your device to factory settings. System File Saving Memory 75349 hr 1. 2. 3. 4. 5. 6. Select in the home page. Select System > Data Reset. “Perform factory reset?” message pops up. to confirm. Press “Keep system data?” message pops up. Select to cancel or to confirm reset. ODO Oncee Perform factory reset? Altitude With connection to Internet, Rider 750 provides altitude information for you to calibrate directly. You can also change altitude manually.
Navigation Settings Navigation Settings Rerouting 1. Select in the home page. 2. Select Navigation Settings. Rerouting Setting 1. Select Auto or Manual. Network (WLAN) Rider 750 supports WLAN.With the access to the internet, the device will sync data to / from Bryton Cloud. Once you finished uploading data, the network will automatically disconnect to the device. WLAN Choose Network Meeting Room Home Getyourownwifi Back to Top Set up a Network 1. Find in the home page. 2. Select Network. 3.
About You can view your device current firmware version. About Version 038.010.022 03.011.000 UUID 1902200600000178 LAT/LONG ---, --- 1. Select in the home page. 2. Select About. 3. Firmware information and current latitude and longitude will show on the device. 2020 Bryton Inc. All Rights Reserved. TSS™, IF™, and NP™ are trademarks of TrainingPeaks, LLC. www.trainingpeaks.
Profile In Profile, you can browse and personalize your information. Personal Information Profile User Name Katherine Gender Female Birthday 1990/1/1 Height 175 cm Weight 59 kg Heart Rate Zone Power Zone Heart Rate Zone MHR LTHR Based on LTHR 172 bpm Zone 1 111-139 bpm Zone 2 139-149 bpm Zone 3 149-159 bpm Zone 4 65% 81% 1. Select in the home page. 2. Tap to edit details. Customize Heart Rate Zone 1. Select MHR. x Use keyboard to enter MHR. x Press to edit details for each zone.
Bryton App Advanced Settings After pairing your Rider 750 with Bryton Active App, you will have access to Notifications. Notifications After pairing your compatible smartphone using Bluetooth Smart wireless technology with Rider 750, you can receive phone calls, texts and email notifications on your Rider 750. 1. iOS Phone Pairing a. Go to your phone “Settings>Bluetooth” and enable Bluetooth. b. Go to Bryton Mobile App and Tap on “Settings>Device Manager>+”. c. Select and add your device by pressing “+”.
Appendix Specification Rider 750 Item Description Display 2.8” Transflective Color TFT LCD Capacitive Touch Screen Physical Size 92.5 x 49.7 x 23.8 mm Weight 93g Operating Temperature -10°C ~ 60°C Battery Charging Temperature 0°C ~ 40°C Battery Li-polymer rechargeable battery Battery Life Up to 20 hours with open sky ANT+™ Featuring certified wireless ANT+™ connectivity. Visit www.thisisant.com/directory for compatible products.
Smart Cadence Sensor (Optional) Item Physical Size Weight Water Resistance Description 36.9 x 31.6 x 8.1 mm 6g Incidental exposure to water of up to 1 meter for up to 30 minutes Transimission Range 3m Battery Life Up to 1 year Operating Temperature -10°C ~ 60°C Radio Frequency/protocol 2.4GHz / Bluetooth 4.0 and Dynastream ANT+ Sport wireless communications protocol NOTE: Accuracy may be degraded by poor sensor contact, electrical, magnectic interference and distance from the transmitter.
To replace the battery: 1. Locate the circular battery cover on the back of sensors. 2. Use your finger to press and twist cover counter-clockwise so the indicator on the cover points to unlock icon ( ). 3. Remove the battery and insert new battery with positive connector first into the battery chamber. 4. Use your finger to press and twist cover clockwise so the indicator on the cover points to locked icon ( ).
Install Rider 750 Use Sport Mount to Mount Rider 1 2 3 4 Use F-Mount to Mount Rider (Optional) 1 2 3 4 Back to Top 46 Appendix
Install the Speed/Cadence Sensor (Optional) Smart Cadence Sensor + Smart Speed Sensor + + NOTE: x Once sensors are waken, the LED blinks twice. The LED continues to blink when you continue to pedal for pairing. After around 15 times blink, it stops blinking. If not used for 10 minutes, sensor would go into sleep mode to preserve power. Please complete the pairing during the time the sensor is awake.
Install Heart Rate Belt (Optional) Strap Electrodes O ENP NOTE: x In cold weather, wear appropriate clothing to keep the heart rate belt warm. x The belt should be worn directly on your body. x Adjust the sensor position to the middle part of the body (wear it slightly below the chest). The Bryton logo shown on the sensor should be facing upward. Tighten the elastic belt firmly so that it will turn loose during the exercise.
Wheel Size and Circumference The wheel size is marked on both sides of the tires.
Data Field Category Energy Data Field Description of Data Fields Calories The number of total calories burned. The accumulated power output in kilojoules for the current activity. The height of your current location above or below sea level. The highest height of your current location above or below sea level which the rider achieved for the current activity. The total altitude distance gained during this current activity. The total altitude lost during this current activity.
Category Data Field Description of Data Fields Cadence The current rate at which rider is pedalling the pedals. The accumulated power output in kilojoules for the current activity. The maximum cadence for current activity. Avg CAD Cadence Max CAD LapAvgCad The average cadence for the current lap. LLapAvCad The average cadence for the last finished lap. Heart Rate Avg HR Max HR LapAvgHR The maximum heart rate for current activity. Your current heart rate divided by Maximum Heart Rate.
Category Power Data Field Description of Data Fields Training Stress Score is calculated by taking into account TSS (Training both the intensity such as IF and the duration of the ride. Stress Score) A way of measuring how much stress is put on the body from a ride. Intensity Factor is the ratio of the normalized power(NP) IF (Intensity to your Functional Threshold Power(FTP). An indication of Factor) how hard or difficult a ride was in relation to your overall fitness.
Category Data Field Description of Data Fields SPD Ring The current speed rate displays in dynamic coloured graphical mode. SPD Bar CAD Ring CAD Bar HR Ring Graph HR Bar PW Ring PW Bar 3s PW Ring 10s PW Ring 30s PW Ring The current cadence rate displays in dynamic coloured graphical mode. The current heart rate displays in dynamic coloured graphical mode. The current power rate displays in dynamic coloured graphical mode. 3 seconds average of power displays in dynamic coloured graphical mode.
Basic Care For Your Rider 750 Taking good care of your device will reduce the risk of damage to your device. x Do not drop your device or subject it to severe shock. x Do not expose your device to extreme temperatures and excessive moisture. x The screen surface can easily be scratched. Use the non-adhesive generic screen protectors to help protect the screen from minor scratches. x Use diluted neutral detergent on a soft cloth to clean your device.
RF Exposure Information (MPE) This device meets the EU requirements and the International Commission on Non-Ionizing Radiation Protection (ICNIRP) on the limitation of exposure of the general exposure requirements, this equipment must be operated in a minimum of 20 cm separation distance to the user. Hereby, Bryton Inc. declares that the radio equipment type Bryton product is in compliance with Directive 2014/53/EU.