FDS 355 User Manual 1
V 2.0 JMK 13th October 1997 Software version 1.
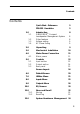
Contents Contents Quick Start - Reference 5 FDS-355 Omnidrive 5 Introduction OMNIDRIVETM Compact Loudspeaker Management System Other features Voltage setting AC Power fusing 8 2.0 Unpacking 9 3.0 Mechanical Installation 10 4.0 4.1 Mains Power Connection Mains power 11 11 5.1 5.2 5.3 Controls Input section Output section Rear panel 12 12 14 15 Screen Layout 16 6.0 Default Screen 20 7.0 Utilities Menu 21 8.0 Inputs Menu 25 9.0 Outputs Menu 26 10.0 EQ Screens 30 11.
Contents 13.0 Phase Compensation 34 14.0 Typical Applications Stereo 2-Way with a mono sub-bass Dual Bi-amp (Stage monitors) 5-Way zoning distribution Mono 5-way 35 35 35 35 36 14.1 14.2 14.3 14.4 15.0 15.3 15.4 15.5 15.6 Quick Reference - How to ... 37 (R) 37 Use delays to Time align drivers Keep relative delays while delaying a group 37 Name a band 37 Make a band full range 37 Add EQ for Constant Directivity horns 38 Loading custom logos 38 16.1 16.
Quick Reference Quick Start - Reference FDS-355 Omnidrive AC Power connection The FDS-355 has a universal voltage AC Power input. Connect the FDS-355 to AC Power with the lead supplied. The unit will switch on automatically (there is no separate on/off switch). The display will show the default screen, with the current program (if selected), and overall system response curves. Audio connections Connect the inputs and outputs as desired.
Quick Reference Setting the crossover points Select the band to be edited by pushing the parameter wheel to cycle through inputs and outputs. Note the LEDs above each channel change as the screen changes. Once the band has been selected, press the UP/DOWN keys until the first crossover (Filter shape - Low slope) screen appears. Select the type of filter shape by using the parameter wheel to cycle through the selection. Refer to section 9.0; Outputs Menu for more info on crossover filter shapes.
Automatic Phase Compensation Automatic phase compensation is employed in the FDS-355 to maintain zero phase difference between adjacent bands, even in 4 and 5-Way systems, where the phase errors due to the effects of closely spaced crossover filters can be significant. Phase compensation helps you to keep the response of the system with the minimum of 'fiddle factor' adjustments. Headroom Management System (H.M.
Introduction 1.0 Introduction 1.1 OMNIDRIVE TM Compact Loudspeaker Management System An arrangement of 3 inputs and 5 outputs, and an additional internal sum of inputs A&B, can be matrixed in any combination to provide a complete loudspeaker management system with integral crossovers, delays, EQ, and protection limiters.
Voltage/Fusing Unpacking 1.3 Voltage setting The FDS-355 uses a switched-mode power supply which offers high efficiency and low heat generation. This power supply accepts universal AC Power input voltages in the range 100V AC to 240V AC (nominal), and requires no setting adjustment for AC power voltages in this range. Minimum AC input voltage is 90 Volts, and the maximum is 264 volts. Outside these ranges the unit will not work satisfactorily, if at all.
Mechanical Installation 3.0 Mechanical Installation A vertical rack space of 1U (1¾" / 44.5 mm high) is required. Ventilation gaps are unnecessary (See Figure 3.1). If the FDS-355 is likely to undergo extreme vibration through extensive road trucking and touring, it is advisable to support the unit at the rear and/or sides to lessen the stress on the front mounting flange. The necessary support can generally be bought ready-built as a rack tray.
Mains Power Connection 4.0 Mains Power Connection 4.1 Mains power Refer also to sections 1.3 and 1.4; Voltage setting and AC Power Fusing. WARNING! THIS APPLIANCE MUST BE EARTHED. IMPORTANT: The wires in the mains lead are colour coded in accordance with the following code. Green and Yellow......Earth Blue......Neutral Brown......Live As the colours of the wires in the mains lead may not correspond with the markings identifying the terminals in your plug, proceed as follows.
Front Panel Controls 5.0 Controls 5.1 Input section Fig 5.1 Front panel A Store key Program data can be stored to either internal memory, or a PC card, and is done by using the store facility. The STORE key also doubles as an ENTER key for confirmation of some actions. Refer to section 11.1; Storing B Recall key Program data is recalled to the unit from either internal memory or a PC card using the recall facility. Refer to section 11.
H PC card slot The card slot is used for storing/recalling program data via a PC card. Refer to section 16.0; PC Card for more information. J Input LEDs These indicate which (combination of) input channels are being edited. The Card LED underneath illuminates when a PC Card is inserted into the front panel slot. Note: If all three input LEDs illuminate at once (which is highly unlikely), the unit is clipping internally due to large amounts of EQ or gain being added.
Output section 5.2 Output section Fig 5.2 Output section A Edit LED Lights up when the output is being edited. B C Output meter Mute LED Shows the mute status of the output band. D Mute key Pressing a mute key will toggle the associated band output on and off. The mute LED is illuminated when the output is MUTED. Mute status is saved when a program is stored. E Gain trim Each output band can be trimmed for output level across a range of -6dB to +6dB.
Rear panel 5.3 Rear panel Fig 5.3 Rear panel A Mains power input The Power inlet for the FDS-355. Note that there is no On/Off switch for the unit. B C Fuse RS-232 connector For connection to a PC for access to one or more FDS-355s on a MIDI loop, which provides an easy way to upload new software. D E MIDI interface connectors 5 Band outputs The FDS-355 audio outputs are electronically balanced and floating. Transformer balancing is available as a retrofit option.
Screen layout - Overview 16
Moving about the screens Use the parameter wheel to move between Default, Utility, Input and Output menus (Vertical columns). Pushing the wheel in, or pushing and holding the wheel in while turning clockwise, will move to the next screen on the right. Pushing and holding the wheel while turning anti-clockwise will move you a screen to the left. Each menu is shaded with a different colour to identify each seperate menu structure.
Key screens After powering up, the FDS-355 performs internal checks and sets up the audio path before releasing the output mute relays. This takes a few seconds. Refer to section 6.0; Default screen. Utilities Pushing the UP key will enter the Utilities Mode. Many of the utility screens are self explanatory (see Screen layout on the previous two pages), but the more important ones are shown below.
Output settings The name screen. Allows each output to be given a descriptive name from a preset list. Refer to section 9.0; Outputs menu. The source screen allows the user to configure the routing of the inputs to the outputs. Refer to section 9.0; Outputs menu. The Xover screens allow each edge of the crossover point to be adjusted, using the following parameters: Polarity, Phase, Low and Hi Filter shape, and Low and Hi crossover frequency. Refer to section 9.0; Outputs menu.
Default screen 6.0 Default Screen Program number Program name Output band curves Unsaved changes flag When the FDS-355 is powered up the Default Screen is shown. This gives a representation of the current state of the unit. If the unit has Lock Out mode ON, the Default screen will be replaced by the current start up logo, along with the current program name and number. The main area of the screen contains the three output band curves.
Utilities menu 7.0 Utilities Menu Selected utility Previous 3 utilities Selected utility parameter Pushing the UP key while viewing the default screen will move you into the Utilities menu. The UP and DOWN keys are used to move along the 'Utilities' path, and the parameter wheel is used to change the selected parameter. If confirmation of an action is required, the STORE key should be pressed. Screens are shown here with only the described utility for clarity.
Utilities menu Delay correction Temperature Delay units Limit units Lock out Allows a delay correction to be entered, to compensate for ambient temperature. With Delay Corrn set to 'Off', the default temperature is set to 20°C. Setting Delay Corrn to 'Manual' allows a user defined value to be entered, from -20°C to 50°C, in 1°C increments. If Delay Corrn is set to 'Midi', then the temperature value can be taken from a temperature probe connected to a 388.
Contrast Brightness Owner lock This allows you to change the contrast of the LCD display. This allows you to change the brightness of the LCD display. The Owner Lock screen allows the owner of the unit to program a system and then lock the unit against being reset. Individual OEM locked parameters cannot be unlocked with the Owner Lock, and the owner cannot view OEM locked parameters. To enter Owner lock, change the lock status from OFF to ACTIVE.
Utilities menu NOTE: You can select either band in order to adjust the crossover - the lower band or upper band - and either adjustment will move both band edges together, updating the data for the other band. EDGE When set to Edge mode, each band edge is adjustable independently. This allows the possibility to create band overlaps at the crossover point. Backup and Swap Defaults to 'Off'.
Inputs menu 8.0 Inputs Menu There are three inputs available for routing to outputs plus an internal mono sum of inputs A and B, referred to as A+B. This gives the Input Channels: A, B, A+B, and C. The facilities described in this section are common to all inputs, except EQ, which is not possible on the mono sum A+B signal. The first screen in the input menu is the DELAY SCREEN. Pressing the UP key will access the EQ screens.
Outputs menu 9.0 Outputs Menu To select any one of the 5 output bands, press the parameter wheel until the output is shown on the screen, and the EDIT led above the desired channel illuminates. Pushing and holding the encoder, then pressing a mute button, will take the display to the corresponding output channel. Name The first screen in the Output menu is the Name function.
Low shape This screen is used to select the filter type/shape for the lower band edge (high-pass) of the current output band. The band edge will be highlighted on the graphic on the screen.
Outputs menu Polarity Limiter The polarity invert function. Default is uninverted. Turning the parameter wheel clockwise will invert the polarity of the output. Turning anticlockwise will return the polarity to uninverted. The limiters can either be set to ON NORMAL, or ON FAST; the fast setting having a faster attack time. It is also possible to disable the protective limiters by turning the parameter wheel anticlockwise to toggle the display to OFF.
Delay The band delays are most often used to electronically align the driver voice coils with the other drivers in the system, so the sound sources are coherent in the physical plane. Each increment is only 11 microseconds, which translates in physical terms to a distance of 3.4mm, giving high accuracy in terms of alignment. If delay units are set to f.p.s., then the value can be adjusted in half frame increments.
EQ menu 10.0 EQ Screens Input being edited Current Parameter Frequency Current Parameter selection Cut/boost Unused EQs Cursor Stereo Width marker If the FDS-355 is configured for MONO, all EQ’s will be mono. If configured for 2x2+1 ("stereo"), EQ’s will be marked as Stereo 'S' when STEREO LINK is ON, and the stereo marker will show an 'S' next to the EQ number. Available spare EQ filters are also shown above the graphic area.
Frequency Turning the parameter wheel adjusts the EQ frequency. The filter position is shown graphically by the cursor, and the Frequency of EQs can range between 15Hz and 16kHz. Cut/Boost Turn the parameter wheel clockwise to add boost (+ gain) or anti-clockwise for cut (- gain). Cut/boost is available between +15dB and -15dB, in 0.2dB increments. Width Turning the parameter wheel clockwise widens the EQ (lower Q), anticlockwise makes the EQ narrower (higher Q). EQ Width is available between 0.
Store and Recall 11.0 Store and Recall Storing and Recalling a program can be done at any time using the STORE and RECALL keys on the left hand side of the LCD, unless Backup and Swap (see section 7.0; Backup and swap) has been turned on. The FDS-355 can hold 60 programs internally, and these can also be saved to a PC card (refer to section 16.0; PC Card). At any time, the Default values of the unit can be restored by recalling program 0, except when Owner Lock is turned ON.
giving you the option to turn off the lock if you wish to overwrite the existing program. STORE TYPE There are 3 ways in which data can be stored, and these are indicated by the STORE TYPE message at the top of the display. To highlight the Store type message, use the DOWN key while a program number is highlighted. Once highlighted, turn the parameter wheel to select the type of store you wish to use. INT This stores the program in the internal memory of the unit.
Headroom Management System (HMS) Phase Compensation 12.0 Headroom Management System Headroom Management System (H.M.S) is employed in the FDS-355 to make maximum use of the dynamic range of the devices inside the unit. In systems where limiter threshold levels are low, the output signal excursions are restricted, and thus make poor use of the available dynamic range.
Typical Applications 14.0 Typical Applications The FDS-355 has three inputs: A, B, C. An internal mono sum of inputs A & B is also available for routing to any of the outputs. Any combination of routing inputs to outputs is available, and the FDS-355 can be configured as a stereo or mono device. 14.1 Stereo 2-Way with a mono subbass. Systems can be run as simple stereo 2-Way, or with an additional sub-bass output (Mono).
Typical Applications 14.4 Mono 5-Way 36 In the mono mode, the FDS-355 can provide a full 5-way system. It can also function as a 4-way system fed from input A, with an independent sub-bass output fed from input C (or B). Two FDS-355s working in this mode can form a stereo 5-way system.
Quick Reference - How to ... 15.0 Quick Reference - How to ... 15.1 Use delays to Time align® drivers The best way to do this is to have a good idea of the physical positions of the voice coils of the drivers in the cabinet. If you do not know this, an estimate can be made, but it may take a while longer. Assume a 3-way box; with a 12” direct radiator, a 2” horn with a compression driver, and a 1” bullet.
Quick Reference - How to ... 15.5 Add EQ for Constant Directivity horns Constant Directivity horns often require additional equalisation in order to extend their frequency response. In most cases, this is a fairly simple EQ, requiring only a gentle slope (6dB per octave) high-pass shelving filter. To add CD EQ, select the band to be equalised by pushing the parameter wheel, and push the UP/DOWN keys until you reach a free EQ band refer to section 10.0; EQ screens.
PC Card 16.0 PC Card The PC Card socket on the front of the unit is designed to use memory cards of between 128kbyte and 2Mbyte storage capacity. Files are stored on the card in a ‘Pseudo-floppy’ format using standard DOS structures. See the box at the end of this section for compatibility information. 16.1 Card types The Smart Card interface requires 68pin compatible SRAM memory cards. Attribute memory is not required and is not used.
System Security 17.0 System Security Any changes made to an audio system have the potential to be damaging, even if only accidentally made. For this reason several different security systems are built in to the FDS-355 to protect the speakers. Each of the security levels locks different groups of variables away from accidental or malicious adjustment. 17.1 Program lock This is a flag that is available for each stored program.
the required parameters have been locked out, the STORE key should be pressed again - prompting for a user password to be entered. The action of pressing the STORE key a final time is to exit Owner Lock setup mode, leaving the Owner Locks in place, ready for the user. The owner can set more locked parameters by turning Owner Lock from active to off (utilities menu) using the user password, and then back to active (which requires the default password) to start setting owner locks. NOTE.
System Security For example, recalled OEM program 1 cannot immediately overwrite program 1, even if the same OEM password is used, and the message 'Program Locked' will appear. The OEM Lock must first be turned off, and then turned back on again (using the same password). Now if the program is stored over program 1, the STORE facility will allow the program to be overwritten. NOTE.
Troubleshooting 18.0 Troubleshooting Problem: Unit does not power up. Solution: Check power cable is inserted properly at back of unit. Check the fuse at the rear of the unit has not blown. Problem: No output. Solution: Ensure mutes are not active. Problem: All 3 Input LEDs light up at once. Solution: The unit is clipping internally. Reduce EQ or gain. Problem: A new program will not save over an existing program. Solution: Check that the existing program is not locked.
Warranty Info 19.0 Warranty Information When sold to an end user by BSS Audio or a BSS Audio Authorised Reseller, this unit is warranted by the seller to the purchaser against defects in workmanship and the materials used in its manufacture for a period of one year from the date of sale. Faults arising from misuse, unauthorised modifications or accidents are not covered under this warranty. No other warranty is expressed or implied.
Specifications 20.0 Specifications and Block Diagram Frequency Response <±0.25dB, 15Hz-20kHz with filters out Distortion (THD) <0.
Index Index A Applications 5-Way Zoning Distribution 35 Dual Bi-amp 35 Mono 5-Way 36 Stereo 2-Way with a mono sub-bass 35 B Backup band gain Block Diagram Brightness 24 28 45 23 C CD Horns adding EQ Clipboard Clipping input level internal Configuration Contents Contrast Cut/Boost EQ 38 24 12 13 18 3 23 31 D Default screen Default values restoring Delay correction input output Delay Link output Delete program Down Key 18, 20 21 18 22 25 29 28 24 12 E Edit LED Encoder EQ adding a new EQ Cut/Boost fre
Index MIDI connectors details dump setting channel number setting mode Mode LED Mono mode Mute key Mute LED 15 18 24 22 22 12 21 14 14 O OEM Lock Output band gain delay Delay (Link) delay link EQ Gain High Xover freq High Xover shape Limiter limiter limiter threshold Low Xover freq Low Xover shape name Phase polarity source Xover Output meter Output section Outputs 41 28 29 19 28 19 19 27 27 19 28 28 27 27 19, 26 27 28 19, 26 19 14 14 15 P Parameter wheel PC Card card types formatting slot Phase Compen
Index delete program Format PC Card Limit Units Lock Out menu MIDI channel MIDI dump MIDI mode OEM Lock Owner Lock Xover mode 24 24 22 22 18 22 24 22 23 23 23 V Voltage setting 9 W Warranty info Width EQ Wiring convention 44 31 15 X Xover adjust Output - High freq Output - High shape Output - Low freq Output - Low shape 48 23 27 27 27 27
User Notes 49
User Notes 50
User Notes 52