user guide *Y O U C BE AL MU FO LE ST R R SU W E Y DIS B IL P SC L O IN D UR LAY RIB FO IS D S E R PLA IVE ER TO M AT Y T RS VIC BT IO HI E 2 E ’s 01 N S 1 Diverse 2011 The Diverse 2011 is not compatible with the Diverse 1000 This equipment is not designed for making emergency telephony calls when the power fails. Alternative arrangements should be made for access to emergency services.
Check that your Diverse 2011 is complete. When you unpack you should have: • Diverse 2011 and base station • Battery pack (NiMH) • Handset belt clip • Battery compartment cover • Power adaptor • Telephone line cord • Caller Display user guide For your records Date of purchase: Place of purchase: Purchase price: For warranty purposes, proof of purchase is required, so please keep your receipt. Base Station PIN Number: Handset PIN Number: See page 25 for more information about your handset PIN.
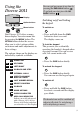
At a glance Display Belt clip Option buttons Menu Lets you select from the menu options on the display. Brings up the menu on the display. End Call (red) Phone Lets you end calls and cancel procedures. 1 4 PQRS For use with switchboards and BT Select Services. 7 a DEF JKL MNO TUV WXYZ 2 GHI Recall ABC 5 8 A ✱ RCL . 0 Used to make and answer calls. 3 6 9 # PWR Power For switching the handset ON and OFF. Battery compartment Power line cord Diverse 2011 Paging button . .
In this guide At a glance 1 Introduction 4 Setting up 4 Using the Diverse 2011 9 Changing the settings of your Diverse 2011 21 Additional Features 24 Registering a new Diverse 2011 with the base station 31 Switchboard compatibility 33 Maintenance 35 Help 35 Technical information 37 Index 39 Hints and tips boxes In this user guide, we have included helpful tips and important information shown in grey boxes.
Introduction Setting Up Please read the instructions carefully before use and retain this user guide for future reference. This guide covers the basic features of the Diverse 2011. Follow these steps to get your Diverse 2011 ready for use. As this product is rechargeable, it is normal that a certain amount of heat will be produced in its day to day operation. Whilst this is entirely safe, we would advise against placing the phone on antique, veneered or wooden surfaces as damage may occur.
WARNING cont. 7 There is a slight chance that your phone could be damaged by an electrical storm. We recommend that you unplug the base station from the mains during storms. 8 Do not use your phone in bathrooms, near fire or water, or in areas where there is a danger of explosion. 9 Clean the handset and base station with a damp (not wet) cloth or antistatic wipe. Never use a dry cloth as this may cause a static shock.
3 Connect the telephone line cord to the Diverse 2011 base station Ensure that this is fitted correctly into the right socket. .. ... ... ... ... ... ...... .. .. .. .. .. .. ... ... ... ... ... ... 5 Install the rechargeable batteries in the handset The handset uses the two AA size rechargeable batteries, which are supplied. You must only use approved batteries. To install them, insert the batteries as indicated on the label inside the battery compartment and slide the battery compartment cover shut.
7 Charge the handset batteries for at least 16 hours Battery display when inserting or replacing a battery When you replace the handset batteries with ones that have been fully charged, the battery indicator will not show full until the next charge cycle has been completed. Charge the handset until the batteries register full again. From then on the display will be correct. Place the handset on the base. The handset can be charged face up or down.
NiMH batteries (nickel-metal hydride) NiMH batteries take much longer to charge but their use can double handset talktime. When NiMH rechargeable batteries are used for the first time the charging display will not function correctly. The display will be correct only after charging the batteries, discharging and then recharging them again. Battery low warning An LCD on the handset display shows the current charging level.
Using the Diverse 2011 You can quit any menu at any time by pressing the END CALL button . To go back one step, press the GO BACK button . Display Option buttons Switching on/off and locking the keypad Menu button To switch on Pwr Your Diverse 2011 offers a menu driven display. You enter menu lists by pressing the MENU button. The OPTION buttons below the screen allow you to select options within each menu and make adjustments to their settings.
Making and receiving calls To make a call ➜ • Dial the number you want. Use the CLEAR CHARACTER button to correct any number you press by mistake. • Press the PHONE button. The number is dialled. Or • Press the PHONE button. You hear the dial tone. • Dial the number you want. To end a call Secrecy You can use the Diverse 2011 to place your caller on hold so that they cannot hear you talking. To obtain secrecy on an external call INT • Press INT.
To delete a redial number – - ➞➞ ▼ – –– REDI OK – • Press the REDIAL button. • Press the DOWN button to highlight the number you want. • Press the MORE OPTIONS button. • Press the DOWN button to highlight DELETE NUMBER • Press the OK button to confirm. Paging and making calls between handsets If you have multiple handsets registered with the base, the Diverse 2011 enables two handsets to talk to each other on an internal ‘intercom’ call, while a third handset can be on an external call.
To transfer an external call between handsets You are in conversation with an outside caller and want to transfer the call to another handset. INT • Press the INT option button. • Dial the extension number you want. • When the call in answered, press the END CALL button, or replace your handset on the base station. Using the Directory Your Diverse 2011 has a Directory which stores up to 100 names and numbers in the memory (the longer the name, the more memory will be used).
Entering names and numbers Delete There are three lines in your display for entering information. 1st line for the name (maximum 16 characters) 2nd and 3rd lines for the number (maximum 32 characters) Press the CLEAR CHARACTER button to delete the character to the left of the cursor. Hold down the button to keep deleting characters automatically. Upper and lower case Insert • Press the button to switch from lower to upper case for one character.
– - – – –– RED OK – You can do a quick delete by pressing the GO BACK button to show the options again, then highlight DELETE ENTRY and press the OK button. 14 – –– RED OK – • Press the DIRECTORY button. • Press the UP/DOWN buttons to scroll to the entry you want or find the required name by using the keypad to enter the first letter of the name. • Press the MORE OPTIONS button. • Press the DOWN button to highlight DELETE ENTRY • Press the OK button to confirm.
Using INSERT FUNCTION allows you to insert a pause. This is generally required when your Diverse base station is connected to a switchboard/PBX. Show Function Displays an explanation of any special character used in a stored number or short cut code (see Short Cuts, page 16) Check Duplicate This allows you to check whether or not the number you are entering has already been stored in the memory. The procedure is cancelled without saving the entry.
Call barring You can set your Diverse 2011 so that no outgoing calls can be made except 999, 112 and 9112 calls and any special ‘emergency numbers’ stored in the base station memory. See your base station user guide for details. Your handset PIN number acts as a security measure when locking the Diverse 2011. To change it, see page 25. The handset will still receive incoming calls. To switch on the handset lock ▼ ▼ N OK OFF REDI REDI • Press the MENU button.
WARNING Total units and unit check features are not applicable in the UK and can be deleted to conserved memory. Then • Press the END CALL button to return to standby or use the UP and DOWN options to perform another short cut operation. Pre-set short cut menu OK RED – –– – – ▲ - ▼ • Press the MENU button. • Use the UP or DOWN options to highlight SHORT CUT. • Press OK. If previous short cuts have been created, they are displayed, otherwise the display shows - - - - - - .
– - ▼ ▲ OK RED • Press the MORE OPTIONS button. • Use the UP or DOWN option to highlight INSERT FUNCTION. • Press OK to display a list of functions. • Use the UP or DOWN option to highlight the function you want. • Press OK. The screen displays the character representing the function you want. See the following function table chart for the meaning of each character. • Repeat the above five steps to add more functions.
Check or Request number (N) The short cut is interrupted and you can enter a number of your choice. When you have confirmed the number press the OK button the short cut continues processing. Request acknowledgement (Q) The short cut is interrupted to allow you to hear the dial tone, for example. When you have confirmed press the NEXT button the short cut continues processing.
To view, change or delete a short cut – ▲ - ▼ – OK –– RED – • Press the MENU button. • Use the UP or DOWN option to highlight SHORT CUT. • Press OK. • Use the UP or DOWN option to highlight the short cut you want. • Press the MORE OPTIONS button. From here you can view, edit or delete a Short Cut. Viewing. ▲ OK RED ➜ ▼ Either • Save the changes by using the UP or DOWN option to highlight SAVE ENTRY. • Press OK Or • Cancel by using the UP or DOWN option to highlight CANCEL. • Press OK.
Either • Press NO to return to the list of short cut names. Changing the settings of your Diverse 2011 Then To adjust the handset volume • Press YES to delete all entries. Or • Press the END CALL button to return to standby or press MORE OPTIONS to create new short cuts. You can set the handset volume to three different levels – low, medium and high. (Default setting low.) ▼ To check how much memory is available This gives you all available memory.
• Press the LEFT/RIGHT buttons to set the volume or tone required. The ringer or tone is played for you. • Press the OK button to confirm. To adjust the ringer volume in the base station There are seven levels: 0 = off, 6 = high. (Default setting is 6.) INT SET # a A ✱ JKL 5 . 0 ➞➞ • Press the INT button. • Press the SET button • Press the # button. • Press the ✱ button. • Press the 5 button. Display shows the volume level set. Ringer sounds a sample level.
Change PIN Lets you change the handset PIN number used to access a range of features. See page 25. To switch Auto Backlight or Auto Talk on and off Language A range of seven languages including English is available for the display on the handset. • Press the MENU button. • Press the DOWN button to highlight SETTINGS. • Press the OK button. • Press the DOWN button to highlight HANDSET SETTINGS. • Press the OK button. • Press the DOWN button to highlight AUTO BACKLIGHT or AUTO TALK. • Press the OK button.
The handset will have the following settings after initialisation: Additional features Ringer volume 6 Ringer tone 1 Handset volume 1 Range warning OFF In-range beep OFF Button beep ON Battery warning beep ON Confirm beep ON Error beep ON Auto talk ON Auto backlight ON Baby alarm volume Last number redial list 2 (deleted) Caller Display Caller Display lets you know who’s calling without lifting the handset.
System code As a digital phone system, your Diverse 2011 provides excellent security against others ‘listening in’ to your calls. You can also prevent unauthorised use of the handset(s). To do this you need to know the system code, which you can change if you wish. The default setting for the system code PIN is 0000. If you do not wish to change either, you can use this number for all code and PIN related functions.
• • • • • Press the OK button. Enter the new PIN. Press the OK button. Repeat the new PIN. Press the OK button to confirm. You can correct any mistakes when entering the PIN by using the LEFT/RIGHT and CLEAR CHARACTER buttons. Try not to forget your PIN number because expert technical help will be needed to release the phone. If you do forget your PIN, contact the Diverse Helpline on 08457 908070.
To set the number of rings on ring priority To add and remove handsets that respond to group ringing You can specify the number of rings your selected handset can have before an incoming call reverts to all available handsets. The default setting is for all registered handsets to be set to group ringing. INT SET # a 1 A ➞➞ ✱ MNO 6 2-9 • Press the INT button. • Press the SET button • Press the # button. • Press the 1 button. • Enter the system code (default = 0000). • Press the REDIAL button.
WARNING The Baby Alarm function on your Diverse 2011 is activated only by noises over a certain volume. As it does not provide continuous monitoring it should therefore only be used as a back-up to your existing baby monitoring system. ▼ OK RED < > • Press the MENU button. • Press the DOWN button to highlight SETTINGS. • Press the OK button. • Press the DOWN button to highlight HANDSET SETTINGS. • Press the OK button. • Press the DOWN button to highlight BABY ALARM LEVEL.
When the Baby Alarm is switched on, the handset will not ring. Incoming calls are displayed on the handset’s screen. Place the phone 1-2 metres away from the baby. Make sure they cannot get hold of the handset. All warning beeps should be switched off before using the Baby Alarm, see page 23. To change the language of the display You can have the display in English, French, German, Italian, Spanish, Portuguese or Dutch. The default setting is English. ▼ ▲ OK RED • Press the MENU button.
Operating with more than one base station Your Diverse 2011 can be used with up to 6 base stations. Each base station should have its own number, from 1-6 or a unique name. If you are registering a handset with more than one base station, we recommend that you: 1. Ensure that each base station has been assigned a different number or name. 2. Ensure that each handset, if possible, is given the same extension number at each base.
Registering a Diverse 2011 handset with a base station To register your handset with more than one base station or to re-register your handset You can also follow these steps if you want to register a handset to only one base station but do not want it to appear on the display as BASE 1. ...either at a Diverse 1010, 1015, 2010, 2011, 2015, 2020 Pocket or 2016 base station. Press and hold down the PAGING button at the base station until you hear the beeps (after about 10 seconds) ...
Alternatively, you can set it to log on to only one specific base station – this is Fixed Selection. – –– – – OK RED - ▼ • Press the MENU button. • Press the DOWN button to highlight SELECT BASE. • Press the OK button. • Press the DOWN button to highlight the base station you want. • Press the MORE OPTIONS button. • Press the DOWN button to highlight PRIORITY SELECT or FIXED SELECTION. • Press the OK button.
Switchboard compatibility Your Diverse 2011 can be connected to all compatible switchboards. For a list of suitable switchboards, phone Diverse Helpline on 0845 790 8070 or BT on 154. Entering external access codes for older switchboards. When you use your telephone on a switchboard you may need to program a delay after you have dialled the access code. This enables the switchboard to pick up an external line.
To set to Earth Recall with Tone dialling INT SET # 1 ➞➞ . 0 DEF 3 Setting the access pause MNO 6 • Press the INT button. • Press the SET button • Press the # button. • Press the 1 button. • Enter the system code (default = 0000). • Press the REDIAL button. • Press the buttons 0, 3, 6. • Press the SET button. To insert an access code The handset must be switched ON. INT SET # . 0 ➞➞ • Press the INT button. • Press the SET button • Press the # button. • Press the 0 button.
Maintenance Help General Simply clean the Diverse 2011 and base station with a damp cloth or an antistatic wipe. Never use a dry cloth as this may cause a static shock. Service Emergency Calls The emergency services can be contacted in the UK by dialling 999 or 112 which is valid in any country that is a member of the European community. Within the warranty period If you experience a problem with your Diverse 2011 you should contact the Diverse Helpline on 0845 790 8070.
Please note that the lifespan of rechargeable batteries depends on how heavily they are used. However, over time, their capacity to recharge will begin to diminish and they will eventually need replacing. Replacing handset batteries After a time, you may find that the handset batteries are running out of charge more quickly. This is a standard sign of wear and the batteries will need replacing. Use only AA size nickel cadmium or nickel-metal hydride rechargeable batteries in the handset.
The base station or handset does not ring The ringer volume may be set too low or, at the base station, switched off. To adjust the ringer volume at the base station, see the user guide for that base station. Handset beeps Are the handset batteries low? You will hear a beep periodically. If a base station name is flashing, you will hear four short beeps when you press the PHONE button. Check you are still in range of the base station.
Connecting to switchboards The Diverse 2011 is only approved for use with a base which is compatible with switchboards, including those which do not provide secondary proceed indication. If you would like a list of suitable switchboards, contact BT on 0800 800 154. If you do have a compatible switchboard, it cannot be guaranteed that the telephone will operate correctly under all possible conditions of connection. If you have any difficulties, contact BT as above or the Diverse Helpdesk 0845 790 8070.
Index Access code Access pause At a glance Additional features Base selection Base signal 34 34 1 24 31 31, 32 Base station Base station name Ringer tone Ringer volume 32 22 22 Batteries approved type charging installing low warning performance replacing Belt clip Building up a phone system 5 7 6 8 7, 35 36 6 4 Call allocation group ringing adding/removing handsets number of rings ring priority 26 26 27 27 26 Call barring lock on lock off 16 16 16 Caller display Connecting the power Connecting the
Maintenance Making and receiving calls Memory available On/Off Paging Pause PIN (Personal Identification Number) Range Redial delete a redial number 23, 25 37 10 11 Redial memor y copy a redial number 15 15 Registering with more than one base station 1010, 1015, 2010, 2015, 2-Line and ISDN Returning your handset Secrecy Setting up Service 31 35 10 4 35 Short cuts adding checking create a new short cut delete edit function table pre-set short cuts saving store using view 16 18 18 17 20 20 18 16 18 17
CE compliant to 89/336/EEC (EMC Directive) & 73/23/EEC (Low Voltage Directive) APPROVED for connection to telecommunication systems specified in the instructions for use subject to the conditions set out in them 609031 Offices in Europe, North America, Japan and Asia Pacific. The Telecommunications services described in this publication are subject to availability and may be modified from time to time.