BF900 multifunctional plain paper fax User guide
For your records Date of purchase: Place of purchase: Serial number (on base of unit): Purchase price: (Proof of purchase is required for warranty purposes, so please keep your receipt) Please open this page for an ‘at a glance’ guide to your BF900 multifunctional fax machine.
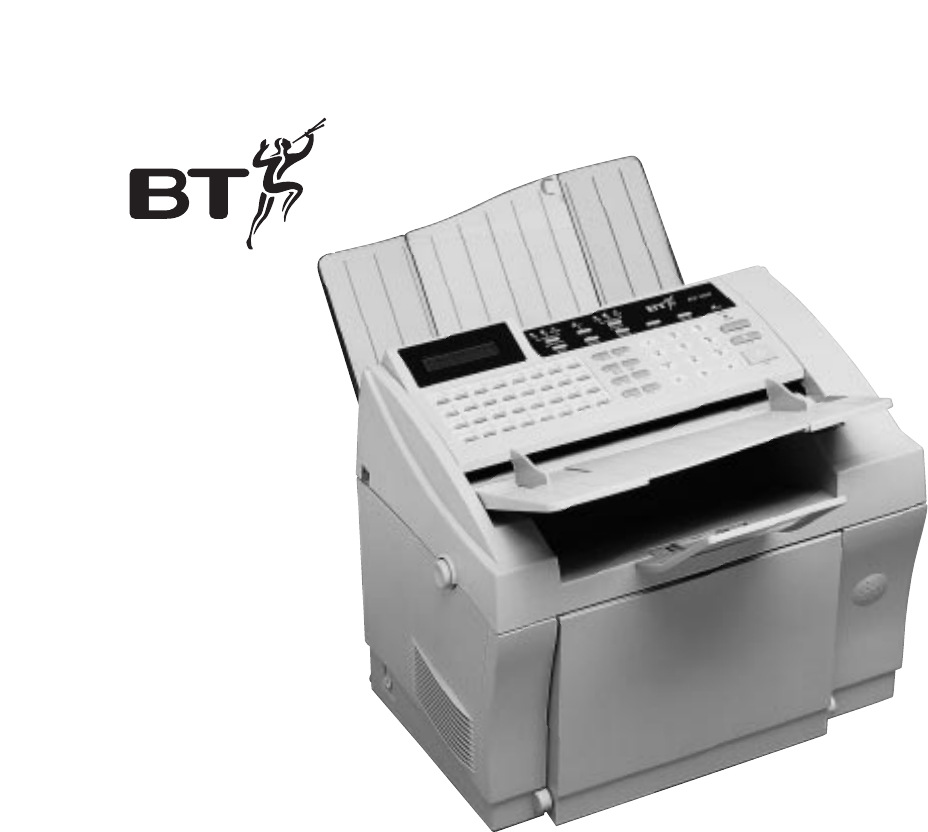
At a glance Control panels At a glance Resolution. Lets you adjust the resolution for documents you are scanning, printing and copying. Mode. Lets you set the machine to receive telephone or fax calls. Photo. Sets the ideal resolution if you are faxing photographs or shaded drawings. Journal. Displays confirmation report details of documents which have been sent, including the session number, telephone number or ID and whether the transaction was successful or not.
At a glance Document receive tray Receives the original document after it has been scanned, faxed or copied. Control panel Document feeder tray Place documents face down, ready for scanning, faxing or copying. Adjust the paper guides to fit the width of your document. Optional handset socket Not for use in the UK. Printed document tray Receives the newly printed document. Cover release button Press to open the cover for clearing document jams and installing the drum and toner cartridge.
In this guide In this guide At a glance 1 Introduction 5 Setting up 6 Using the BF900 15 Additional features 27 Connecting to a PC for printing, scanning and faxing 43 Connecting to a switchboard 44 Optional extras 45 Maintenance 47 Help 49 Technical specification 54 Technical information 56 Index 59 Hints, tips and important information In this user guide we’ve included helpful tips, useful notes and important information shown in grey boxes.
Introduction Introduction Your BF900 multifunctional, plain paper fax machine is designed for ease of use and made to the high standards set by BT. Thank you for choosing a BT product. Your BF900 is Millennium compliant and you can expect it to provide many years of quality service. Please read these instructions carefully before use and keep this user guide for future reference. Check that your BF900 is complete. When you unpack, you should have: • • • • BF900 fax machine. Toner cartridge (in box).
Setting up Setting up follow these steps to get your BF900 ready to use. When setting up refer to ‘At a glance’ on page 1 for location of sockets and buttons. Remove the adhesive strips securing the control panel and plain paper cassette. With the ‘L’ mark to the left and the ‘R’ mark to the right, line up the drum cartridge with the slots on the inside of your BF900, as indicated by the green labels inside the machine, and slide the whole cartridge down into place.
Setting up Hold the toner cartridge by its handle, ensuring the printed instructions on the cartridge unit are facing you, and line up the pins at each corner with the slots on the inside of your BF900. ( Push the toner cartridge down until it clicks into place. Lay the handle down flat. Close the cover, pushing it down until it clicks into place. 2 Install the Document Receive Tray Insert the two tabs into place on the back of your BF900.
Setting up 5 Plug in the telephone line cord 6 Plug in the mains power cable Connect to the right hand socket marked LINE on the side of the machine. Make sure the power switch on the side of the machine is set to O (OFF). Line cord Plug the other end of the telephone line cord into the telephone socket. Connect the mains lead to the back of the machine. Connect the 3-pin plug to the mains power.
Setting up Open the cover and pull out the extender. 8 Plug in a telephone If you wish, you can connect a telephone to the same line as your BF900. Connect the telephone cord to the line adaptor on your BF900 telephone line cord. The phone will work whether your BF900 is connected to the mains power or not. Cover Extender Load paper into the tray. Telephone line cord 9 Load the paper cassette tray Push the cassette tray to lower it flat. Adjust the extender to fit the paper length.
Setting up 10 Switch the power ON 11 Enter your telephone number You can have your fax or phone number, printed at the very top of each fax you send. The number can be up to 20 digits long. FUNCTION 9 ENTER 1 PAUSE\ REDIAL STOP The machine will beep and go into standby mode. The screen displays the date and time. If the incorrect date and time are shown, change them by following the steps shown in To change the date and time, p11. Remove the clear plastic protective film from the display.
Setting up 12 Enter your name 13 Setting the date and time You can have your name printed at the very top of each fax you send. The name can be up to 20 characters long. You can have the date and time, printed at the very top of each fax you send. The name can be up to 20 characters long. The time is set using the 24-hour clock. FUNCTION 9 ENTER 2 A FUNCTION STOP • Press the FUNCTION button. Display shows FUNCTION MODE 0~9,#,*,<,>.
Setting up 14 Setting the supplier telephone number This enables your BF900 to contact your fax supplier automatically to tell them to supply a new toner cartridge. FUNCTION 9 ENTER 4 PAUSE\ REDIAL STOP • Press the FUNCTION button. Display shows FUNCTION MODE 0~9,#,*,<,>. buttons) to display • Press 9 (or the PROG USER DATA 0-9,#,*,>, ENTER. • Press the ENTER button. Display shows PROG USER DATA 1-6, >, <,>. arrows) to display • Press 4 (or the SUPPLIER TEL. 1-6 ENTER. • Press the ENTER button.
Setting up 16 Setting user mailboxes You can set mailboxes for up to 9 individual users, ensuring their faxes remain private. Each mailbox user has a password which must be used in order to open the mailbox and print out the documents. You first allocate the mailboxes 1-9 and then set the 4 digit password of your choice. Then you can enter the mailbox holder’s name. FUNCTION 9 ENTER 6 1- 9 A STOP • Press the FUNCTION button. Display shows FUNCTION MODE 0~9,#,*,<,>.
Setting up Memory Your BF900 has 1Mb of memory to store received documents and documents for sending and polling. It also stores the GDI and PC-Fax printing files. Additional memory can be purchased to a maximum of 7mb, see Optional Extras, page 45.
Using the BF900 Using the BF900 Sending faxes To load documents for faxing. Load up to 30 pages at a time, face down, into the document feeder. The first page is automatically drawn a little way into the feeder. Display shows SELECT LOC/COPY.
Using the BF900 If you make a mistake when dialling, press the < button to move the cursor back to the digit you want to change. The selected digit f lashes. Enter the new digit. Press the > button to move the cursor forward. Alternatively, delete all the digits shown in the display by pressing the CLEAR/TONE button. On-hook dialling Please note The telephone must be connected to the line adaptor socket on the BF900 line cord. • Replace the handset. Your document starts to go through.
Using the BF900 Speed dialling To set up a batch dial You can store up to 100 numbers in the speed dial directory. (See page 23 on how to store speed dial numbers.) You can set the ONE-TOUCH buttons to send faxes automatically at a pre-set time every day. This can be useful if you want to send faxes at times when call charges are lower or if you are faxing abroad to coincide with the other person’s office hours. SPEED-DIAL FUNCTION • Load the document.
Using the BF900 To delete a batch dial To stop a document being scanned ENTER STOP • Follow the stops shown under ‘To set up a batch dial’ above and put in a START TIME of 00:00. • Press the ENTER button to confirm. • Remove any unscanned sheets from the document feeder tray. • Press the STOP button. To stop a document being sent During transmission: Delayed sending You can store a document in the memory and set a time for it to be sent later. FUNCTION 2 1 STOP 0 ENTER • Press the STOP button.
Using the BF900 Sending documents without scanning into the memory Receiving faxes If your BF900 does not have enough memory capacity and you are not ready to clear the memory, you can bypass it to send documents direct. If you have a telephone attached to your BF900, you can select whether you want to answer all calls manually or receive faxes automatically. FUNCTION 3 Automatic (FAX) mode ENTER STOP START • Load the document • Select the RESOLUTION, TYPE ORG and PHOTO settings if required.
Using the BF900 Session numbers Your BF900 gives a session number to each document which has been sent or received. This number is printed at the top of each page making it easy to keep track of each document. You can view the directory of documents on the screen or print out a list of documents. (See Reports and Lists, page 34.) Please note If your BF900 runs out of paper or toner, or is stopped by a paper jam, the received document will be stored in the memory.
Using the BF900 Copying Storing numbers You can make up to 99 laser quality copies of an original document. Using the one-touch buttons to enter names • STACK COPIES prints documents in page order, for example 111, 222, 333, 444, 555, • SORTER COPIES collates the document, for example; 12345, 12345, 12345. To copy a document Load up to 30 pages in the document feeder. COPY START • Place the document to be copied face down. The first page is drawn a little way into the machine.
Using the BF900 To store a One-Touch name and number FUNCTION 7 ENTER 1 0 • Press the FUNCTION button. Display shows FUNCTION MODE 0~9,#,*,<,>. buttons) to display • Press 7 (or the PROGRAM TEL. NO 0~9,#,*,>, ENTER. • Press the ENTER button. Display shows PROGRAM TEL NO. 1-5, <,>. arrows) to display • Press 1 (or the ONE-TOUCH DIAL 1-5, >, ENTER. • Press the ENTER button. Display shows ONE-TOUCH DIAL, PRESS OT KEY. • Press the One-Touch button you want. Display shows the button number, e.g.
Using the BF900 To add mailbox number: 1 You can store up to 100 fax numbers which can be dialled by pressing just 3 buttons. ENTER STOP • If you want to add a mailbox number, press 1. Display shows MAILBOX NO=PRESS ENTER. • Use the keypad to enter the mailbox number. • Press the ENTER button. Display shows ONE-TOUCH DIAL, PRESS OT KEY. If you want to add another one-touch number, press the ONE-TOUCH button you want and repeat the steps above.
Using the BF900 To store numbers under a Group Dial button To add a name: 1 ENTER 0 STOP • Press 1. Display shows NAME=A~Z, (UP ARROW), *, ENTER. • Use the alphabet letters on the one-touch numbers to add a name. • Press the ENTER button. Display shows DATA ENTRY OK followed by NETWORK ADDRESS 0=(NO) 1=(YES). You can set 8 of the One-Touch buttons as Group Dial buttons. These are buttons 25-32. Each one can hold up to 40 fax numbers.
Using the BF900 • Press the ENTER button again after you have entered your last number in the Group. Display shows NAME 0=(NO) 1=(YES). • Either press 0 to display GROUP DIAL PRESS 0T 25-32. You can select another Group Dial button. • Or press 1 to set a name for the Group Dial button. Display shows – A-Z, *, (UP ARROW), ENTER. • Use the keypad to enter a name, e.g. Group 1. The name can be up to 10 characters long. • Press the ENTER button to confirm the name. Display returns to GROUP DIAL PRESS OT 25-32.
Using the BF900 If no number is stored under the One-Touch button you have pressed, the display will show BATCH TX NOT REGISTER. • Press 4 (or the • • • • • • arrows) to display BATCH TX 1-5, >, ENTER. Press the ENTER button. Display shows BATCH TX PRESS OT KEY. Press the ONE-TOUCH button that you want. Display shows *01=1234 PRESS ENTER. Press the ENTER button. Display shows START TIME=00:00 (or a previously set batch time) PRESS ENTER.
Additional features Additional features Setting Resolution, Photo and Type Org. (contrast) TYPE ORG (or contrast) You can choose different resolution and contrast settings to ensure the best quality when faxing or copying a document. The setting you choose is shown by an indicator light.
Additional features To set up a broadcast FUNCTION ENTER START • Load the document. • Select the RESOLUTION, TYPE ORG and PHOTO settings if required. • Press the FUNCTION button. Display shows FUNCTION MODE 0~9,#,*,<,>. buttons) to display • Press 1 (or the BROADCASTING 0~9,#,*,>, ENTER. • Press the ENTER button. Display shows BROADCASTING SELECT LOC/ENTER. • Enter the number – you can use the keypad, One-Touch button, Group Dial button or Speed Dial code. Display shows TEL=(NO.) PRESS ENTER.
Additional features To set up a relay A FUNCTION ENTER STOP • Press the FUNCTION button. Display shows FUNCTION MODE 0~9,#,*,<,>. buttons) to display • Press 7 (or the PROGRAM TEL. NO 0~9,#,*,>, ENTER. • Press the ENTER button. Display shows PROGRAM TEL NO. 1-5, <,>. arrows) to display • Press 5 (or the RELAY INITIATE 1-5 > ENTER. • Press the ENTER button. Display shows RELAY INITIATE PRESS OT KEY. • Press the ONE-TOUCH button that you want to be relayed. Display shows *01=1234 PRESS ENTER.
Additional features • The fax number is dialled. Display shows CALLING. When the call is answered, the display shows FAX CONNECTION. TRANSMITTING. • While the fax is being transmitted, the display alternates between the number of pages being sent and the fax number you have dialled. • After the last page has been completed, display shows TX=OK.
Additional features To delete a bulletin board document FUNCTION 5 ENTER 0 CLEAR/ TONE STOP • Press the FUNCTION button. buttons) to display • Press 5 (or the BULLETIN BOARD 0~9,#,*,>, ENTER. • Press the ENTER button. Display shows ADD DOC.=1 CLEAR DOC.=0. • Press 0 to delete a document. Display shows xxx=YYY >, CLEAR, STOP. • Press the buttons to scroll through the bulletin board ID list and display the one you want to delete • Press the CLEAR button. • Press the ENTER button to confirm deletion.
Additional features Set the time Don’t set the time Setting time means your BF900 will poll at a set time each day. Your BF900 will begin polling as soon as you have finished these steps. ENTER • Enter the time you want your machine to begin polling • Press the ENTER button. Display shows REPEAT POLLING 0=NO 1=YES. If you choose NO: Your BF900 will poll once at the set time.
Additional features Security features To save incoming documents into the memory. To set/change Dept ID’s, mailbox passwords and passwords to access documents saved in the memory. You can set your BF900 to save received faxes in the memory and protect them with a 4-digit password. To print, you must enter the correct password. You can change mailbox passwords and Department ID’s which have already been set by following the special procedures shown here.
Additional features To print documents received to memory FUNCTION # ENTER 2 • Press the FUNCTION button. Display shows FUNCTION MODE 0~9,#,*,<,>. buttons) to display • Press # (or the OTHER OPTIONS 0~9,#,*,<,> ENTER. • Press the ENTER button. Display shows OTHER OPTIONS 1~7 < >, ENTER. buttons) to display • Press 2 (or the PRINT TO MEMORY, 1~7, >, ENTER. • Press the ENTER button. Display shows PASSWORD=PRESS ENTER. • Enter your 4 digit password. • Press the ENTER button.
Additional features Reports available on request To print a report or list Using the Function menu, you can print out the following: FUNCTION 6 ENTER START Activity Report A list of the last 40 documents to be sent and received. One Touch List Shows all the information held under each One-Touch button, including: Telephone number, Name, Batch time, Relay Initiate List Number and Relay Report Number. Group Dial List 35 Lists the numbers and names stored under each Group Dial button.
Additional features Activity report guide Your guide to the details shown on an activity report. TYPE DEPT SESS DATE/TIME DURATION REMOTE ID SPEED PAGE RESULT (a) (b) (c) (d) (e) (f) (g) (h) (I) a) TYPE Meaning MEMORY TX Document sent from memory. DIRECT TX Document sent without scanning into memory. MANUAL TX Document sent from number entered via the keypad. GROUP TX b) DEPT.
Additional features g) SPEED This is the speed of transmission, either: 14 = 14,400bps 12 = 12,000bps 96 = 9600bps 72 = 7200bps 48 = 4800bps 24 = 2400bps h) PAGES Total number of pages successfully sent or received for each session. i) RESULT This will be one of the following: 37 OK Successful. NG Transmission was not completed properly. NO ANSWER Dialling did not work. MEM. FULL Memory became full during reception. JAM Document jam in the Automatic Document Feeder.
Additional features Setting user preferences You can change a number of original settings to suit your preferences. These are: Name Original setting Alternatives Activity Report ON ON/OFF Activity reports are printed automatically after every 40 transactions. Error Report ON ON/OFF Error reports are printed automatically after any failure in sending or reception. TX Confirmation Report OFF ON/OFF Enables a report confirming the status of each document sent.
Additional features Name Toner Low Report Reduction Type Original setting OFF AUTO Alternatives ON/OFF Prints warnings when the toner needs replacing. Auto Reduction 70%~100% The BF900 automatically reduces incoming faxes down to 70% of the original if necessary, to fit on the paper. No Reduction Your BF900 does not reduce the size of incoming faxes. If the image length exceeds the paper length it will print onto a second page.
Additional features To change the user preference settings FUNCTION 8 Fonts ENTER • Press the FUNCTION button. Display shows FUNCTION MODE 0~9,#,*,<,>. buttons) to display • Press 8 (or the PROG USER SWITCH 0~9,#,*,>, ENTER. • Press the ENTER button. Display shows PROG USER SWITCH 0~9,#,*,<, >. You can now select the setting you want to change 0 -9 * # Printer preferences ENTER JOURNAL S • Press 1 to display ACTIVITY REPORT. Or Press 2 for ERROR REPORT. Press 3 for TX CONFIRMATION REPORT.
Additional features Installing other fonts If you choose OFF You can download fonts that are compatible with the Hewlett Packard PCL4. ENTER To set automatic paper cassette selection If you have the additional paper cassette attached, you can set your BF900 to switch automatically between the two cassettes to suit different paper sizes loaded in each cassette. You can load A4, Letter and Legal Size. FUNCTION 0 ENTER 1 • Press the FUNCTION button. Display shows FUNCTION MODE 0~9,#,*,<,>.
Additional features To set the number of copies To set the number of lines per page You can set your BF900 to print out between 1-99 copies of each document as standard. You can set the number of lines printed on each page from 1-127. The original setting is 64 lines. FUNCTION 0 ENTER 2 • Press the FUNCTION button. Display shows FUNCTION MODE 0~9,#,*,<,>. buttons) to display • Press 0 (or the SET PRINTER 0~9,#,*,<,> ENTER. • Press the ENTER button. Display shows SET PRINTER 1-6 <.
Connecting to a PC for printing, scanning and faxing Connecting to a PC for printing, scanning and faxing Software and cables are required. See page 46 for details. Printing Your BF900 can act as a 300dpi laser printer for your PC. Printer upgrade You can upgrade your BF900 printer from 300 dpi to 600dpi with additional printer memory. This is available as an optional extra, (see page 45) or call the BT Helpline number on your BF900.
Connecting to a switchboard Connecting to a switchboard If you want to connect your BF900 to a switchboard, (also known as a PBX), you can take advantage of its PBX mode. You can also follow these steps to switch back to PSTN for connection to the normal public network. FUNCTION * ENTER 2 JOURNAL • Press the FUNCTION button. Display shows FUNCTION MODE 0~9,#,*,<,>. buttons) to display • Press ✱ (or the DIAL OPTIONS 0~9,#,*,<,> ENTER. • Press the ENTER button. Display shows DIAL OPTIONS 0~9 <,>.
Optional extras Optional extras Printer memory You can add 2Mb, 4Mb and 6Mb to the standard 1Mb of memory your BF900 printer has. If you want 600dpi print quality, we recommend you add 6Mb of extra memory. DEFAULT PRINTER FUNCTION Memory of Machine Fax Memory Printer Memory PCL4/600 dpi flag GDI 300 dpi PCL4 A4 PCL4 Legal GDI 600 dpi A4 GDI 600 dip LG STD 1M 1M 0.5 M off Y no no no no Add. 2m 1.5 M 1.5 M on Y Y Y N.R. N.R. Add. 4M 3.0 M 2.0 M on Y Y Y Y N.R. Add.
Optional extras Additional plain paper cassette Holds up to 250 additional pages of plain paper. PC connection kit This includes your PC Connection Cable and software and is required for printing, scanning and faxing from/to your PC. Additional memory is also required, please see p45 for more details. Modem upgrade to 33.6kps To order this upgrade, please contact the Helpline number. To order any optional extras, please call the number shown on your BF900.
Maintenance Maintenance Cleaning the outside • Gently wipe the glass of the scanner. Use a soft damp cloth to wipe the outside of your BF900. Warning Always turn the mains power off before opening the front cover Cleaning the document feeder and scanner Use a soft damp cloth. You can add a little mild soap or detergent if necessary. • Lift open the control panel. Cleaning the fax interior Use a soft DRY cloth for cleaning the fax interior. Warning Parts inside the fax machine can get very hot.
Maintenance • Remove the toner cartridge and the drum cartridge. • Close the cover. • Turn the Transport Roller cog and wipe the Transport Roller clean of dirt and dust. • Replace the drum cartridge then the toner cartridge.
Help Help If you have any problems using your BF900, this section gives you the most common solutions. • Remove the empty toner cartridge. To replace the toner cartridge You can buy replacement toner cartridges from all BT Shops, main electrical retailers and good stationers. You can also obtain replacement cartridges by phoning the number shown on your BF900. Your machine is supplied with a Starter Toner Cartridge.
Help • Remove the jammed paper. Paper jammed in the Printed Document Tray • Remove the paper by pulling it outward as shown. • Close the cover. To clear a paper jam Display shows PAPER JAM. Warning Parts inside the fax machine can get very hot. Be careful not to touch the fusing section inside the top cover. Paper jammed in the Paper Cassette Tray • Remove the paper by pulling it outward as shown. Paper jammed inside the machine: • Press the cover release button and open the front cover.
Help 51 Paper jammed in the middle of the paper path • Open the front cover. You will be able to see the leading edge of the page. Hold the edge of the page and pull it gently towards the back of the machine as shown Paper jammed in Additional Paper Cassette • Lift up the standard Paper Cassette • Press the Paper Lifting Plate of the Additional Cassette together with the loaded paper down into the locked position.
Help Display is blank Make sure the mains power cord is plugged in properly. Check the power has been switched on at the mains and at the machine. Check your mains power socket is working by plugging in another appliance. Incoming faxes are not printed Try copying a page to check that the printer is working. No dialling tone can be heard on an attached telephone Check that the line cord is plugged in to the telephone wall socket.
Help Pages come out wrinkled, frequent jams or the machine picks up two pages at once Check that you are using the correct size of paper. Check that your paper is not already creased. The alarm light stays ON and the display shows CHECK PAPER and PRESS START Load more paper and press the START button. If this does not work, check that the cassette tray is installed properly. Display shows TONER LOW Replace the toner cartridge.
Technical specification Technical specification General Type: Compatibility: Applicable: Dual access: Communication Modem speed: Coding Scheme: Error Correction Mode (ECM): Polling: Memory Capacity: Option Memory: Dialling Method One-Touch Dialling: Speed Dial: Group Dial: Full Dial: On Hook Dial: Desktop. ITU-T (former CCITT) G3. Public Switched Telephone Network (PSTN). Multitasking. 14400, 12000, 9600, 7200, 4800, 2400 Auto step down. MH, MR, MMR. Yes. Up to 180 locations for one session.
Technical specification Document input Scanning method: Resolution: ADF pages: Document thickness: Scanning speed: Error diffusion: CIS. Standard – 8 (dot/mm, Hori.) x 3.85 (line/mm, vert.). Fine & ~Photo – 8 (dot/mm, Hori.) x 7.7 (line/mm, vert.). Extra Fine – 8 (dot/mm, Hori.) x 15.4 (line/mm, vert.). 30 sheets (A4, 80 gsm). Single sheet: 0.05mm to 0.13mm (45 gsm to 100 gsm). Multi sheet: 0.06mm to 0.1mm (52 gsm to 80 gsm). 6 secs/A4. Yes.
Technical information Technical information Choosing a location Your BF900 should be kept clear of dust, moisture, high temperature and vibration and should not be exposed to direct sunlight. Don’t install it close to radiators or air conditioning outlets or in excessively warm, humid or dusty places. Warning The apparatus is only designed to be operated in a normal office or domestic environment where the relative humidity does not exceed 60%. It should not be used in bathrooms or near water.
Technical information You may connect it – • To direct exchange lines. • To extensions with new plug and socket arrangements provided with these direct exchange lines. • To compatible switchboards. BF900 has a REN of 1. Any telephone provided by BT may be assumed to have a REN of 1 unless otherwise stated on the base. Even where the number of telephones has been limited, there is no guarantee that the different types of telephone on the same line will ring. You may NOT connect it To shared (party) lines.
Technical information Connecting to switchboards Your BF900 is approved only for use with a compatible switchboard including those which do not provide secondary proceed indication. If you do have a compatible switchboard, it cannot be guaranteed that the BF900 will operate correctly under all possible conditions of connection. If you have any difficulties, contact BT on Freefone 0800 800 152 for business Customers or Freefone 0800 800 150 for residential customers (9am to 5pm Monday to Friday).
Index Index *01 #001 Approvals Batch dialling Broadcasting Bulletin Board Cleaning Clear/Tone Copying Cover release Date Delayed send Department ID DEPT.
Index Number, supplier your fax your telephone On-Line indicator On/Off One-touch buttons Opening cover Optional extras P Page, lines per PAGES Paper jams Paper cassette additional select Parallel port Passwords Pause Pause/Redial button PC connection faxing from PC PC fonts Photo.
Index Storing numbers one-touch Storms Supplier number Switchboard Tel/Dir button Telephone attached phone calls Telephone line Telephone line cord Time Tone/Pulse Toner cartridge Trays feeder manual feed paper cassette printed document receive TX Type org.
Offices in Europe, North America, Japan and Asia Pacific. The Telecommunications products and services described in this publication are subject to availability and may be modified from time to time. Services and equipment are provided subject to British Telecommunications plc’s respective standard conditions of contract. Nothing in this publication forms any part of any contract. TouchtoneTM is a registered trade mark of British Telecommunications plc in the UK. © British Telecommunications plc 1999.