BT On-Air DECTf@x Plus F@x machine and digital telephone system User guide This equipment is not designed for making emergency telephone calls when the power fails. Alternative arrangements should be made for access to emergency services. This product is intended for connection to analogue public switched telephone networks and private switchboards in the United Kingdom.
This equipment is not designed for making telephone calls when the power fails. Alternative arrangements should be made for access to emergency services.
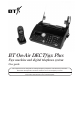
At a glance EXT EXT Redial -11 Intercom -11 INT INT Redial Recall Handset functions Intercom Recall Handset display icons Battery. Shows the status of the handset battery. Up/Down. Lets you move through the options and lists. Silent mode. Displayed when the handset ringer has been switched off. Clear. In Use. Shows that the handset is in use. OK button. To confirm settings. In Range. Indicates that you are in range of the base station. Redphone. To end a call and turn the power off.
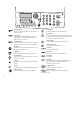
BT On-Air DECTf@x Plus AB G P ) ‘ ] [ = “ ! $ < ; \ > ? & } { , : % ~ . TU 7 8 ✱ 0 6 W XYZ ( _ V - RS Q + M NO 5 L HI JK 4 DE 3 F 2 C 1 9 / @ Ctrl @ Resolution button Redial button Adjusts the resolution at which your DECTfax Plus sends documents. Automatic redial of the last number dialled.
5
In this guide At a glance Introduction Setting up Using your fax machine Using your handset Using the answering machine Using Internet functions Using mailboxes Using additional handsets Additional features Help Technical information Technical specification Index 3 7 8 15 28 34 39 53 56 60 66 71 72 73 Hints and tips boxes In this user guide, we’ve included helpful tips and useful notes. These are shown in grey boxes.
Introduction Thank you for choosing a BT product. We expect that you will have many years of excellent service from it. Your BT On-Air DECTf@x Plus machine is designed for ease of use and built to the high standards demanded by BT. Equipment Check your BT On-Air DECTf@x Plus is complete when you unpack it. You should have: • BT On-Air DECTf@x Plus machine with print ribbon* installed • Power cable Please read these instructions carefully before use and retain this user guide for future reference.
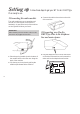
Setting up Follow these steps to get your BT On-Air DECTf@x Plus ready to use 1 Connecting the radio module 3 Connect the cable to the socket on the side of the machine. The radio module acts as a transmitter and receiver for radio signals to and from the handset(s). It goes at the back of the machine on the right-hand side as you face it. IMPORTANT Before installing the radio module, make sure the machine is not plugged into the mains.
Setting up 2 Turn your machine upside down. Connect the power supply cable (1) to the socket (2). Insert the power supply cord (3) to the guide groove (4). Turn your machine back over. Connect the mains plug to a wall socket. 3 When the mains power is switched on the display shows CHECK DATE to prompt you to set the correct date and time. ‘Setting the date and time’ on page 13 shows you how to do this.
Setting up Install the battery in the handset and charge them for at least 16 hours. WARNING Under no circumstances should non-rechargeable batteries be used. Only use the approved batteries. Using unapproved batteries will invalidate your warranty and may damage the telephone. Fully discharging the batteries at least once a week will help them to last as long as possible.
Setting up To print out a list of all the functions of the OnAir DECTf@x Plus, which allows you to see them at a glance, along with the function codes to carry them out, see ‘Printing out the functions list’ on page 45. There are a number of buttons which are used to access the functions of your On-Air DECTf@x Plus: Button What it’s used for Date and time It is important that your On-Air DECTf@x Plus is always set to the correct date and time.
Setting up Entering your own telephone/fax number Connecting to a switchboard Your telephone/fax number can be printed at the top of each fax you send and displayed by the machine you are calling. Your BT On-Air DECTf@x Plus has been preset to work on a direct exchange line (PSTN). You will not normally need to alter this setting unless you will be connecting the machine to a switchboard, or PABX. You may also need to change the setting if you are connected to a BT Home Highway line.
Setting up 2 Press OK/Menu, the display shows WITHOUT 2 Use the keypad to enter the number you 3 Move the cursor to WITH and press OK/Menu 3 Press OK/Menu to confirm the entry. and WITH. require (2-9). to confirm the entry. The display shows ENTER PREFIX. 4 Enter the required prefix and press OK/Menu You will hear the current ringing tone and the display will show the current setting. AB DE 3 F 2 C to confirm the entry. The display shows NUMBER LENGTH.
Setting up 6 Setting the receive mode You can set your On-Air DECTf@x Plus to answer calls automatically or manually. There are two auto answer modes, to allow you to receive just telephone calls and faxes or telephone calls, faxes and voice messages. To set the receive mode • Press the Tel Fax Tad button to switch After answering, if fax tones are not detected, the base station and your handset(s) will ring.
Using your fax machine Using your fax machine Sending a fax WARNING Do not put paper into the machine if: - it has paper clips, staples or any metal attachment - it is wet with ink, paste or correcting fluid - it is too thick or too thin and flimsy - it has sellotape or other paper stuck on it 2 Place the document(s) face down into the document feeder and adjust the left-hand guide (a) to the width of the paper if necessary. The display will show READY when the documents are correctly placed.
Using your fax machine 4 Press Start. The display shows MEM PG 1, then CALLED NUMBER and begins to send the document. If the number dialled is engaged, your On-Air DECTf@x Plus will automatically redial the number, after a few minutes. You can redial the number yourself by pressing the Start button. Resolution You can adjust the resolution at which your OnAir DECTf@x Plus sends documents.
Using your fax machine Delayed send and broadcasting This allows you to send a fax automatically at a preset time, within the next 24 hours. It also allows you to send a fax to up to 10 different numbers. To use delayed send and broadcasting 1 Enter the number that you want to send to. 2 If you want to send to more than one number press the © button. The display shows CALLED PARTY 2. You can enter up to ten numbers using the © button to go to the next entry.
Using your fax machine WITHOUT PAGE This will be printed as a message on the header page and can be up to 800 characters. The document is sent without a header sheet. Press OK/Menu to confirm your selection. 8 If you selected MEMORY or PAPER FEEDER, the display will now show NB PAGES. 9 Enter the number of pages you will be inserting into the document feeder and press OK/Menu to confirm. The display will now show INSERT DOCUMENT.
Using your fax machine 2 Press OK/Menu. The display shows two options: Normal • Make sure you have paper in the sheet feeder. Press the Fax button. The stored faxes will print out. YES NO Incoming faxes are stored in the memory, even if there is paper in the sheet feeder. This is the default setting. Incoming faxes are printed as they are received. If there is no paper in the sheet feeder, the faxes are stored in the memory. 3 Use the ¶ and Ä buttons to select NO. Press OK/Menu to confirm the change.
Using your fax machine If you have created any mailboxes, before printing you will be asked to enter a mailbox number. 4 Enter the mailbox number you want to print from, or enter 0 to print from the main memory. 5 Press OK/Menu to confirm the setting and the stored faxes are printed in reduced size. To store a number in the directory 1 Press OK/Menu then 1 then 1. The display shows 11 ADD NAME. 1 1 2 Press OK/Menu. The displays shows NAME. Enter the recipient’s name using the alphabetic keypad.
Using your fax machine 6 Use the ¶ or Ä buttons to select WITH MEMO if you wish to record a message. Select WITHOUT MEMO if you don’t. 7 Press OK/Menu. If you have selected WITH MEMO, the display will say PLEASE OFF HOOK. At this point you must press the green phone button on your handset and record the message (up to 5 seconds long). Once the Message has been recorded it will be played back to you and then the display will return to the ADD NAME option.
Using your fax machine 2 Press OK/Menu. The display shows MODIFY and the first name in the directory. Use the to scroll through the entries until you reach the name you want to alter. Press OK/Menu to select the name, then use the § button to delete letters. ¶ and Ä buttons 3 Press OK/Menu. The display shows the number that was entered with that name, which you can also modify. 4 Press OK/Menu. The display shows the e-mail adress that was entered with that name, which you can also modify.
Using your fax machine • If you choose WITHOUT MEMO, the display MODIFY (you can’t set the ring tone because unit does not ring to fax calls). 9 Press OK/Menu to mofify another entry or press Stop to return to stanby. or To delete an entry in the directory 1 To delete an entry press OK/Menu then 1, then 4. The display shows 14 CANCEL. G 1 HI now shows PHONE CALL and FAX CALL (if there was a voice message associated with the record, it is deleted).
Using your fax machine Send reports Activity Reports You can set your On-Air DECTf@x Plus to print out a report of your fax transmissions. There are three settings: The On-Air DECTf@x Plus will record details of the last 30 fax transactions. ALWAYS a report is printed after every fax OFF no report will be printed (this is the default setting). ERROR ONLY a report will only be printed to record a failed transmission To change the send report setting 1 Press OK/Menu then 2 then 8.
Using your fax machine MULTI POLLING The document can be polled indefinitely until deleted from the memory (see ‘To cancel a timed job’ on page 26). 5 Use the ¶ and Ä buttons to scroll through the options and press OK/Menu to select the If you choose TYPE MESSAGE you can type in the text of your fax, up to 80 characters, using the alpha keypad and dialling keypad for numbers. 8 The display shows NB PAGES. Enter the number of pages to be transmitted. 9 Press Start. The display shows DOC TO BE POLLED.
Using your fax machine 5 To set your machine to poll at a specified time, press OK/Menu, enter the polling time and press OK/Menu to confirm the entry. To cancel a timed job 1 Press OK/Menu then 8 then 4 then 3. The display shows 843 CANCEL JOB. G 4 DE 3 F V The display will show the time and fax number of the next job to be sent. HI TU 8 2 Press OK/Menu.
Using your fax machine To start a timed job immediately 1 Press OK/Menu then 8 then 4 then 1. The display shows 841 START JOB. be modified. G V HI TU 8 3 Use the ¶ and Ä buttons to scroll through the jobs. Press OK/Menu to select the job to 4 1 2 Press OK/Menu to bring up the list of timed jobs. 3 Use the ¶ and Ä buttons to scroll through the jobs. 4 Make the changes as necessary and press the OK/Menu button to confirm the changes.
Using your handset IMPORTANT In order to use your On-Air DECTf@x Plus handset the radio module must be connected to the base unit and the base unit must be connected to both the telephone line and power socket (see steps 1 & 2 of ‘Setting up’ on pages 8 and 9). IMPORTANT The new handset may not be charged. It takes up to 16 hours to charge completely. Switching the handset on and off Your handset must be switched on before you can use it to make or receive calls.
Using your handset 4 To end the call, press the red button. You can dial the number before pressing the green button: 1 Dial the number you want to call. Use the C button to delete numbers to make sure you don’t dial a wrong number. 2 Press the green button. The number entered is dialled after a few seconds. To receive a call 1 When your handset rings press the green button.
Using your handset 3 Press OK to confirm your choice. The handset beeps. Earpiece volume To adjust the volume in the earpiece 1 During a phone conversation, press ▲ to increase the volume and ▼ to decrease it. Secrecy While making a call you can stop the other person hearing you talk to someone in the same room as you. 1 During a call, press C on the handset. You can now talk without the other caller hearing you.
Using your handset To adjust the ring volume Your On-Air DECTf@x Plus handset has four ring volume settings. 1 Press OK then 2. 2 Use the ▲ and the ▼ buttons to choose the volume setting you want. To store a number 1 Press the ▲ or the ▼ button. The display shows MEM. 2 Enter the two-digit number under which you want to store the phone number, for example 00, then press OK. eg 3 Press OK to confirm your choice. To switch off the ring tone 1 Press OK then 1.
Using your handset To change a stored number 1 Press the ▲ or the ▼ button. 2 Use the ▲ and ▼ buttons to scroll through the telephone numbers until you see the one you want. 2 Enter the two-digit memory number or scroll through the stored numbers until you reach the phone number you require. 3 Press OK when you have the number displayed then use C to delete the number. 4 Enter the new phone number. 5 Press OK again to confirm the change.
Using your handset 2 Use the ▲ and ▼ buttons to scroll through the telephone numbers until you see the one you want. (Names will not be displayed at the handset). Call timer After you have finished a call you can check the length of the call. To check the duration of a call 1 When you have finished a call, press the C 3 Press the green button and the number will dial automatically. Keypad tones The handset is preset to have no keypad tones. You can switch on and adjust the volume of the tones.
Using the answering machine Answer mode Your On-Air DECTf@x Plus also operates as an answering machine. The answering machine has two basic modes: Answer and record The answering machine plays your outgoing message and then callers can leave a message or send a fax. Answer only The answering machine plays your outgoing message then switches to fax receive mode. Callers can send a fax but not leave a voice message. Your On-Air DECTf@x Plus is preset to Answer and record mode.
Using the answering machine To record an outgoing message for Answer and record mode 1 At the base station - Press OK/Menu then 4 then 1. The display shows 41 RECORD OGM. This message can be up to 20 seconds long. G G HI 4 HI 1 At the base station - Press OK/Menu then 4 then 1. The display shows 41 RECORD OGM. 4 1 2 Press OK/Menu. The display shows 411 OGM and 412 SIMPLE OGM. 1 2 Press OK/Menu. The display shows 411 OGM. 3 Press the ▼ button to select 412 SIMPLE OGM. 3 Press OK/Menu.
Using the answering machine Listening to your messages • Press © twice or more to skip forward If you have received any messages the PLAY light will light up and the display will show the total number of messages received. If you have received new messages the PLAY light will flash. You can listen to your messages either at the base station or through your handset. • Press § once to go back to the start of the At the base station To listen to your messages • Press the Play button.
Using the answering machine At the handset 5 Press OK/Menu to confirm the selection. To listen to your messages • Press INT, then 7. Your messages are played back to you. When all your messages have been played the machine beeps twice. See also ‘Operating the answering machine from the handset’ on page 38. Intercom You will be asked to enter a mailbox number and your Remote access code before messages are played back. Recording a memo message If you have not received any messages the machine beeps.
Using the answering machine 4 Press the red button on the handset to stop recording. While listening to your messages Press To Pause or restart listening 5 Press Stop at the base station to return to standby. The PLAY light will flash and the Skip to the next message display will show that a new message has been recorded. Restart listening to a message Skip to the previous message Note: if you have created any mailboxes, you will be asked to enter a mailbox number before recording.
Using Internet functions The Internet functions allow you to send faxes to an E-Mail address, send E-Mails to an E-Mail address and to send voice-mails to an E-Mail address. You can also download web pages from the Internet. E-Mail 1 Press OK/Menu then 9 then 1 then 2 then OK/Menu. The display will show CALL NUM. W 9 1 AB 2 C XYZ Your machine includes a pre-programmed, free, talk 21 email account which is ready to use (you just pay the cost of a local call each time you use it).
Using Internet functions 6 Press the § button to delete the existing entry and then enter your new password. Note: The password will be visible as you enter it, so you can check that it is correct before you confirm the entry. Once it has been confirmed, it will be displayed as a row of ****** to prevent unauthorised persons reading it. DON’T FORGET YOUR PASSWORD.
Using Internet functions 2. For E-Mail • • • • • 4 You will now need to enter the account Shown on the display as E-mail password EMAIL PASSWORD E-mail address E-MAILADDR E-mail identifier EMAIL ID SMTP server address SMTP POP3 server address POP3 If your E-mail identifier is not given, then you can assume it is the same as the first part of your email address up to, but not including, the @ symbol. details, starting with CALL NUM. Press OK/Menu to complete each entry and go to the next.
Using Internet functions Disabling Internet functions Note: if an internet call fails the display will show If you do not wish to use the Internet functions: 1 Press OK/Menu then 9 then 1 then OK/Menu. INTERNET. If a time is also shown, then DECTf@x Plus will retry automatically at the time shown. If no time is shown then the retry will have to be done manually (press @ button twice). W XYZ 9 1 2 Use the ▲ or ▼ buttons to select NO ACCESS and press OK/Menu to confirm.
Using Internet functions Sending voice mail to an E-Mail address 4 Press the @ button. You can send voice mail to an electronic mailbox: 1 Press the @ button. @ Sending E-mail to an E-Mail address You can send a message entered on the keyboard to an electronic mailbox: 1 Press the @ button or OK/Menu then 9 then 3 then OK/Menu. W 9 DE 3 F or XYZ @ 2 Enter the E-mail address and press OK/Menu to confirm. @ 2 Enter the E-mail address. 3 Press the Play button.
Using Internet functions Note: your fax cannot process files other than faxes Standard settings (e. g. word processing files, CAD files, etc.). You can keep these documents in your Internet mailbox for use by your computer (see ‘Settings, mail switch (Menu 96)). CONNECTION (MENU 951) Printing your Internet settings To print a list of your parameter and Internet settings at any time, print all the settings press OK/Menu then 5 then 4 then OK/Menu or OK/Menu then 9 then 5 then 4 then OK/Menu.
Using Internet functions TRANSMISSION (MENU 952) • SMTP Server: automatically indicates the This menu allows you to choose the mode for sending documents via the Internet: 1 Press OK/Menu then 9 then 5 then 2 then OK/Menu and choose an option using the ▲ or ▼ buttons: server address for all standard Internet transmissions. • POP3 Server: automatically indicates the server address for all documents to be retrieved in your Internet mailbox, • PRIMARY DNS / SECOND DNS: send messages via the Internet.
Using Internet functions 1 Press OK/Menu then 9 then 6 then OK/Menu and select an option (PC ONLY or SHARE PC) using the ▲ or ▼ buttons. W M 6 NO XYZ 9 2 Press OK/Menu to confirm your choice. . If you choose DISTINCT PC MB: enter the E-Mail address of the PC to which you wish to send attached files not read by your fax (this is only necessary if your PC’s E-Mail is different from your f@x machine’s E-Mail).
Using Internet functions 1 Press OK/Menu then 9 then 8 then OK/Menu. W TU 8 V XYZ 9 2 Press the ▲ or ▼ buttons to scroll through the options (ON, OFF or SETUP). Select an option and press OK/Menu. If you choose WITH OGM: a recorded announcement on the recipient telephone/fax indicates that relayed documents are about to arrive. To record this announcement: . Pick up from the DECT handset, . Record the announcement, .
Using Internet functions . TO MY E-MAIL, to transfer all your messages to your E-Mail addresses (shared with a computer for example), . TO OTHER ADD: enter the recipient E-Mail address. The connection can be programmed one or several times a day: You define how many times per day the unit should connect to the Internet. To do this, define: - FIRST CALL: the time of the first connection. - NUMBER OF CALLS: the number of times per day that the unit should connect to the Internet.
Using Internet functions 3 Type the Web site address, e.g.: www.bt.com (you don’t normally need to type the “http://”) and press OK/Menu to confirm. The display shows MANUAL ACCESS and AUTO ACCESS. downloaded, e.g. enter 09:15. Press OK/Menu. The machine will now download the BT page at 09:15 every Monday and Friday until you change the settings. 4 You can now choose to print out the Web page: • on request - select MANUAL ACCESS.
Using Internet functions 3 Edit the name and press OK/Menu to 3 Press OK/Menu to confirm deletion. confirm, the display shows WEB ADDRESS. 4 Press Stop to return to standby. 4 Edit the address and press OK/Menu to confirm, the display shows MANUAL ACCESS and AUTO ACCESS. 5 Select either manual or auto and press OK/Menu to confirm. If you choose AUTO you will now be able to edit the days and then time for auto retrieval. Press OK/Menu to confirm each setting.
Using Internet functions 3 Use the ▲ and ▼ buttons to scroll to the next name you want and press OK/Menu to confirm. Repeat the procedure for all the other names (up to 10). Note: if you want to retrieve more than 10 pages at a time you will need to repeat the procedure and enter the same day and time. Printing out the Web directory 4 When you have selected the last name, press OK/Menu again. The display shows DAYS and 6 Press OK/Menu and the display shows TIME.
Using Internet functions Manually entering the address 1 Press the @ button, the display shows ADDRESS. @ 2 Type in the Web site address (e.g. www.bt.com) and press the @ button to confirm. @ Your fax automatically retrieves and prints out the relevant Web page.
Using mailboxes This facility allows up to five people to have their own individual addresses at which they can receive fax or voice messages. To create a mailbox 1 Press OK/Menu then 7 then 1. The display shows 71 CREATE. 5 Press OK/Menu. The display shows 712 REMOTE ACCES. 6 Press OK/Menu. The display shows two options: RS Q P 7 1 2 Press OK/Menu. Enter a mailbox number between 1 and 5. 3 Press OK/Menu. The display shows 711 MAILBOX CODE.
Using mailboxes 8 Press OK/Menu, the display shows HANDSET NUMBER and 0. Enter the number of the handset (this is shown in the handset display) or leave it at 0 if you don’t want a dedicated handset. To delete a mailbox 1 Press OK/Menu then 7 then 2. The display shows 72 CANCEL. AB 2 mode’, page 14). 2 The person calling you dials your number and, after your On-Air DECTf@x Plus has answered, then presses #, then 1, then your mailbox number (1-5) on their phone keypad.
Using mailboxes From the handset 3 Press Start and the message will be sent. You can access voice messages in mailboxes using the handset that has been dedicated to that mailbox. 1 Press the INT button then 7. Polling from a remote mailbox Intercom 2 The handset accesses the recorded message and plays it to you. 2 Press OK/Menu.
Using additional handsets Multiple registration You can use up to 4 handsets with your On-Air DECTf@x Plus base station. A handset can be registered with up to 4 DECT base stations. If you want to change the code, or register a handset to more than one base station, handsets must be registered using the customised method. The simple method For each handset to interact with the base station, they must be registered with it. Your handset is pre-registered with the base station as handset number 1.
Using additional handsets The customised method Use this method if you: Have set the base station handset security code to a number other than 0000. Want to register a handset to more than one base station. Want to allocate a handset with a handset number other than the next sequential one. NO 1 the display will show this number to indicate that the handset is registered. To change the handset security code 1 Press OK/Menu, then 6, then 3.
Using additional handsets To prioritise a base station You can set a handset to give priority to a particular base station, so that it will always link up to that base station first if it is in range. 1 Press OK then 7 on the handset, then use the ▲ and ▼ buttons to select the base station number you want to prioritise. Transferring calls To transfer a call from the base station to a handset You can make or receive a call at the base station and transfer it to a handset.
Using additional handsets 3 Press the green button. 3 The base station will beep, and the handset(s) you are contacting will ring. 4 At the other handset - press the green button to connect the internal call. The two handsets can now talk to each other while the external caller is on hold. 4 At the handset being contacted, the display will show a flashing INTERCOM icon and the handset will ring.
Additional features Remote access Your On-Air DECTf@x Plus enables you to access your stored faxes and messages remotely (from another phone) by dialling your number and using the numerical keypad to control the machine. Remote access codes To protect your messages you must set up a remote access code. This acts as a ‘password’ you need to enter when accessing your messages remotely. Remote access of your fax machine You can retrieve faxes from your On-Air DECTf@x Plus from another fax machine.
Additional features Remote access of your answering machine You can access your voice messages stored in your On-Air DECTf@x Plus from another telephone. 1 From another telephone dial your number. 2 Press the ✱ button during the announcement. ✱ 3 Enter your four-digit security code. Your voice messages are played back to you, followed by a series of beeps. Using your On-Air DECTf@x Plus as a photocopier 1 Make sure you have inserted some paper into the output sheet feeder.
Additional features Printing the fax directory Alarm This allows you to print out the names and numbers stored in the fax directory. 1 Press OK/Menu then 1 then 2. The display shows 12 PRINT. You can set your On-Air DECTf@x Plus to act as an alarm. AB 2 C 1 shows 81 ALARM. TU 8 V 2 Press OK/Menu. The fax directory will print To set the alarm 1 Press OK/Menu then 8 then 1. The display 1 out in alphabetical order. 2 Press OK/Menu. The display shows START.
Additional features To cancel the alarm 1 Press OK/Menu then 8 then 1. The display shows 81 ALARM. TU V 8 1 2 Press OK/Menu. Press the Ä button to move Caller Display If you subscribe to a caller display service, the On-Air DECTf@x Plus will show the caller information on its display and on the handset display.
Additional features If a new call is from the same number as an earlier call only the later call details will be stored. Number Withheld, Number Unavailable, Operator and International calls will not be stored. The list of stored call details can be reviewed from the base station and from the handset. To review the list from the base station: 1 Press OK/Menu then Redial. The display shows details of the last call. To review the list from the handset: 1 Press the INT button then .
Additional features Putting the privileged access function into service 1 Press OK/Menu then 4 then 8 and Start. G TU 8 V HI 4 2 Choose WITH using the ▲ and ▼ buttons. 3 Press OK/Menu to confirm, • When the privileged access function is in service, the TEL blinks. Privileged calls Only those privileged callers having your privileged access code will be able to call you. To do so, they should proceed as follows: 1 Dial your number.
Help If you have any problems using your DECTfax, this section will give you the most common, easy-to-follow solutions. The consumables (ink ribbon and smartcard) are already installed in the machine. You will need to change these consumables when they become worn. To do so, refer to the instructions in the following paragraphs. Replacing the print ribbon and smartcard The print ribbon and the smartcard work together, and the fax will not work without the smartcard.
Help 3 4 Press out the new smartcard (3) (pre-cut). 5 Gently pull the smaller spool towards you and place it in its housing - there are two slots that hold it in place close, the rear cover. Replacing the smart card The smartcard enables screen display, after printout, of remaining ink ribbon. 4 3 3 5 Insert the new smartcard (3) into its 1 support. Make certain that the chip (4) of the smartcard (3) is positioned upwards, with its bevelled corner on the left.
Help Fax Problem Solution Blank unit display. • Check that the power cord is properly connected The unit does not answer incoming calls after several rings. • The FAX icon may be off: check the receive mode (Manual/automatic). • Check the number of rings. • Configure the unit for “private network” (see the sections headed ‘Ring settings’ and ‘Network and dial settings’ in the ‘Setting up’ chapter). Blank photocopies. • The document was positioned facing the wrong way round in the feeder.
Help Telephone Problem Solution The radio link is not set up between the base station and the handset. • Check that the handset battery is properly charged. • Check that the the base station and handset are properly matched. • Check that the base station power supply pack is not too close to the radio module. The base station does not ring. • Check that the base station ringing is not switched off. The dial tone is busy each time you dial a number.
Help Transmission report codes The activity reports and send reports detail the outcome of each transaction. In the event of an error they will use one of the following codes: Code Meaning and action 1 No answer; try again later 3 Call interrupted by user pressing Stop 70 4 Invalid speed dial number. Check number 5 Document feeder problem during the call: paper jam or document feeder malfunction 7 Bad line or remote terminal malfunction.
Technical information This product is intended to be connected to analogue networks and private switching systems in the United Kingdom. This equipment complies with the essential requirements of the Radio Equipment and Telecommunications Terminal Equipment Directive, 1999/5/E Choosing a position Your On-Air DECTf@x Plus should be kept clear of dust, moisture, high temperature and vibration and should not be exposed to direct sunlight.
Technical specification On-Air DECTf@x Plus Type/compatibility Desktop ITU-T G3 transceiver Applicable network PSTN and PBX Transmission Speed 14400/12000/9600/7200/4800/2400 Automatic fall back Communications Half duplex Coding scheme MH/MR Horizontal resolution 8 dots/mm Vertical resolution 3.85 line/mm (standard) 7.
Index Activity reports Additional handsets Alarm setting cancelling Answering machine answer mode answer delay from handset on/off remote access Answer only mode Base station priority Battery low Broadcasting Call back Call timer Call transfer Caller Display Charging the handset Copying documents Customising Date and time Delayed send Directory changing numbers dialling numbers dialling from base station fax from base station handset storing numbers Document feeder 24 56 62 63 34 34 12 38 34 61 35 58 10 17
Index creating deleting faxing to messages in polling from remote access sending protected messages Mains power Memo messages Memory storing numbers dialling from edit delete Messages deleting playing protecting skip through Monitoring a call Name, entering Network settings Paging a handset Paper inserting thickness Pause Photocopier Polling setting up to be polled to poll from from a mailbox Prefix Print ribbon installing purchasing new security Printing a fax Priviliged access Radio module 74 53 54 54 5
Declaration of Conformity BT On-Air DECTf@x Plus This equipment complies with the Requirements of the Radio Equipment and Telecommunications Terminal Equipment Directive, 1999/5/EC. In demonstration of conformance with the Essential Requirements for Safety and Electro-Magnetic Compatibility covered by the above directive, the product meets the following standards: Safety EN60950/08:1992 incorporating amendments 1,2,3,4 and 11.
Offices in Europe, North America, Japan and Asia Pacific. The telecommunications services described in this publication are subject to availability and may be modified from time to time. Services and equipment are provided subject to British Telecommunications plc’s respective standard conditions of contract. Nothing in this publication forms any part of any contract. 23226896-8 C Touchtone™ is a registered trade mark of British Telecommunications plc in the UK. © British Telecommunications plc 2000.