
User's Manual


159
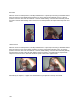
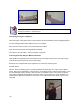
Using the Small Goniometer Feature
When assessing motion in the smaller joints of the digits in the hand or foot, the Dual Inclinometers may
be interlocked to form a small goniometer.
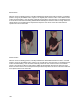
Once interlocked tight together they form a perfectly level and zeroed surface. As with the landmarking
instructions above, place the goniometer so that one Inclinometer is on the proximal side and the other on
the distal side of the joint being assessed.
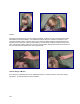
Digit Ankylosis
If there is joint ankylosis that is to be documented, the following steps are required to obtain the
measurement.
The first reading should be taken with the goniometer interlocked and placed against a wall or on a
tabletop. Next place the client's joint in as close to a neutral position as possible. Place the inclinometer
appropriately, then take the second reading. This is the degree of ankylosis.
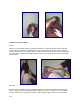
Digit Range of Motion Evaluation
To document small digit range of motion, manually landmark the joint being assessed proximally and
distally while in a neutral position, with the client in a seated or lying position. Align the sensors in the
plane of movement (generally sagittal) and position the Inclinometers. Click the button on the master
sensor to take the initial reading. Have the client maximally flex (or extend / abduct / adduct / etc. as the
case requires) the digit. Click the button on the Master sensor a second time to take the final reading.
ODES will automatically document the final true range. Return the client's digit to the neutral position.
Repeat these steps two more times on the same side and then repeat 3 times for the other side.