
User's Manual Part 2


section 07
page
5
40040005 rev. 000
Step 10. Depending on which report you have selected to view and which step you would like
to do next, click Next, Print Notes, or Preview Notes. Note that if you click Preview Notes, you
will be able to print them from the Preview Screen. If you are able to click Next, the Report Op-
tions screen will appear (Figure 7-5).
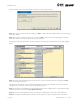
Step 11. Choose whether you would like to address the report for a Referral, Insurance, At-
torney, Patient, Physician, Employer, Case Manager, or Specialist. If you select once of these
listed icons, the address needs to have been entered in the client information screen. If you
wish to address the report to a person or company other than the ones listed, or an address
hasn’t been entered in the client information screen, you may manually enter the address in
the text field.
Step 12. Select whether you would like to include the following in the report (note that these
may not be available for every report):
•Injury Location Diagram
•Injury Location Chart
•Evaluator Comments
•Job Demands on a separate page
•Page numbering
•Client’s name at the bottom of every page
•Client’s file number at the bottom of every page
Step 13. Type in a title name for this report and click Store. Note that this option may not ap-
pear for every type of report.
Step 14. Check the box if you would like to return to the Home Screen after previewing or
printing the report.
Step 15. Depending on which step you would like to do next, click Preview Report or Print Re-
port. Note that if you click Preview Report, you will be able to print it from the Preview screen.
If you choose Preview Report, the Report Preview screen will appear (Figure 7-6).
Figure 7-5. Report Options