
User's Manual Part 2


page
42
section 06
40040005 rev. 000
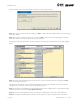
This will bring you to the main Super Protocols screen (Figure 6-92).
Step 1. Create a new protocol by clicking on New. A new icon will appear within the main Super
Protocols screen.
Step 2. To view the super protocol, first click on Edit; the Edit icon should change to Cancel
Edit. Next click on the super protocol you just created.
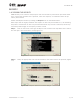
A screen will appear with boxes of test names on the left and a blank box on the right (Figure
6-93).
Step 3. Select the applicable tests from the lists on the left-hand side of the page and Add
them to the Super Protocol.
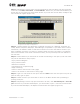
The order of testing can be changed by highlighting one of the included tests and using the
Change Order arrows to move it up or down within the list.
Step 4. Once you have added all the applicable tests and arranged them in the desired order,
finish the process by clicking Lock Super Protocol.
Step 5. You will be prompted to enter and confirm a password to lock the Super Protocol.
Step 6. To apply a Super Protocol, select a client then click Super Protocol from the Home
Figure 6-92. Super Protocol Main Screen
Figure 6-93. Create/Edit Super Protocol