Tipbx 5.4 Software per la configurazione di Centralini Telefonici Art. 335818 e 335828 Manuale d’uso copyright 1998-2005 Manuale Tipbx 5.4 Pag.
SOMMARIO 1. REQUISITI HARDWARE E SOFTWARE 5 2. INSTALLAZIONE 6 3. CONCETTI FONDAMENTALI 9 4. SELEZIONE ATTIVITÀ 10 5. NUOVO PROGETTO DI CONFIGURAZIONE GUIDATA 11 6. 5.1 Step 1 – Dati Progetto 12 5.2 Step 2 – Linee Urbane 13 5.3 Step 3 – Partizioni 14 5.4 Step 4 – Segreteria Modem Fax 15 5.5 Step 5 – Risposta Automatica 16 5.6 Step 6 – Relé Ausiliari 17 5.7 Step 7 – Videocitofonia 18 5.
6.4.1 6.4.2 6.4.3 6.5 Sezione Parametri Linea Telefonica Codici Flessibili Family Sezione Codici Flessibili Office Scenari 6.6 Scarico Configurazione 6.6.1 Procedura di scarico dati da TiPbx 36 37 38 39 40 40 7. APRI PROGETTO DI CONFIGURAZIONE GUIDATA 41 8. UPLOAD CONFIGURAZIONE 42 9. DOWNLOAD FIRMWARE 42 1. HARDWARE AND SOFTWARE REQUIREMENTS 45 2. INSTALLATION 46 3. BASIC CONCEPTS 49 4. SELECTION OF THE ACTIVITIES 50 5. NEW PROJECT OF GUIDED CONFIGURATION 51 6. 5.
6.2.2 6.2.3 Outgoing Enabling Section Automatic Answering 70 71 6.3 Telephone Numbers Index 6.3.1 Emergency Numbers Section 6.3.2 1st and 2nd group Short Numbers Section 6.3.3 Programmed Dial Codes Section 6.3.4 Activation Prefix Lock 72 72 73 74 75 6.4 Telephone Parameters 6.4.1 Telephone Line Parameters Section 6.4.2 Family Flexible Codes 6.4.3 Office Flexible Codes Section 76 76 77 78 6.5 Scenes 79 6.6 Configuration Downloading 80 7. OPEN A GUIDED CONFIGURATION PROJECT 81 8.
Tipbx 5.4 Il programma Tipbx 5.4 costituisce lo strumento fondamentale per la configurazione dei centralini PABX 18 e 28 Bticino. Il contenuto di questo programma è oggetto di diritti esclusivi della Bticino s.p.a.. 1.
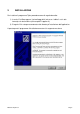
2. INSTALLAZIONE Per installare il programma Tipbx procedere come di seguito descritto: 1) Inserire il Cd-Rom oppure il primo floppy disk (nel caso si abbia il set in tale formato) nel relativo drive (ad esempio D: oppure A:) 2) Eseguire il file setup.exe contenuto nella directory d’installazione dell’applicativo A questo punto il programma d’installazione mostrerà la seguente maschera Manuale Tipbx 5.4 Pag.
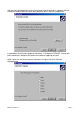
Alla pressione dell’apposito pulsante l’installazione continuerà con la seguente finestra nella quale occorre definire il nome della directory dove installare il programma: La procedura d’installazione propone la directory “C:\Programmi\TiPbx50”, l’utente può però selezionare il direttorio che preferisce mediante l’apposito pulsante Nella successiva maschera occorre selezionare la lingua che verrà utilizzata dall’applicativo Manuale Tipbx 5.4 Pag.
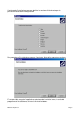
Continuando l’installazione occorre definire la nazione di riferimento per le personalizzazioni delle configurazioni Per procedere all’installazione premere il pulsante Next della seguente maschera: E’ ora possibile eseguire l’applicativo selezionando la relativa icona, inserita dal programma di installazione, nel menù Avvio di windows. Manuale Tipbx 5.4 Pag.
3. CONCETTI FONDAMENTALI Il software Tipbx 5.4 permette di eseguire la configurazione di centralini PABX Bticino di ultima generazione Si consiglia di leggere il manuale di istruzioni per l’uso del centralino PABX prima di utilizzare Tipbx 5.
4. SELEZIONE ATTIVITÀ In questa fase vengono esposte all’utente le funzioni disponibili nell’applicativo come mostrato nella maschera seguente: In particolare sono disponibili le seguente funzioni: Creazione di un nuovo progetto con Configurazione Guidata Selezionando questa opzione viene eseguito la funzione di creazione di un nuovo progetto tramite una serie di operazioni guidate (wizard) che facilita la configurazione del centralino.
5. NUOVO PROGETTO DI CONFIGURAZIONE GUIDATA Selezionando questa funzione all’utente vengono proposte delle maschere in successione che permettono di eseguire una semplice configurazione del centralino PABX. La prima maschera presentata all’utente è una nota informativa sulle potenzialità della funzione: Esce dalla funzione Wizard Passa al passo precedente Passa al passo successivo Temina la funzione Wizard La navigazione tra i vari step avviene con gli appositi pulsanti Avanti e Indietro.
5.1 Step 1 – Dati Progetto In questo step all’utente viene richiesto di immettere i dati caratteristici del progetto e di scegliere il tipo di PABX che si vuole configurare Per poter proseguire occorre digitare il nome del cliente di riferimento e l’indirizzo. L’applicativo propone come data di configurazione la data corrente, Occorre decidere inoltre la tipologia del centralino che si vuole configurare, selezionando tra PABX 1-8 e PABX 2-8. Manuale Tipbx 5.4 Pag.
5.2 Step 2 – Linee Urbane In questa fase occorre definire la nazione di riferimento per i parametri di linea e il numero di linee urbane presenti. In particolare: Nazione di riferimento: Occorre selezionare la nazione nella quale verrà installato il centralino, selezionandola tramite l’apposita casella a discesa Tipo di linee in ingresso In funzione del tipo di centralino selezionato nello step 1, risulteranno abilitate da 1 a 4 linee urbane entranti.
5.3 Step 3 – Partizioni In questa fase viene decisa la presenza o meno delle partizioni (fare riferimento al manuale di istruzioni per l’uso del centralino PABX) e la tipologia di servizio (Office o Family) Nel caso si abbia selezionato un centralino di tipo 1-8, non risulta possibile alcuna configurazione. Manuale Tipbx 5.4 Pag.
5.4 Step 4 – Segreteria Modem Fax Poiché il PABX è dotato di linee preferenziali per la trasmissione dati, in questa fase si definisce la presenza di apparecchiature speciali come segreterie telefoniche, modem o fax. Manuale Tipbx 5.4 Pag.
5.5 Step 5 – Risposta Automatica In questa sezione si definisce l’eventuale comportamento automatico del centralino a fronte di una chiamata entrante su un determinata linea urbana Per la varie modalità fare riferimento al manuale di istruzioni per l’uso del centralino PABX Attivando il servizio di Teleattivazione sulla linea urbana 1 non può essere attivato il servizio di identificazione del chiamante (CLID).
5.6 Step 6 – Relé Ausiliari Vengono qui definiti i comportamenti degli eventuali relé ausiliari connessi con il PABX, oltre al relé interno Per ogni relé sono disponibili le seguenti selezioni: Teleazionabile 2 secondi Teleazionabile 3 minuti Teleazionabile On / Off Non teleazionabile 2 secondi Non teleazionabile 3 minuti Non teleazionabile On / Off Luci Scale 2 secondi Ripetitore di chiamata Manuale Tipbx 5.4 Pag.
5.7 Step 7 – Videocitofonia Nel caso si preveda l’integrazione con un impianto videocitofonico con distributore video, in questa sezione è possibile selezionare il codice di uno schemo installativo. Per il numero dello schema installativo fare riferimento alla documentazione tecnica Bticino allegata all’articolo Distributore Video Manuale Tipbx 5.4 Pag.
5.8 Step 8 – Fine della Configurazione Guidata Si è conclusa la configurazione guidata dei parametri per il centralino. A questo punto all’utente sono date le seguenti possibilità Stampare Vengono stampati tutti i macrocomandi previsti per portare il centralino alla configurazione voluta.
6. APRI PROGETTO DI CONFIGURAZIONE DETTAGLIATA Selezionando questa opzione viene presentata all’utente la seguente maschera. Vengono visualizzati tutti i progetti in modalità dettagliata creati con l’applicativo. L’utente può quindi selezionare quello voluto e visualizzarlo, tramite la pressione del pulsante Apri. Per una corretta navigazione durante la fase di configurazione si consiglia l’uso delle frecce poste in ogni pagina.
Barra degli strumenti Configurazione Scenario 2 Configurazione Scenario 3 Configurazione Scenario 4 Parametri linea telefonica Configurazione Scenario 5 Rubrica numeri telefonici Copia i dati in uno scenario Configurazione generale derivati (scenario 1) Parametri Generali Invio Configurazione Stampa il progetto corrente Salva il progetto corrente Informazioni Seleziona Attività Esce dall’applicativo Ogni pulsate riportato nella barra degli strumenti ha il corrispettivo menu. Manuale Tipbx 5.
6.1 Parametri Generali In questa sezione vengono accorpati tutti i dati caratteristici dell’impianto che occorre configurare per il centralino. 6.1.1 Sezione Generale Vengono riprese le selezioni eseguite nello step 1 della configurazione guidata In particolare selezionando una nazione vengono caricati i dati caratteristici della linea telefonica e i numeri di emergenza della nazione stessa.
6.1.
6.1.3 Sezione Partizioni e Modalità Vengono ripresi i dati configurati nello step 3 della configurazione guidata Risultano inoltre disponibili le seguenti opzioni: Durata chiamata citofonica Permette di definire la durata in secondi di una chiamata proveniente da un posto esterno Password Vengono configurate tutte le password per l’accesso alla programmazione del centralino Per le varie funzioni fare riferimento al manuale di istruzioni per l’uso del centralino PABX Manuale Tipbx 5.4 Pag.
6.1.4 Sezione Assegnazione Partizioni In questa sezione viene definita l‘appartenenza di un derivato a una determinata partizione (se abilitata). Viene inoltre definita l’appartenenza di una linea urbana uscente ad una determinata partizione Manuale Tipbx 5.4 Pag.
6.1.5 Sezione Tipo Derivati Viene qui definita la tipologia di apparecchiatura connessa un derivato interno Le selezioni disponibili sono: Telefono Segreteria Fax Modem Segreteria + Fax Segreteria + Modem + Fax Modem + Fax Manuale Tipbx 5.4 Pag.
6.1.6 Sezione Relé Ausiliari Per il relè ausiliario interno al PABX e per ogni relé ausiliario interno, viene qui configurato il comportamento. Risultano disponibili molte più opzioni di quelle presenti allo step 6 della configurazione guidata.
6.1.7 Sezione Videocitofonia In questa sezione viene configurato l’eventuale impianto videocitofonico con distributore video. Per le singole configurazioni si faccia riferimento al manuale di istruzioni per l’uso del distributore Video per centralini PABX. E’ possibile definire l’impianto da realizzare (corrispondente ad uno degli schemi presenti nel manuale del Distributore Video), semplicemente tramite l’immissione del codice nell’apposito campo e la successiva pressione del pulsante Carica.
6.2 Configurazione Generale Derivati In questa sezione viene configurato il comportamento dei singoli derivati a fronte di una chiamata in uscita o in ingresso unitamente al comportamento del centralino in caso di risposta automatica. 6.2.
6.2.2 Sezione Abilitazione in uscita Viene configurato quale linea urbane delle disponibili, può essere utilizzata da ogni singolo derivato interno per eseguire una chiamata esterna. Manuale Tipbx 5.4 Pag.
6.2.3 Risposta Automatica Vengono riprese e ampliate le selezioni eseguite allo step 5 della configurazione guidata. Per i vari servizi riportati nella pagina fare riferimento al manuale di istruzioni per l’uso del centralino PABX.
6.3 Rubrica Numeri Telefonici In questa sezione sono accorpati tutti i numeri telefonici memorizzati dal centralino e utilizzabili dall’utente, unitamente agli eventuali blocchi sulla composizione dei numeri in uscita. 6.3.1 Sezione Numeri di Emergenza Vengono riportati i numeri telefonici di emergenza (ovvero i numeri che in qualsiasi caso si ha la possibilità di comporre) Con il pulsante Default si riportano i numeri di emergenza a quelli predefiniti per la nazione di riferimento selezionata.
6.3.2 Sezione Numeri Brevi 1° e 2° gruppo Sono a disposizione dell’utente per poter memorizzare i numeri telefoni di più largo uso. Risultano composti in maniera automatica anteponendo al numero breve il codice 30 Ad esempio per poter comporre il 1° numero occorre digitare il codice 3001 Manuale Tipbx 5.4 Pag.
6.3.3 Sezione Prefissi Programmati Questa sezione riprende le configurazione eseguite allo step 7 della configurazione guidata.
6.3.4 Attivazione Blocco Prefissi Per ogni derivato si ha la possibilità di diversificare le configurazione.
6.4 Parametri Telefonici In questa sezione vengono configurati i parametri temporali della line telefonica e i codici flessibili per i servizi supplementari 6.4.1 Sezione Parametri Linea Telefonica In base alla nazione di riferimento vengono caricati dall’applicativo i valori di default Il pulsante Default consente di riportare i parametri presenti nella sezione a quelli predefiniti per la nazione di riferimento selezionata. Manuale Tipbx 5.4 Pag.
6.4.2 Codici Flessibili Family Per ogni servizio messo a disposizione dal PABX in modalità Family vengono configurati i codici di attivazione di riferimento Per ulteriori informazioni sui singoli servizi consultare il manuale di istruzioni per l’uso del centralino PABX. Nota: Per la compilazione di questa tabella sono ammessi solo i caratteri numerici e il carattere # Manuale Tipbx 5.4 Pag.
6.4.3 Sezione Codici Flessibili Office Per ogni servizio messo a disposizione dal PABX in modalità Office vengono configurati i codice di attivazione di riferimento Per ulteriori informazioni sui singoli servizi consultare il manuale di istruzioni per l’uso del centralino PABX. Nota: Per la compilazione di questa tabella sono ammessi solo i caratteri numerici e il carattere # Manuale Tipbx 5.4 Pag.
6.5 Scenari Sono a disposizione nel PABX 5.4 ulteriori scenari di configurazione dei derivati interni Questi scenari sono configurabili attivando il pulsante opportuno nella barra degli strumenti. Risultano a disposizione dell’utente le seguenti configurazioni: Abilitazione del singolo derivato alla chiamate uscenti Abilitazione del singolo derivato alla chiamate entranti Risposta automatica Per l’attivazione del singolo scenario consultare il manuale di istruzioni per l’uso del centralino PABX.
6.6 Scarico Configurazione Consente di inviare i dati di configurazione al centralino tramite il protocollo di comunicazione seriale. Per eseguire questa operazione è necessario che tutti i derivati connessi al Pabx siano a riposo (cornetta abbassata). Nota: La procedura da eseguire durante la fase di scarico della configurazione è la seguente: 1. 2. 3. 4. 5. 6. 6.6.
7. APRI PROGETTO DI CONFIGURAZIONE GUIDATA Con questa funzione vengono visualizzati tutti i file di configurazione guidata preventivamente salvati Alla pressione del pulsante Apri viene eseguita una configurazione guidata nella quale i dati risultano precompilati dai dati salvati preventivamente Manuale Tipbx 5.4 Pag.
8. UPLOAD CONFIGURAZIONE Questa funzione permette di verificare la configurazione corrente del centralino PABX connesso al PC tramite un porta seriale. Per eseguire questa operazione è necessario che tutti i derivati connessi al Pabx siano a riposo (cornetta abbassata). I dati ricevuti dal centralino vengono trasformati dall’applicativo in un progetto dettagliato che potrà essere salvato come un normale progetto. 9.
Attenzione Questa funzione deve essere usata con molta cautela, in quanto inviando al centralino un file errato lo si potrebbe rendere non più operativo. Dopo aver selezionato il nuovo file del firmaware alla pressione del pulsante Aggiorna Versione viene presentato all’utente la seguente maschera: Occorre selezionare la nazione di riferimento che verrà utilizzata dal PABX. Premere OK ed attendere la richiesta di accensione del centralino.
Tipbx 5.4 Configuration Software for Telephone Switchboards PABX 1-8 (Item 335818) and PABX 2-8 (Item 335828) USE INSTRUCTION MANUAL copyright 1998-2005 Manuale Tipbx 5.4 Pag.
Tipbx 5.4 Tipbx 5.4 program constitutes the basic tool for the configuration of the PABX 18 and 28 BTicino telephone exchanges. The content of this program is subject to exclusive rights by BTicino s.p.a. 1.
2. INSTALLATION To install the program Tipbx, operate as follows: 3) Insert the Cd-Rom or the first floppy disk (in case only this driver is present) into the relevant drive (i.e. D: or A:) 4) Run the file setup.exe included in the installation directory of the application At this point the installation program the following mask is shown: Manuale Tipbx 5.4 Pag.
When confirmed by the button, the installation continue with a window in which it is required to give the name of the directory in which the program has to be installed. The installation procedure suggests the directory “C:\Programs\ TiPbx50”, however the user can select the preferred directory by means of the button”. The next mask asks which language to use by the application Manuale Tipbx 5.4 Pag.
The installation continue asking which default nation to use by the application To begin the installation press Next buttom in the following mask is shown: Now it is possible to run the application by selecting the relevant icon, inserted by the setup program, in Start menu of Windows. Manuale Tipbx 5.4 Pag.
3. BASIC CONCEPTS The software Tipbx 5.4 allows the configuration of the last generation PABX telephone exchange by BTicino, both version 1-8 and version 2-8. It is advisable to read the PABX telephone exchange use instruction manual before using Tipbx 5.4.
4. SELECTION OF THE ACTIVITIES In this phase, the available program functions are exposed to the user as shown in the following mask: In particular, the following functions are available: Creation of a new project by Guided Configuration By selecting this option, the function of creating a new project is performed through a series of guided operations (wizard) to make easier the configuration of the telephone exchange.
5. NEW PROJECT OF GUIDED CONFIGURATION By selecting this function, some masks in sequence are proposed to the user that allow a simple configuration of the PABX telephone exchange. The first mask shown to the user is an informative note about the function potentiality: Quit from application Previous Step Next Step Terminate Wizard function The navigation among the different steps is obtained by means of appropriate buttons Continue and Back.
5.1 Step 1 – Project Data In this step, the user is required to input the project characteristical data and to choose the type of PABX to be configured To continue, it is necessary to input the reference customer name and the address. The application proposes the current date as configuration date. Moreover, it is necessary to decide the type of telephone exchange to be configured, by selecting between PABX 1-8 (Item 335818) and PABX 2-8 (Item 335828). Manuale Tipbx 5.4 Pag.
5.2 Step 2 – Local Lines In this phase, it is required to define the reference Nation for the line parameters and the number of the present local lines. In particular: Reference Nation: It is necessary to select the Nation in which the telephone exchange has to be installed, by selecting it through the appropriate curtain box Input line types Depending on the telephone exchange type selected in step 1, it will be enabled from 1 to 4 input local lines.
5.3 Step 3 – Partitions In this phase, the possible presence of partitions has to be decided (refer to PABX telephone exchange use instruction manual) and the type of duty (Office or Family) In case a type 1-8 telephone exchange has been selected, no configuration is possible. Manuale Tipbx 5.4 Pag.
5.4 Step 4 – Answering service Modem Fax Since the PABX is provided with preferential lines for data transmission, the presence of special devices as answering service, modem or fax is defined in this phase. Manuale Tipbx 5.4 Pag.
5.5 Step 5 –Automatic Answering In this section is defined the telephone exchange eventual automatic conduct consequently to an input call on a determined local line For the different modes, refer to PABX telephone exchange use instruction manual Activating the Remote control service on local line 1 the caller identification service (CLID) cannot be activated. The Remote control service and Recognition of fax tone services cannot be activated at the same time on the same local line.
5.6 Step 6 – Auxiliary Relays The conduct of the eventual auxiliary relays connected to the PABX is defined here, in addition to the internal relay The following selections are available for each relay: Tele-activable 2 seconds Tele-activable 3 minutes Tele-activable On / Off Not tele-activable 2 seconds Not tele-activable 3 minutes Not tele-activable On / Off Stair Lights 2 seconds Call repeater Manuale Tipbx 5.4 Pag.
5.7 Step 7 – Video Door Entry Systems In case the integration with a video door entry system is planned, in this section it is possible to select the code of an installation diagram. For the number of the installation diagram, please refer to the BTicino technical literature. Manuale Tipbx 5.4 Pag.
5.8 Step 8 – End of Guided Configuration The guided configuration of the telephone exchange parameters is complete. At this point, the user has the following possibilities: Print All macro-commands foreseen to configure the telephone exchange as desired.
6. OPEN A PROJECT IN DETAILED CONFIGURATION MODE By selecting this option, the following mask is shown to the user: All projects in detailed mode created by the application are visualised. Then, the user can select the desired one and he can visualise it, by clicking the button Open. For a correct navigation during the configuration phase, it is advisable the use of the arrows placed in every page. In the following, the different program functions available in detailed mode are shown.
Tool bar Scenes 2 Scenes 3 Scenes 4 Telephone Line Parameters Scenes 5 Short Numbers Copy scene data Extension General Configuration (scene 1) General Parameters Send configuration Print current project Save current project About Select Activity Appllication quit Each button present in the tool bar has its relevant menu. Manuale Tipbx 5.4 Pag.
6.1 General Parameters In this section are grouped all characteristic data of the plant to be configured for the telephone exchange. 6.1.1 General Section The selections of step 1 of guided configuration are resumed In particular, by selecting a Nation, the characteristic data of the telephone line of the nation itself are loaded. The selection of the project PABX type is not available; in order to change the type it is necessary to create a new project Manuale Tipbx 5.4 Pag.
6.1.2 Local Line Section The selections of step 2 of guided configuration are recalled Moreover, it is possible to decide the source of the wait music: Internal, autonomously produced by the telephone exchange External, supplied to the telephone exchange by the appropriate entry Enabling on slave 1 of the caller identifier displaying from local line 1 The caller identification service (CLID) cannot be activated if the Recognition of fax tone service is active on local line 1. Manuale Tipbx 5.4 Pag.
6.1.3 Partition and Mode Section The selections of step 3 of guided configuration are resumed Moreover, the following options are available: Length if intercom call It allows to define the length in seconds for a call coming from an outdoor station Password All passwords are configured for the access to the telephone exchange programming For the different functions, refer to PABX telephone exchange use instruction manual. Manuale Tipbx 5.4 Pag.
6.1.4 Partition Allocation Section In this section is defined the belonging of an extension to a defined partition (if enabled). Moreover, it is defined the belonging of an outgoing local line to a particular partition. Manuale Tipbx 5.4 Pag.
6.1.5 Extension Type Section Here is defined the type of device connected to an indoor extension. The available selections are: Telephone Automatic answering Fax Modem Automatic answering + Fax Automatic answering + Modem + Fax Modem + Fax Manuale Tipbx 5.4 Pag.
6.1.6 Auxiliary Relay Section Here, the conduct for the PABX internal auxiliary relay and for any internal auxiliary relay is configured. Many more options are available with reference to those present in step 6 of the guided configuration.
7.1.7 Video Door Entry Section In this section is configured the possible video door entry system. For single configurations, please refer to the use instruction manual of the PABX switchboard. It is possible to define the system to be realised (corresponding to one of the wiring diagrams included in the Video Signal Distributor's manual), by simply inserting the code into its special space and then pressing the Load key.
6.2 Extension General Configuration In this section, the conduct of the single extensions is configured in consequence of an outgoing or incoming call together with the conduct of the telephone exchange in case of automatic answering. 6.2.1 Call Enabling Section for extensions 1-8 / 9-16 The local line from which it is possible to receive an incoming call is defined, for each indoor extension.
6.2.2 Outgoing Enabling Section It is configured which local line, among the available ones, can be used by any single indoor extension to execute an external call. Manuale Tipbx 5.4 Pag.
6.2.3 Automatic Answering The selections carried out in step 5 of the guided configuration are resumed and increased. For the different services quoted in the page, refer to PABX telephone exchange use instruction manual. Activating the Remote control service on local line 1 the caller identification service (CLID) cannot be activated. The Remote control service and Recognition of fax tone services cannot be activated at the same time on the same local line.
6.3 Telephone Numbers Index In this section are grouped all telephone numbers memorised in the telephone exchange and usable by the user, together with the eventual blocks on the outgoing dialling numbers. 6.3.1 Emergency Numbers Section The emergency numbers are reported (that is, the numbers that it is possible to dial in any case). Through the Default key the emergency numbers are reported for the selected nation. Manuale Tipbx 5.4 Pag.
6.3.2 1st and 2nd group Short Numbers Section They are at user’s disposal to memorise the most used telephone numbers. They are dialled automatically by placing the code 30 before the short number For example, to dial the 1st number it is necessary to digit the code 3001 Manuale Tipbx 5.4 Pag.
6.3.3 Programmed Dial Codes Section This section resumes the configurations carried out in step 7 of the guided configuration.
6.3.4 Activation Prefix Lock The configuration can be diversified for each extension The options available are: - if the “Lock international calls” has been selected the international prefix 00 cannot be dialled. - Selecting the “Activation programmed locks” option activates the lock of the prefixes programmed in the “Programmed prefixes” page.
6.4 Telephone Parameters In this section are configured the time parameters of the telephone line and the flexible codes for additional services 6.4.1 Telephone Line Parameters Section Referring to the reference nation, the application loads the default values The Default button allows to change the parameters present in the section into the default ones for the selected nation Manuale Tipbx 5.4 Pag.
6.4.2 Family Flexible Codes For each service available in PABX in Family mode, the reference activation codes are configured For further informations on single services, see the PABX telephone exchange use instruction manual. Note: To fill in this table, only numerical characters and the # character are allowed. Manuale Tipbx 5.4 Pag.
6.4.3 Office Flexible Codes Section For each service allowed by PABX in Office mode, the activation and reference codes are configured For further informations on single services, see the PABX telephone exchange use instruction manual. Note: To fill in this table, only numerical characters and the # character are allowed. Manuale Tipbx 5.4 Pag.
6.5 Scenes In PABX telephone exchanges, 4 further scenes are available to configure the indoor extensions These scenes are configurable by activating the appropriate button on the tool bar. The following configurations are at user’s disposal: Enabling of the single extension to outgoing calls Enabling of the single extension to incoming calls Automatic answering To activate the single scene, see the PABX telephone exchange use instruction manual.
6.6 Configuration Downloading It allows to send the configuration data to the telephone exchange by means of the serial communication protocol. To carry out this operation, it is necessary that all extensions connected to the PABX are in resting position (receiver hung up). Note: The procedure to carry out during the configuration downloading phase, is the following: 5. Switch-on the PABX 6. Insert the programming cable 7. Activate the Tipbx procedure 8. Remove the programming cable 9.
7. OPEN A GUIDED CONFIGURATION PROJECT By means of this function, all previously saved guided configuration files are visualized By pressing the Open button, a guided configuration is carried out in which the data are pre-set by the previously saved data Manuale Tipbx 5.4 Pag.
8. CONFIGURATION UPLOAD This function allows to verify the current configuration of the PABX telephone exchange connected to the PC through a serial port. To carry out this operation, it is necessary that all extensions connected to the PABX be in resting position (receiver hung up). The data received from the telephone exchange are transformed by the application into a detailed project that can be saved as a normal project. 9.
Attention This function must be used with maximum caution, because sending a wrong file to the telephone exchange can put it out of operation. After having selected the new firmware file, the following mask is presented to the user by pressing the Update Version key: The reference nation that will be used by the PABX telephone exchange has now to be selected. Press OK and wait for the switch on enquiry of the PBX (Private Branch Exchange). Energize the PBX and check that the red led starts to blink.