
Product Brochure


NEOPERL, Inc.
171 Mattatuck Heights Road
Waterbury, CT 06705 USA
www.neoperl.com/consumer
Retail Sales Customer Support
Tel: 203-756-8451
Fax: 203-757-5512
E-mail: retail.sales@neoperl.com
retail.support@neoperl.com
© Mar. 2011 by NEOPERL
®
, Inc. All rights reserved. Rev. August 2013
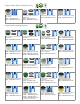
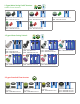
Faucet aerator - insert
If your metal aerator housing is in good condion, you can decide to replace the insert only.
1. Simply remove the aerator from your faucet. Use aerator wrench if
necessary or a standard wrench (with cloth over aerator to protect
nish). Clean the threads on the faucet for easier installaon.
2. Place the new aerator insert into the original housing.
3. For housing with outside threads, use thicker washer. For housing
with inside threads use thinner washer
4. Install spout by hand or with wrench. Turn on faucet. If leak occurs,
ghten more rmly.
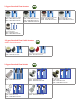
Faucet aerator - full assembly
NOTE: A damaged metal housing requires replacement of the enre unit.
• First determine if you need a male or female housing
• Most faucets are manufactured with a female outlet (threads on
the inside), you will need a male aerator
• If you have a faucet with a male outlet (threads on the outside),
you will need a female aerator
• A great opon is the dual thread housing. This ts both male and
female faucet outlets
• Replacement of the enre unit is easy as 1-2-3
1. Simply remove the aerator from your faucet. Use aerator wrench
if necessary or a standard wrench (with cloth over aerator to protect
nish). Clean the threads of the faucet for easier installaon.
2. Install new aerator housing on to faucet by hand or with aerator
wrench.
3. Turn on faucet. If leak occurs, ghten more rmly.
Remember: If you are replacing with a dual thread housing, for faucets with outside
threads, remove the thicker washer. For faucets with inside threads, leave thicker
washer in place.
Caché
®
Hidden Faucet Aerators
1. Simply use the Caché key to remove aerator from your faucet. Clean
the threads of the faucet for easier installaon.
2. Install the new Caché aerator to faucet with the caché key.
3. Turn on faucet. If leak occurs, ghten more rmly.
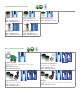
Installaon instrucons
Delta & Moen Caché
®
Kits
1. Use key to easily remove your Caché® aerator.
2. Clean threads for easier installaon.
3. Assemble your new aerator (see diagram 1).
4. Use key to install your new Caché® aerato r.
Shower Flow Controller
1. Remove showerhead.
2. Apply plumber’s tape to threads.
3. Install adapter onto spout by hand.
Reconnect showerhead.
4. Turn on shower. If leak occurs, ghten
more rmly
Faucet Adapter
1. Remove aerator from faucet. If a wrench is
necessary, place cloth over aerator to prevent
damage.
2. Remove any old washers that might be
caught inside the spout.
3. Clean the threads on faucet for easier
installaon.
4. Install adapter onto spout by hand.
5. Connect your water applicance to the
adapter.
6. Turn on faucet, if leak occurs, ghten more
rmly.
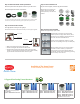
PCA
®
Supply Line Adapter
1. Turn o water at shuto valve.
2. Remove water supply lines.
3. Apply plumbers tape to threads.
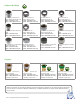
4. Install supply line adapters by hand as seen in diagram below.
5. Turn on water slowly and check for leaks. Tighten more, if needed.
Do not over ghten
Faucet Aerator - full assembly
Aerator wrench
Install to
faucet
spout
Faucet aerator insert
Aerator wrench
Install to
faucet
spout
diagram 1