
Product Brochure

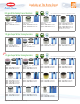
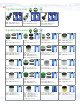
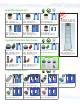
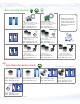
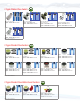
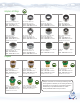
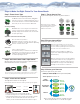
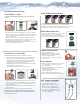

diagram 1
Delta & Moen Caché
®
Kits
1. Use key to easily remove your Caché
®
aerator.
2. Clean threads for easier installation.
3. Assemble your new aerator (see diagram 1).
4. Use key to install your new Caché
®
aerator.
Caché
®
Hidden Faucet Aerators
1. Simply use the Caché key to remove aerator from your faucet.
2. Clean the threads of the faucet for easier installation.
3. Install the new Caché aerator into faucet with the caché key.
4. Turn on faucet. If leak occurs, tighten more firmly.
Installation Instructions
1. Simply remove the aerator from your faucet. Use aerator
wrench if necessary or a standard wrench (with cloth over
aerator to protect finish). Clean the threads on the faucet for
easier installation.
2. Place the new aerator insert into the original housing.
3. For housing with outside threads, use thicker washer. For
housing with inside threads use thinner washer
4. Install onto spout by hand or with wrench. Turn on faucet. If
leak occurs, tighten more firmly.
Faucet Aerator - Insert
If your metal aerator housing is in good condition, you can decide to replace the
insert only.
Faucet Aerator - Full Assembly
NOTE: A damaged metal housing requires replacement of the entire unit.
• First determine if you need a male or female housing.
• Most faucets are manufactured with a female outlet
(threads on the inside), you will need a male aerator.
• If you have a faucet with a male outlet (threads on the
outside), you will need a female aerator.
• A great option is the dual thread housing. This fits both
male and female faucet outlets.
• Replacement of the entire unit is easy as 1-2-3.
1. Simply remove the aerator from your faucet. Use aerator
wrench if necessary or a standard wrench (with cloth over
aerator to protect finish). Clean the threads of the faucet for
easier installation.
2. Install new aerator housing on to faucet by hand or with
aerator wrench.
3. Turn on faucet. If leak occurs, tighten more firmly.
Remember: If you are replacing with a dual thread housing, for faucets with
outside threads, remove the thicker washer. For faucets with inside threads,
leave thicker washer in place.
PCA
®
Supply Line Adapter
1. Turn off water at shutoff valve.
2. Remove water supply lines.
3. Apply plumbers tape to threads.
4. Install supply line adapters by
hand as seen in diagram below.
5. Turn on water slowly and check
for leaks. Tighten more, if needed.
Do not over tighten.
Shower Flow Controller
1. Remove showerhead.
2. Apply plumber’s tape to threads.
3. Install adapter onto spout by hand.
Reconnect showerhead.
4. Turn on shower. If leak occurs, tighten
more firmly.
Faucet Adapter
1. Remove aerator from faucet. If a wrench is
necessary, place cloth over aerator to
prevent damage.
2. Remove any old washers that might be
caught inside the spout.
3. Clean the threads on faucet for
easier installation.
4. Install adapter onto spout by hand.
5. Connect your water applicance to the adapter.