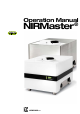
Operation Manual NIRMaster 11593389 en ®
Table of contents Table of contents 1 2 3 4 5 6 3 About this manual . . . . . . . . . . . . . . . . . . . . . . . . . . . . . . . . . . . . . . . 5 Safety . . . . . . . . . . . . . . . . . . . . . . . . . . . . . . . . . . . . . . . . . . . . . . 6 2.1 User qualification . . . . . . . . . . . . . . . . . . . . . . . . . . . . . . . . . . . . 6 2.2 Proper use . . . . . . . .
Table of contents 7 8 9 10 11 4 6.5.6 Start new / rerun / close measurement . . . . . . . . . . . . . . . . . . . . . . . . . . 41 6.6 Shutting down the NIRMaster . . . . . . . . . . . . . . . . . . . . . . . . . . . . . 42 6.6.1 Standard shutdown instructions . . . . . . . . . . . . . . . . . . . . . . . . . . . . 42 6.6.2 Forced power-off instructions . . . . . . . . . . . . . . . . . . . . . . .
1 1 About this manual About this manual This manual describes the NIRMaster including its standard software and provides all information required for its safe operation and to maintain it in good working order. It is addressed to laboratory personnel and operators in particular. Read this manual carefully before installing and running your system and note the safety precautions in section 2 in particular.
2 2 Safety Safety This section introduces the safety concept of the instrument and contains general rules of behavior and warnings from direct and indirect hazards concerning the use of the product. For the users safety, all safety instructions and safety messages in the individual sections shall be strictly observed and followed. Therefore, the manual must always be available to all persons performing any tasks described herein. 2.
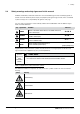
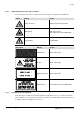
2 2.4 Safety Safety warnings and safety signs used in this manual DANGER, WARNING, CAUTION and NOTICE are standardized signal words for identifying levels of hazards and risks related to personal injury and property damage. All signal words, which are related to personal injury are accompanied by the general safety sign.
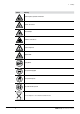
2 Symbol Safety Meaning Explosive gases, explosive environment Hot item, hot surface Device damage Inhalation of substances Fragile components Magnetic field Unplug device Wear protective goggles Wear protective gloves Carry load with two persons Do not dispose as unsorted household waste! 8 NIRMaster Operation Manual, Version A
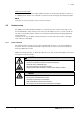
2 Safety Additional user information Paragraphs starting with NOTE transport helpful information for working with the device / software or its supplementaries. NOTEs are not related to any kind of hazard or damage (see following example). NOTE Useful tips for the easy operation of the instrument / software. 2.5 Product safety The NIRMaster has been designed and built in accordance with state-of-the-art technology, at the time of development. Safety warnings in this manual (as described in section 2.
2 2.5.2 Safety Warning labels on housing and assemblies The following warning sticker(s) can be found on the housing or assemblies of the NIRMaster: Symbol Meaning Location Hot item, hot surface Inside housing, next to lamp modules LASER emission Sticker at the rear side Sticker inside housing, at the LASER module Electrical hazard HV supply LASER Device labels 2.5.3 Meaning Location FCC declaration Sticker at the rear side See text.
2 2.5.4 Safety Built-in safety elements and measures The instrument is equipped with the following safety elements: • • • • • 2.6 Two outer filter elements with covering frame Two inner filter elements Multiple overtemperature sensors to monitor thermal spots inside the instrument Protective cable feedthrough at the housing rear side Transportation lock of interferrometer General safety rules Responsibility of the operator The head of the laboratory is responsible for training his/her personnel.
3 3 Technical data Technical data This section introduces the reader to the instrument specifications. It contains the technical data and materials used.
3 Technical data Technical data NIRMaster — IP class 54 versions only (cont.) Dimensions and weight Height Width Depth Weight Weight (Pro – version) 360 mm 420 mm 540 mm 43 kg 49 kg Interferometer data Type of interferometer Spectral range Resolution Type of interferometer Wavenumber accuracy SNR (Signal to Noise Ratio) Number of scans/sec.
3 3.1 Technical data Materials used Materials used 3.2 Component Material designation Spectrometer base Aluminum Wedges TeO2 Polarizers Glass Upper housing part (NIRMaster) PMMA (food grade) Upper housing part (NIRMaster Pro) Stainless steel, food grade (1.4301), PETP inlay Lower housing part Stainless steel, food grade (1.4301) Spinner PETP, stainless steel 1.4305 / 1.4301 XL add-on Stainless steel 1.
4 4 Description of function Description of function This section explains the basic principle of the instrument, shows how it is structured and gives a functional description of the assemblies. 4.1 Functional principle The NIRMaster is an optical instrument to determine the matter and concentration of substances in samples. In detail, the NIRMaster is a Fourier Transformation Near Infrared spectrometer (FT-NIR).
4 Description of function Reference laser control The laser deliveres a constant, wavelength-stable beam of 633 nm. The laser beam a is coupled into the NIR beam b to pass the interferometer before being decoupled d and analysed by the “Laser feedback sensor” e. A fraction of the beam is splitted at the polarizer b and picked up by an intensity sensor c to monitor the laser beam quality.
4 Description of function Data processing and interferogram analysis The NIR light interacts with the sample G material in different ways, leaving a characteristical fingerprint on the interferogram. At liquids the light is mostly transmitted and at solids reflected. The remaining light is collected by the detector H. The built-in computer further processes the raw signal. 4.
4 Description of function Factors that can influence the measurement: • • • • • Not enough sample material available Sample not homogenious or representative Humidity of sample material Temperature of sample material Sample cup inadeqate (e.g. cup material and thickness, blind spots, dirt etc.) NOTE • The samples should either be measured at a constant temperature or the temperature influences must be considered during calibration.
4 4.3 Description of function NIRWare software suite NIRWare is the interface program suite between the instrument and the operator. All program parts are hosted on the embedded PC. About the embedded PC The compact embedded PC runs an embedded Windows® operating system. The NIRWare software suite and database are preinstalled. It communicates with the spectrometer via internal network adapter. A second network interface is available to connect the NIRMaster to a local network, e.g.
5 5 Putting into operation Putting into operation This section lists the basic environmental installation requirements. Also see environmental data in the table of technical data, section 3 ff. At delivery, the system does not have full ingress protection! It is highly recommended NOT to unpack the system.
5 Putting into operation NOTICE Risk of instrument damage by liquid and particle ingress • • Store and operate the instrument only in accordance to its ingress protection class only Install dust caps and covers and housing parts tight to establish safe operation conditions Protection against ingress of dust and water IP Code First digit Second digit IP54 5 – dust protected 4 – splashing water Ingress of dust is not entirely prevented, but it must not enter in sufficient quantity to interfere with
5 Putting into operation Basic installation conditions ! DANGER Death or serious injuries by use in explosive environments. • • • Do not store or operate the instrument in explosive environments Remove all sources of flammable vapors Do not store chemicals in the vicinity of the device The instrument must be installed: • • • • indoor only with a clearance of 15 cm minimum to walls and any other objects without being exposed to heating or cooling source (e.g.
5 Putting into operation NOTE • To cut the power in case of an emergency by unplugging, the instrument or any other item must not block the mains plug! In this case, the plug must be able to be pulled out instantly. • When the system is installed with a locked or secured plug an external power switch is required. • When the system is installed stationary (without power plug) an external power switch is required. • External power switches (e.g.
6 6 Operation Operation This section describes how to start a measurement and how to prepare a reference measurement and gives recommendations on possible applications of the instrument. Additional information can be found in the NIRWare online help. NOTICE Risk of instrument damage at use with engaged transportation lock. • • 6.1 Disengage the transportation lock prior use Keep shocks and vibrations away Initializing the system Before starting the NIRMaster, switch ON the monitor a.
6 Operation Preconfigured Windows login accounts User name 6.1.1 Minimum skill level Intended use of this account Administrator niradmin IT specialist or advanced PC administrative user Trained Buchi service specialists User Standard operator Administration of network and PC settings Administration / repair / advanced system configuration etc. Standard operations and measurements System warm-up When cooled down below working temperature, the spectrometer needs a warm-up time of approx. 15 min.
6 6.2.1 Operation Temperature tests in detail The system is equipped with numerous temperature sensors. Individual lower and upper temperature limits are predefined for each sensor. ➡ To pass this test, all actual temperature values must be within the limits. NOTE Mind the ambient temperature data as listed in section 3, Technical data. 6.2.
6 6.3.1 Operation Performing a reference measurement After the expiration of a predefined time interval (60 min. by default), a pop-up window a will remind the operator to perform an External reference measurement. The interval can be set in the Application Designer. The software guides the user through the process: a When the External reference b has been positioned properly Press the ‘Checkmark’ button. The NIRMaster will automatically measure the referance spectrum.
6 Operation External reference positioning for XL addon (without Spinner): NOTE For proper device calibration, the External reference must be placed plane on top of the sample window of the NIRMaster. It is not necessary to remove the spinner! In case the Spinner is installed, turn the External reference until it fits perfectly.
6 Operation Transflectance adapter positioning with / without Spinner: NOTE For proper device calibration, the Transflectance adapter must be placed plane above of the sample window of the NIRMaster. When working with the Transflectance adapter, the Spinner device is a recommended accessory.
6 6.3.2 Operation Frequency of reference measurement An additional External reference measurement is mandatory: • after application change • after lamp exchange and lamp failure • after service (when top cover has been reinstalled and locked!) • when changing the add-on or measurement setup • at every system start / restart 6.4 Operator software – the user interface for spectroscopy Every NIRMaster comes installed with two different user interfaces of the Operator software.
6 6.4.1 Operation Starting the NIRMaster Operator software The Operator software can be set to start automatically (via Autostart folder entry) after login procedure or manually. This requires administrative rights. To start the program manually, use the program icon on the desktop. After startup, the program establishes the internal connection to the interferometer. This is indicated by a progress bar at the bottom line of the program window and green icons in the lower right corner.
6 6.4.
6 6.4.3 Operation Program login After every program start, the user must login (see example below) with a valid user name and password. NOTE Different login data and access-rights can be set by the NIRWare administrator. 6.5 How to perform a measurement For easy handling, the software wizard guides the operator through the measurement process.
6 6.5.1 Operation Step 1 — Select an application After login, Press the ‘Wizard’ button to start the software wizard. The application manager appears in a pop-up window. Select the matching application for the actual sample. Press the ‘Next’ button to proceed with the batch manager or close the wizard with the ‘Exit’ button. NOTE • Only applications dedicated to the NIRMaster will be shown. • Some applications require special measurement setups.
6 6.5.2 Operation Step 2 — Select / create a batch for the sample The batch manager is a convenient tool to handle batch production. Select or create a batch Use the drop-down menu to select an entry from the list of available batches or press the ‘New’ button to generate a new entry and to enter a batch name. For enhanced process safety, the useable character set (e.g.
6 Operation Press the ‘Next’ button to proceed with the batch manager or close the wizard with the ‘Exit’ button. Enter a unique identifier Enter a unique identification string (e.g. sample identification number or sample name) as measurement description. Example with predefined auto-timestamp Press the ‘Next’ button to proceed with the batch manager or close the wizard with the ‘Exit’ button.
6 6.5.3 Operation Step 3 — Perform a measurement By standard, a reference measurement is requested prior to the first sample measurement (see section 6.3, Reference measurements). After referencing, the sample has to be placed into the interferogram beam at the sample window. • P lace the sample material onto the sample window of the NIRMaster according to the chosen measurement setup. • Press the ‘Start’ button.
6 Operation ‘Overview’ tab • Standard tab view • Shows the main measurement value as defined in the application NOTE *Press* on the ‘Checkmark‘ button to open the ‘Detailed result’ window.
6 Operation ‘Results’ tab • View and print a detailed report. • Offers comprehensive toolbar for report handling. * * To install and configure a printer, administrative rights are required! Press on the printer button to send the report to an installed printer or use the toolbar buttons to review the report at the monitor. NOTE The software can be configured to automatically print out a report after each measurement.
6 Operation ‘Spectra’ • View detailed spectrum-graph • Print graph by pressing the printer button 40 NIRMaster Operation Manual, Version A
6 6.5.5 Operation No / invalid result If a result is invalid, it will be displayed with a red background to make the user alert. In this case, no result value will be shown. NOTE Press the symbol in the overview window to call up the ‚Detailed Result‘ window. The individual range (calibration, action, warning) of the chosen application can also be found here. 6.5.
6 6.6 Shutting down the NIRMaster 6.6.1 Standard shutdown instructions Operation Press the on/off button on the left side of the instrument for 1 – 3 seconds to switch off the NIRMaster. Subsequently, the embedded Windows will shutdown the computer, spectrometer and internal electronic. In case the shutdown procedure is interrupted and in case of a power outage the embedded Windows and especially the internal database with applications and user data may be damaged! 6.6.
7 7 Maintenance and repairs Maintenance and repairs This section gives instructions on all maintenance work to be performed in order to keep the instrument in good working condition. 7.1 Maintenance schedule Due to safety reasons some parts are to be serviced by authorized technical service personnel only. The table below shows the maintenance material and recommended interval.
7 7.2.1 Maintenance and repairs Housing Clean the housing with a soft, lint free damp cloth with mild soapy water. For hygienic reasons, use surface disinfectant wipes in combination with similar disinfectant spray on alcohol basis. If the sample window on top of the instrument is dirty, clean it with an antimicrobial wipe (e.g. Melisptol® wipes). In order to avoid contamination by sample material between the measurements, clean the surfaces in direct contact with the sample after each measurement.
7 7.2.2 Maintenance and repairs External reference For dependable reference measurements the External reference and Transflectance adapter must be clean and damage free. For cleaning, use abrasion-resistant precision cloths (e.g. Kimwipes from Kimberly-Clark). If substances still adhere, you may additionally rinse the surfaces with alcohol. NOTE The External reference is sensitive to scratches.
7 Maintenance and repairs Grandfather-Father-Son example backup strategy A commonly used media rotation schedule is “Grandfather-Father-Son”. This scheme has an hierarchical structure with daily (Son), weekly (Father), and monthly (Grandfather) backup sets. • I ndependent media are labeled for daily backups (Monday through Thursday). This ‘Son’ group of media will be recycled weekly. • On Friday, a weekly backup must be perfomed.
7 7.3.2 Maintenance and repairs Advanced selective archive actions Via the entry ‘Archive Operations’ the NIRMaster Administrators can create a new, empty database containing all subsettings i.e. security, user and lifecycle settings. A wizard will guide the Administrator through the procedure. Applications and library calibrations can can be selected to be imported into the new database. The old database will be transformed into a backup file. 7.3.
7 Maintenance and repairs To maintain the IP class while having a USB flash drive installed, a special cover with a sleeve nut is available. Follow the instructions to connect the USB storage device (here: flash drive a) to the NIRMaster. Subsequently, put on the flash drive cover. Solely turn the sleeve nut clockwise, while keeping the horizontal alignment of the cover body.
7 Maintenance and repairs Network NOTE For information about network settings and available network drive(s) contact the local network administrator! 7.4 How to lift off the top cover Safely switch off the instrument (see section 6.6 ff.) and cut off the external power supply according to the type of installation. Clean the housing i.e. remove any dust between the upper and lower cover. This can easily be done with compressed air if available.
7 Maintenance and repairs Locked Unlocked NOTICE Risk of instrument damage by ingress of particles. • • 7.5 Check proper seating and reliable locking before use Do not operate instrument when housing is open or unlocked How to exchange inner / outer filters Outer filters The outer filters are the first filter stage. • Pull off the filter frames, holding the filter pad. • Exchange the filter pads.
7 Maintenance and repairs Cooling airflow NOTE When changing the outer filters, do not tilt the NIRMaster – direct access is possible from the side! 51 NIRMaster Operation Manual, Version A
7 Maintenance and repairs Inner filters The inner filters are the second filter stage.
7 7.6 Maintenance and repairs NIRMaster basic instrument The drawing below shows the main components of the NIRMaster at open housing. Interferometer Primary lamp LASER assembly Interferometer interface panel Internal fuses ON / OFF button Cable feedthrough USB Connector Add-on Connector 7.6.1 Resetting the system fuses The primary fuses are located inside the instrument next to the interferometer power supply socket.
7 7.6.2 Maintenance and repairs Lamp exchange The light source of the NIRMaster has a life expectancy of approx. 6000 hours. After this time, it needs to be replaced. To avoid downtime, the NIRMaster is equipped with an independent secondary backup lamp. In case of a primary lamp module failure: • The system automatically switches to the secondary lamp in case of a primary lamp failure. • The secondary lamp will be in use until the primary lamp has been exchanged by the user or a service person.
8 Troubleshooting How to replace the primary lamp module • • • • • • Switch OFF the instrument. Lift off the top cover a and put it aside. Unplug the mains plug inside the device b! Unplug the power cable c of the primary / secondary lamp module. Turn the locking lever upwards d to unlock the module. Carefully pull out the lamp e. To install the new lamp module, proceed in reverse order and reset the software hour counter as described in the following section. 7.6.
8 7.7 Troubleshooting Laser unit Over its lifetime, the intensity of the laser light will decrease. Thus, it is continuously monitored by a sensor to be sure levels are above a certain threshold. After its mean time between failures (MTBF) of 20.000 hours and in case of an earlier defect service personnel is required to replace the LASER unit. The laser unit comprises: • Laser tube (factory aligned) • High voltage power supply 7.8 Special settings and enhanced system diagnose 7.8.
8 8 Troubleshooting Troubleshooting This section helps to resume operation after a problem has occurred with the instrument which does not necessarily require special technical training. It lists possible occurrences, their probable causes and suggests how to remedy the problem. The troubleshooting table below lists possible malfunctions and errors of the instrument. The operator is enabled to correct some of those problems or errors by him/herself.
8 Start Troubleshooting Exit After diagnostic check, basic information about the software version, timestamp and the performed tests are reported. The test result can be found at the “Datafile” location as displayed (last entry of the program window) in an *.xml file. The actual location may vary according to local settings. For problem evaluation, send this file to the local Buchi representative. For example: “C:\Documents and Settings\username\My Documents\MyNadiaFiles\11-2007-01-12_09-16-17.
8 8.3 Troubleshooting Reference measurement fails When the deviation between the stored reference spectrum is out of limit, the reference measurement will fail. A pop-up window will show both curves and give details of the measurement result. Possible reasons for a reference measurement to fail • • • • Optical surfaces (e.g. External reference) dirty or scratched Environmental conditions out of operational range (e.g. condensating humidity at optical surfaces) Defective instrument (e.g.
8 Troubleshooting Buttons ‘External Reference Deviation’ Button Functionality ‘Exit’ ‘Rerun’ ‘Checkmark’ NOTE After lamp-module exchange, a reference spectrum should be generated to match the individual light intensity output of the module. In all other cases, perform consequent trouble shooting (run SST) before setting a new reference spectrum! 8.4 Connection to a local network The embedded PC is equipped with two Ethernet (LAN) sockets.
9 9 Storage, transport and disposal Storage, transport and disposal This section instructs how to handle the instrument for storage or transport, and gives advice on disposal. NOTICE Risk of instrument damage at transport • • • • 9.1 Engage the transportation lock before storing, transport and re-packaging Only transport the instrument in original packaging Keep shocks and vibrations away Safely store and transport accessories separately Storage and transport The NIRMaster weights approx.
9 9.2 Storage, transport and disposal Transportation lock The NIRMaster is equipped with a mechanical transportation lock to avoid damage of the interferometer during transportation and shipping by shocks and vibrations. The transportation lock is in “Locked” position at initial delivery. After system installation and prior use, the interferometer has to be unlocked! See following section for information about unlocking. NOTICE Risk of instrument damage at use with engaged transportation lock. • • 9.2.
9 Storage, transport and disposal Locked Unlock Locked After turning the transportation lock the housing has to be closed again. Put the top cover in place and lock all four latches. 9.3 Disposal For instrument disposal in an environmentally friendly manner, a list of materials is given in section 3.1. This helps to ensure that the components can be separated and recycled correctly by a specialist for disposal.
10 10 Spare parts Spare parts and accessories This section lists spare parts, accessories and options of the instrument including their ordering information. Order the spare parts from Buchi. Always state the product designation and the order number when ordering spare parts. Use only genuine consumables and genuine spare parts for maintenance and repair to assure good system performance and reliability.
10 10.2 Spare parts Spare parts, optional accessories and consumables Spare parts Example Operation Manual NIRMaster® 11593389 Quick Guide 65 Order no.
10 Spare parts Spare parts 66 Description Order no. External reference 11056371 Spinner (Easy-Spin drive) 11056771 Spinner (inlay-) ring 11056772 Unbreakable cup 11055058 Transflectance adapter for unbreakable cup (0.
10 Spare parts Spare parts 67 Description Order no. Set of 10 glass petri dishes (inner diameter 100 mm) for NIRFlex Solids with the petri dish add-on 041583 Transflectance adapter for petri dishes (0.3 mm gap) 041636 Transflectance adapter for petri dishes (0.
11 11 Declarations and requirements 11.1 FCC requirements (for USA and Canada) Declarations and requirements English: This equipment has been tested and found to comply with the limits for a Class A digital device, pursuant to both Part 15 of the FCC Rules and the radio interference regulations of the Canadian Department of Communications. These limits are designed to provide reasonable protection against harmful interference when the equipment is operated in a commercial environment.
11 11.
11 Declarations and requirements Health and Safety Clearance Declaration concerning safety, potential hazards and safe disposal of waste. For the safety and health of our staff, laws and regulations regarding the handling of dangerous goods, occupational health and safety regulations, safety at work laws and regulations regarding safe disposal of waste, e.g.
BÜCHI Labortechnik AG CH-9230 Flawil 1 / Switzerland T +41 71 394 63 63 F +41 71 394 65 65 www.buchi.