Operation Manual Vacuum Controller V�850/855 093081 en Firmware 3.
Table of contents Table of contents 1 2 3 4 About this manual . . . . . . . . . . . . . . . . . . . . . . . . . . . . . . . . . . . . . . . 5 1.1 Reference documents . . . . . . . . . . . . . . . . . . . . . . . . . . . . . . . . . . 5 1.2 Trademarks . . . . . . . . . . . . . . . . . . . . . . . . . . . . . . . . . . . . . . . 5 1.3 Abbreviations . . . . . . . . . . . . . . . .
Table of contents 5 6 7 8 9 10 11 4 Putting into operation . . . . . . . . . . . . . . . . . . . . . . . . . . . . . . . . . . . . 20 5.1 Setting up the Rotavapor with the Vacuum Controller V-850/855 . . . . . . . . . . . .20 5.1.1 Installation . . . . . . . . . . . . . . . . . . . . . . . . . . . . . . . . . . . . . . . 20 5.1.2 Cable connections to the Rotavapor . . . . . . . . . . . . . . . . .
1 1 About this manual About this manual This manual describes the vacuum controller and provides all information required for its safe operation and to maintain it in good working order. It is addressed in particular to laboratory personnel and operators. NOTE: The symbols pertaining to safety (WARNINGS and ATTENTIONS) are explained in chapter 2. 1.
2 2 Safety Safety This chapter points out the safety concept of the instrument and contains general rules of behavior and warnings from hazards concerning the use of the product. The safety of users and personnel can only be ensured if these safety instructions and the safetyrelated warnings in the individual chapters are strictly observed and followed. Therefore, the manual must always be available to all persons performing the tasks described herein. 2.
2 2.4 Safety Safety warnings and safety signals used in this manual DANGER, WARNING, CAUTION and NOTICE are standardized signal words for identifying levels of hazard seriousness of risks related to personal injury and property damage. All signal words, which are related to personal injury are accompanied by the general safety sign.
2 Symbol Safety Meaning Hot item, hot surface Additional user information Paragraphs starting with NOTE transport helpful information for working with the device/software or its supplementaries. NOTEs are not related to any kind of hazard or damage (see example below). NOTE Useful tips for the easy operation of the instrument. 2.5 Product safety Safety warnings in this manual (as described in section 2.
2 2.6 Safety General safety rules Responsibility of the operator The head of laboratory is responsible for training his personnel. The operator shall inform the manufacturer without delay of any safety-related incidents which might occur during operation of the instrument. Legal regulations, such as local, state and federal laws applying to the instrument must be strictly followed.
3 3 Technical data Technical data This chapter introduces the reader to the instrument specifications. It contains the scope of delivery, technical data, requirements and performance data. 3.1 Scope of delivery Check the scope of delivery according to the order number. 3.1.
3 3.1.2 Technical data Standard accessories Standard accessories Product Order number Operation Manual: 3.1.
3 Technical data Optional accessories (cont.) 12 Product Order number Vacuum valve 24 V/2.
3 Technical data Control cable Mini DIN 1500 mm between 38010 vacuum controller and vacuum pump (on/ off) compatible with Vacuum Controller V-800/805/850/855 and Vacuum Pump V-500/1000 Optional accessories (cont.
3 3.2 Technical data Technical data overview Technical data Vacuum Controller V-850/855 3.3 Dimensions casing ( W×H×D) 160×115×120 mm Weight 700 g Power supply 30 VDC from RJ-45 connector when using Controller with a Rotavapor R-210/215 or Vacuum Pump V-700/710 or from the power pack for stand-alone versions.
3 3.4 Technical data Solvent table Molar mass Evaporation energy Boiling point Density in Vacuum in mbar for Solvent Formula in g/mol in J/g at 1013 mbar g/cm3 boiling point at 40 °C Acetone CH3H6O 58.1 n-amylalcohol, n-pentanol 553 56 0.790 556 C5H12O 88.1 595 37 0.814 11 Benzene C6H6 78.1 548 80 0.877 236 n-butanol C4H10O 74.1 620 118 0.810 25 tert. butanol (2-methyl-2-propanol) C4H10O 74.1 590 82 0.789 130 Chlorobenzene C6H5Cl 112.6 377 132 1.
4 4 Description of function Description of function This chapter explains the basic principle of the instrument, shows how it is structured and gives a functional description of the assemblies. 4.1 Functional principle The Vacuum Controller V-850 and V-855 can be universally used for the display, adjustment and control of vacuum.
4 4.1.2 Description of function Rear connections 1 2 3 12 4 7 8 5 6 11 a Connection for AutoDest probe/switch box (AS/SB) b Connection for cooling water valve (CW) c Connection for valve unit or vacuum valve (VALVE) d Power supply connection for stand alone mode 30 VDC e Mains switch On/Off f USB for data output/firmware update 4.
4 4.2.1 Description of function Manual mode The Manual mode serves to maintain and control a preset pressure. The pressure setpoint can be adjusted by means of the selection knob when the pump is running or, before operation, via the corresponding menu by pressing the menu button P Set. 4.2.2 Timer mode The Timer mode serves to control the pressure over a predefined time interval. When the time interval is over, the process stops. 4.2.
4 4.2.7 Description of function LabVac mode The LabVac mode serves to control the pump within a laboratory vacuum system. The pump operation is switched off when the vacuum has reached the lowest possible value and is switched on again when the pressure increases by a preset value (hysteresis [dP]). The pump operation is also switched on, as soon as a load is present in the vacuum system. When the menu button CONT.
5 5 Putting into operation Putting into operation This chapter describes how the instrument is installed and gives instructions on initial startup. NOTE: Inspect the instrument for damages during unpacking. If necessary, prepare a status report immediately to inform the postal company, railway company or transportation company. Keep the original packaging for future transport. 5.1 Setting up the Rotavapor with the Vacuum Controller V-850/855 5.1.
5 5.1.2 Putting into operation Cable connections to the Rotavapor 4 3 2 1 a Mains connection (R-210/215) b Communication vacuum controller/Rotavapor c Communication vacuum pump/Rotavapor d Communication vacuum controller/Rotavapor To connect the vacuum controller to the Rotavapor electrically, proceed as follows: • Connect the communication d of the vacuum controller to the Rotavapor b. • Connect the communication c of the vacuum controller to the Vacuum Pump V-700/710.
5 5.3 Putting into operation Installing the AutoDest probe 2 1 To install the AutoDest probe proceed as follows: • Insert the AutoDest probe into the opening at the top of the condenser. • Push the probe down between the inner condenser coil and the vacuum tube in the center of the condenser. • Position the probe as shown in Fig. 5.3. Make sure that the prope tip position corresponds to position in Fig. 5.3. • Tightened screw cap at the top of the condenser.
5 5.4 Putting into operation Initial software settings When you switch on the vacuum controller for the first time, a wizard will guide you through the initial settings to be carried out. To change the default settings within the screens, use the selection knob at the vacuum controller. Turning it to the left moves you further down within the context menus, turning it to the right moves you up again. By pressing OK the currently highlighted setting will be accepted.
5 Putting into operation In the Options controller you can define several system settings by turning the selection knob and confirming with OK: • Language: Select the screen language from the available languages English, German, French, Italian, Spanish, and Japanese. NOTE When you select Japanese as language by mistake, you will see that the word “language” will remain in English.
5 Putting into operation On the Remote control Rotavapor screen you can define the following remote control parameters: • Rotation start On/Off: Automatic rotation start of flask when controller is started • Rotation stop On/Off: Automatic rotation stop of flask when controller is stopped • Immerse flask On/Off: Automatic lowering of the flask into the heating bath when controller is started • Emerge flask On/Off: Automatic raising of the flask from the heating bath when controller is stopped The foll
6 6 Operation Operation This chapter explains the operating elements and possible operating modes. It gives instructions on how to operate the instrument properly and safely. 6.1 Menu structure of the Vacuum Controller V-850/855 software Manual Timer AutoDest Mode EasyVac Gradient Repeat LabVac Options controller Cont. System configuration Options Menu Configuration AutoDest Control Rotavapor Wizard Manual mode P Set Save Program Open Delete Solvent library Solvent library Calibr.
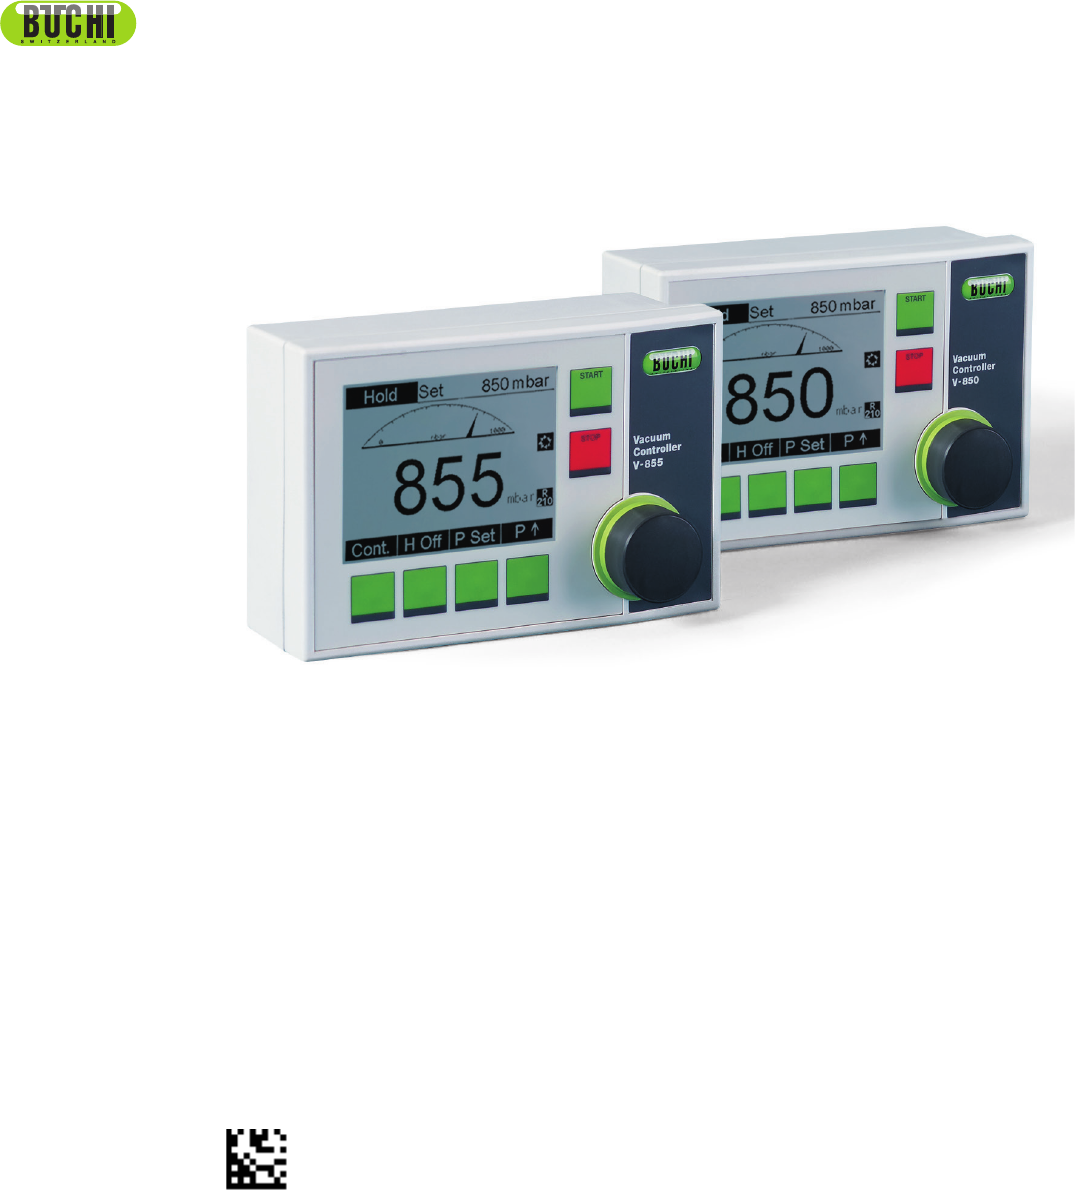
6 6.2 Operation Vacuum Controller V-850/855 main screen in Manual mode When you switch on the vacuum controller, first the instrument type and the software version are displayed, then the main screen appears.
6 6.3 Operation Selecting the distillation conditions To achieve optimal distillation conditions, the distillation energy supplied by the heating bath must be dissipated by the condenser. To ensure this, operate the instrument according to the following rule of thumb: Cooling water: max. 20 °C Vapor: 40 °C Bath: 60 °C How are these conditions achieved? • Set the bath temperature to 60 °C. • Set the cooling water temperature not higher than 20 °C.
6 6.4 Starting a distillation 6.4.1 Quick start of manual distillation Operation To start a distillation, proceed as follows: • Switch on the vacuum controller using the on/off switch on the right hand-side. • If the instrument is not in the Manual mode, change to this mode. • Press the menu button.
6 Operation • Adjust the system pressure by means of the selection knob on the vacuum controller as needed. • To stop the process, press the STOP button. The evaporating flask stops rotating and is removed from the heating bath automatically, if configured accordingly. NOTE Depending on whether you have selected Aeration On/Off in the Options controller, the system is either aerated directly after the STOP button was pressed (Aeration ON) or when the STOP button is pressed a second time (Aeration OFF).
6 Operation By pressing OK the currently highlighted setting is saved and automatically set on the chiller as well. NOTE The values indicated for Boiling point and Cooling H2O max only serve for information purposes. • Press Accept to confirm your settings and get back to the main screen.
6 6.5 Operation Vacuum Controller V-850/855 main screen in Gradient mode When you switch on the vacuum controller, first the instrument type and the software version are displayed, then the main screen appears.
6 6.6 General information on buttons 6.6.
6 6.6.2 Operation Menu buttons The following menu buttons are available in the software to call up certain menu functions: Continuous pump operation (100 % full speed to 0 % single stroke mode) Manual pump operation Switch to the AutoDest mode Open the main menu Set the system pressure Library button to open the solvent library Switch Hold mode off Increase the system pressure or interrupt a pressure drop during the start phase.
6 6.7.1 Operation Mode Depending on the controller and the Rotavapor you are working with, several modes are available, enabling you to work in different environments and use different programs, see chapter 4.2. 6.7.2 Options The submenu Options contains the same system configuration screens as the Wizard and the Wizard itself.
6 Operation NOTE You can define up to 20 steps. • To save your settings as a program, select Save. The following screen appears: Use the selection knob on the vacuum controller to move the “cursor” from one character to the other and press Enter each time you want to take a character over into the field at the top. Press Save to save the program under the entered name.
6 Operation The Save option is especially interesting in the Repeat mode. The last distillation carried out with the system, e.g. a distillation in Manual mode, is saved in the buffer and can be repeated within the Repeat mode. To save such a distillation as a program, highlight the Save option and press the Forward button. You can now enter a name under which you want to save the distillation as a program.
6 Operation Edit solvent When you select this menu and press the Forward button, the following screen appears: Here you can define up to 15 new solvents, change and delete a self-defined one and determine whether the predefined solvents should be shown or hidden in the solvent library. When you want to define a new solvent or change an existing solvent, press the corresponding Forward button.
6 Operation Use the selection knob on the vacuum controller to move the “cursor” from one character to the other and press Enter each time you want to take a character over into the field at the top. Press Save to save the solvent under the entered name. To delete a self-defined solvent, in the Edit solvent screen go to Delete solvent, select the desired solvent from the drop-down list, press OK and confirm with Yes.
6 6.8 Operation Calibrating the pressure sensor In the Extra menu, select Calibr. pressure sensor. Now press the Forward button, the following screen appears: You can now calibrate the pressure sensor: NOTE The pressure sensor is precalibrated by the manufacturer before the system is shipped to the customer. You can adjust this calibration to your working conditions by means of a reference measuring device. 6.8.
6 6.8.2 Operation Simple calibration (without temperature compensation) NOTE This calibration should only be carried out by authorized service personnel. The calibration at room temperature serves to adjust the linearity of the pressure sensor at certain predetermined pressure levels. This is a 6 step calibration at room temperature, the pressure sensor is calibrated at atmospheric pressure, 800, 600, 400, 200, and 10 mbar.
6 ! Operation CAUTION Risk of minor or moderate injuries by hot surfaces when the instrument comes out of the laboratory oven. • • Always be aware of the burn hazard. Always wear personal protective equipment such as protective gloves when getting the instrument out of the laboratory oven. NOTE During the calibration procedure the system carries out a plausibility check on the measured values and displays an error message when the confirmed values are implausible.
6 6.9 Operation Recirculating chiller This menu is only available when a recirculating chiller is connected to your instrument. To configure it, go to Recirculating chiller and press the Forward button. The following screen appears: On the Recirculating chiller screen you can specify the following: • Actual value: Actual chiller temperature (not editable) • Set value: Target value of the chiller. It can either be set here via the selection knob or in the solvent library (see also section 6.4.
6 6.10 Tips and tricks for a distillation 6.10.1 What to do when the solvent starts foaming? Operation • P ress the button P↑. The current system pressure is frozen and the aeration valve is opened. The system is aerated and switches into the Hold mode, i.e. the H Off button becomes active. • When the foam is gone or has sufficiently degenerated, press the H Off button to continue with the distillation process. • In case the solvent starts foaming again, repeat the measures described above. 6.10.
7 7 Maintenance and repairs Maintenance This chapter gives instructions on all maintenance work to be performed in order to keep the instrument in good working condition. In addition to this, adjustment jobs the operator can carry out by himself/herself are explained. ! CAUTION Risk of minor or moderate burns by electric current. • • 7.1 Switch off the instrument and disconnect the power cord. Do not spill liquids over the device Housing Immediate maintenance The housing is made of plastic.
8 8 Troubleshooting Troubleshooting This chapter helps to resume operation after a minor problem has occurred with the instrument. It lists possible occurrences, their probable cause and suggests how to remedy the problem. The troubleshooting table below lists possible malfunctions and errors of the instrument. The operator is enabled to correct some of those problems or errors by him/herself. For this, appropriate corrective measures are listed in the column “Corrective measure”.
8 Troubleshooting Error messages 8.2 Error message Remedy The pressure sensor is not working Contact the BUCHI customer service. The pressure sensor is not calibrated Calibrate the pressure sensor as described in chapter 6.8. We recommend to have the simple and the complete calibration carried out by the BUCHI customer service. Data transfer error on the RS-485 Check whether the RS-485 cable is at the right place and that only one vacuum controller is connected to it.
9 9 Shutdown, storage, transport and disposal Shutdown, storage, transport and disposal This chapter instructs how to shut down the instrument, how to pack it for storage or transport, and specifies the storage and shipping conditions. 9.1 Storage and transport Store and transport the instrument in its original packaging. 9.2 Disposal To dispose of the instrument in an environmentally friendly manner, a list of materials is given in chapter 3.
9 Shutdown, storage, transport and disposal Health and Safety Clearance Declaration concerning safety, potential hazards and safe disposal of waste. For the safety and health of our staff, laws and regulations regarding the handling of dangerous goods, occupational health and safety regulations, safety at work laws and regulations regarding safe disposal of waste, e.g.
10 10 Spare parts Spare parts This chapter lists spare parts, accessories, and options including their ordering information. Order the spare parts from BUCHI. Always state the product designation and the part number when ordering spare parts. Use only genuine BUCHI consumables and genuine spare parts for maintenance and repair to assure good system performance and reliability. Any modifications to the spare parts used are only allowed with the prior written permission of the manufacturer.
11 11 Declarations and requirements 11.1 FCC requirements (for USA and Canada) Declarations and requirements English: This equipment has been tested and found to comply with the limits for a Class A digital device, pursuant to both Part 15 of the FCC Rules and the radio interference regulations of the Canadian Department of Communications. These limits are designed to provide reasonable protection against harmful interference when the equipment is operated in a commercial environment.
11 11.
BÜCHI Labortechnik AG CH-9230 Flawil 1/Switzerland T +41 71 394 63 63 F +41 71 394 65 65 www.buchi.