
User Guide

Applications manual
| 13
Panel Radiator
Applications Manual
Panel Radiator Applications Manual | 07.2017 Technical specifi cations are subject to change without prior notice
4. Mounting Guidelines
Panel Radiator Installation
Both model 21 and 22 radiators can be wall or fl oor
mounted. All wall brackets must be secured to studs or
other supports of suffi cient strength for panel radiator
weight. Radiators with a length of 71" or less require 2
brackets (1 set); lengths 79” or larger require 2 sets.
Do not attempt to mount radiators soley to
sheet rock or similar material.
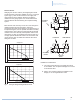
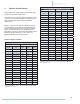
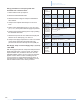
Radiator Clearance Requirements:
Clearance for right hand radiators Table 6
Clearance
dimensions
Minimum
clearance
Reason
Floor 2" (51mm)
4" (102mm)
5" (127mm)
5" (127mm)
- No diverter valves
- Angled diverters
- Straight diverters
- Cross-over valves
Side of
fl owsetter
valve
5" (127mm) Thermostatic Sensor Head
Side opposing
the fl owsetter
valve
2" - 4"
(51-102mm)
Access to manual air
bleeder
Top 2" - 4"
(51-102mm)
Access to the top of wall
bracket
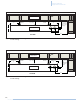
Model 21 and 22: Wall Mounting
Position the brackets evenly along the radiator and at
least 4" in from either side for aesthetic reasons. The
bottom of the radiator rests approximately 5/8" above the
bottom edge of the bracket. Brackets greater than or
equal to 71" contain an additional third, shortened
bracket. Piping connections are located at 1-3/16"
(return) and 3-3/16" (supply) in from the valve side of the
radiator. For Model 21 radiators, the center of the piping
should be 2 9/16" - 2 11/16" from the fi nished mounting
wall. For Model 22 radiators, the center of the piping
should be 3 5/16" - 3 7/16" from the fi nished mounting
wall. The center of the return piping should be at least
5 1/2" from the fi nished side wall for both Model 21 and
22 radiators. If the thermostatic sensor head is not
installed, this can be reduced to 3 1/2". For left hand
radiators, measure these dimensions from the left side.
See Figures 8 and 9 for details.
Mount the brackets on a level plane to studs or other wall
supports capable of carrying the load of the full radiator
(see tables 1 and 2). Use at least 2 screws per bracket.
Pull the T-shaped plastic securing plate forward and slide
the top holder upward.
Lift the radiator onto the bottom edge of the bracket and
rotate the top of the radiator towards the wall. Align the
sliding tabs on the top of the radiator with the top portion
of each wall bracket. The tabs will insert directly into the
slot in the top portion of the brackets. To adjust the
distance between the wall and the radiator, loosen the
screw on the top of the bracket and then tighten once it’s
in the desired position.
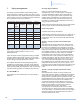
Fig. 7 Wall mounting bracket