Quick Setup Guide LS-QL/R5 LinkStation Quad Package Contents: • • • • • • LinkStation Quad Ethernet Cable Power Adaptor & Cord LinkNavigator Installation CD Quick Setup Guide (this manual) Warranty Card www.buffalotech.com v1.
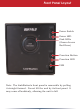
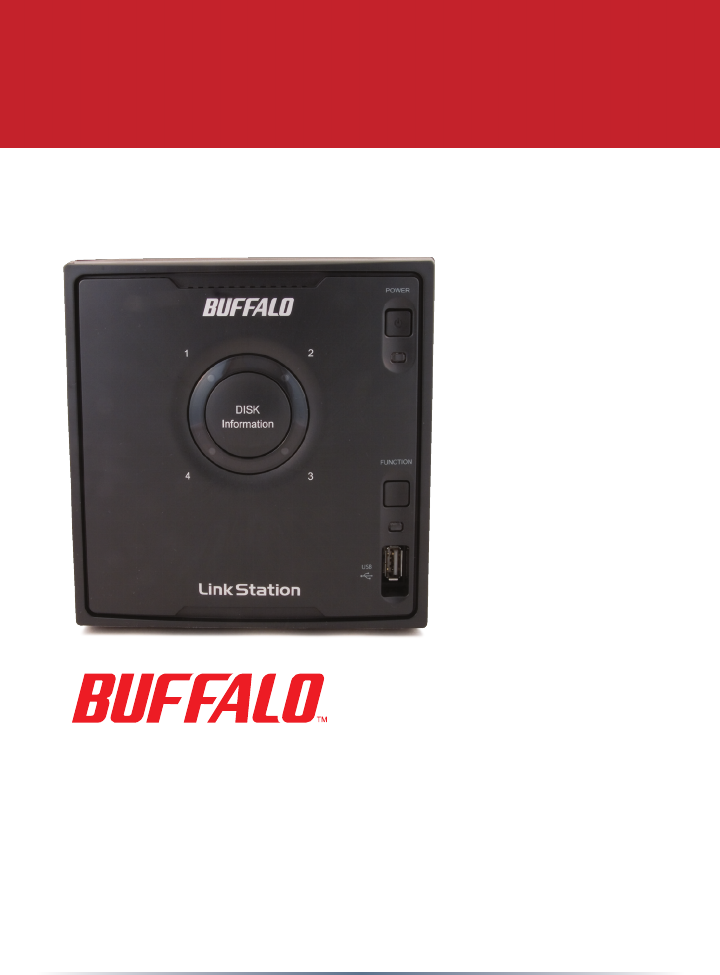
Front Panel Layout Power Switch Power LED Disk LEDs (Green-Access Red-Error) Function Button Function LED USB Note: The LinkStation’s front panel is removable by pulling it straight forward. Do not lift the unit by its front panel. It may come off suddenly, allowing the unit to fall.
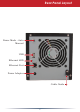
Rear Panel Layout Power Mode - Auto Manual USB Ethernet LED Ethernet Port Power Adaptor Cable Guide 3
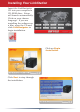
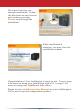
Installing Your LinkStation Insert the LinkNavigator CD into your computer’s CD-ROM drive. Setup will launch automatically. Click on your chosen language. If you are installing the software on a Mac, open the CD and click LinkNavigator to begin installation. Click on Begin Installation. Click Next to step through the installation.
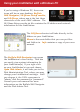
The wizard will step you through installation. Follow the directions on each screen and continue pressing Next to step through the installation. When installation is complete, you may close the installation window. Congratulations! Your LinkStation is ready to use. Turn to page 6 for more on using your LinkStation with a PC, or page 7 for more on using your LinkStation with a Mac®. Please see the LinkStation User Manual on your LinkNavigator CD for more help and configuration options.
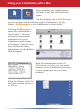
Using your LinkStation with a Windows PC If you’re using a Windows PC, three new icons will be on your desktop: Buffalo NAS Navigator, LS-QLxxx Setup results, and LS-QLxxx, where xxx is the last three characters of the unit’s MAC address. The LS-QLxxx Setup results.txt file contains the IP address and network information for the LinkStation. The LS-QLxxx shortcut will take directly to the folders on your LinkStation. Share is the main folder that you can put files and folders in.
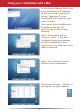
Using your LinkStation with a Mac After installing the LinkNavigator software, your Mac will have new icons. On the desktop, the LS-QLSettings. txt file contains the IP address of your LinkStation. In the Finder, NASNavigator is the LinkStation’s client utility. Clicking NASNavigator opens the LinkStation’s client utility. This lets you easily view system information for your LinkStation and change its settings. Consult your user manual for more information on the Buffalo NAS Navigator.
Using your LinkStation with a Mac In the Server Address field, enter your LinkStation’s IP address in the form smb://ipaddress (where “ipaddress” is your LinkStation’s IP address), and click Connect. You can get your LinkStation’s IP address from the LSQLSettings.txt file on your desktop. Select Guest and click on Connect. Note: If you have configured share permissions on your LinkStation, select Registered User and enter your login credentials. Select share from the list of folders on the LinkStation.
Technical Specifications Data Transfer: 10/100/1000 Mbps Hard Drives: 3.5” SATA II (3 Gb/s) Main Connector: RJ-45 (Ethernet) USB Interface: USB 2.0/1.1 Protocol Support: TCP/IP, AppleTalk SMB, FTP (File Sharing) HTTP (Management) NTP (Time Synchronization) Power Supply: 100-240V 50/60Hz Client OS Support: Windows® Vista™, XP, 2000, Server 2003*, Server 2008*, Mac OS® 10.3.9 or later † Power Consumption: ~45W (with no USB devices connected) Dimensions: 5.91” x 5.91” x 9.
Memo 10
Memo 11
http://www.buffalotech.com USA/Canada Technical Support is available 24 hours a day, 7 days a week Toll-Free: 866-752-6210 email: info@buffalotech.com 35010599 ver.01 1-01 C20-005 ©2005-2008, Buffalo Technology (USA), Inc.