Quick Setup Guide AirStation MIMO Wireless CardBus Adapter WLI-CB-G108 Use this guide to quickly and easily install your Wireless CardBus Adapter. For advanced setup and configuration information, refer to the AirStation Wireless CardBus Adapter Manual, located on the Air Navigator CD. Contents ◗ Wireless 54Mbps CardBus Adapter (WLI-CB-G108) ◗ Air Navigator CD ◗ Quick Setup Guide ◗ Warranty Card If any items are missing, please contact the reseller from whom you purchased this product.
Installing and Configuring the Wireless CardBus Adapter: Step 1 Installing the Wireless CardBus Adapter Drivers Caution: Complete Step 1 before inserting the Wireless CardBus Adapter. ◗ Insert the Air Navigator CD into the CD-ROM drive of the PC. The Air Navigator Setup Wizard launches automatically. If the Air Navigator Setup Wizard does not launch automatically, launch the wizard manually by selecting Start » Run to open the Run dialog box. Enter D:\Setup.
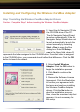
Step 2 Installing the Wireless CardBus Adapter ◗ When the window which prompt you to attach the Wireless CardBus Adapter to the CardBus appears, firmly insert the Wireless CardBus Adapter into an available CardBus slot. ◗ CardBus slots are located on one side of the Laptop. Please consult the Laptop Manufacturer's documentation for CardBus installation instructions.
◗ If the Found New Hardware Wizard launches, click Finish to complete the wizard. ◗ When the Wireless CardBus Adapter is successfully installed, click the Finish button. Restart your PC if prompted. ◗ Windows 2000: If the Digital Signature Not Found page opens, informing you that no digital signature exists for the driver you are installing, click the Yes button to continue the installation process.
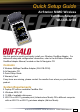
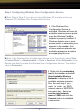
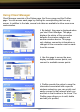
Step 3 Configuring Wireless Zero Configuration Service ■ Note: Skip to Page 9 if you are not using Windows XP or prefer not to use Windows XP's Wireless Zero Configuration Service. ◗ If the Wireless Zero Configuration Service is activated, Windows will scan for available wireless access points once the Wireless CardBus Adapter is properly installed. If Windows detects one or more access points, a networking icon appears in the taskbar.
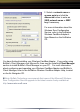
◗ Select a network name or access point and click the Advanced button to enter an SSID network name or WEP key if necessary. For more information about the Wireless Zero Configuration Service, refer to the AirStation Wireless CardBus Adapter's User Manual on the AirStation CD. You have finished installing your Wireless CardBus Adapter. If you prefer using Buffalo's Client Manager over Microsoft's, then see the Installing Client Manager section to install Buffalo's Client Manager on your PC .
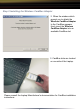
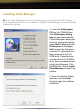
Installing Client Manager ■ Note: Client Manager does not function properly if the Windows XP Wireless Zero Configuration Service is enabled. Installing Client Manager will automatically disable this service. ◗ Insert the AirNavigator CD into the CDROM drive. The AirNavigator dialog box will open automatically. If the AirNavigator dialog box does not open automatically, select Start » Run and enter D:\Setup.exe in the Open field to open the dialog box manually.
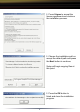
◗ Press I Agree to accept the license agreement and continue the installation process. ◗ Choose the installation path or accept the default path and press the Next button to continue. Setup will begin copying files at this point. ◗ Press the OK button to finish and close the installation program.
◗ Press the Exit button to exit the Client Manager installation utility. ◗ The Buffalo Client Manager is now installed and running, right clicking on its icon (the black laptop CardBus icon) will allow you to begin using it. For detailed instructions on using Buffalo's Client Manager, please refer to the AirStation Wireless CardBus Adapter Manual, located on the Air Navigator CD in the MANUAL folder.
Using Client Manager Client Manager consists of the Status page, the Survey page and the Profiles page. You can access each page by clicking the corresponding tab from any screen. In addition to the tabs, several sub-tabs are available to allow even more customization. ◗ By default, this page is displayed when you start Client Manager. This page displays the status of the connection between the wireless adapter and another wireless device.
Using AOSS AOSS (AirStation One-Touch Secure System) is a simple, one-touch setup for connecting wireless clients to an access point while setting up the most secure possible connection. Users no longer need to worry about choosing the proper security protocols, IP addresses, or SSID's. The intelligence of AOSS determines the most optimal connection and configures itself in seconds. Using the Quick Setup Guide for your client device, please install the drivers and client manager software.
◗ Initialize AOSS mode on the AOSS Access Point. This is done by pressing the AOSS button on the Access Point. Typically the button will need to be pressed for 3-5 seconds until the AOSS light on the Access Point begins to flash. Please consult the Quick Setup Guide or the AOSS Supplement Guide that came with your Access Point for more information. ◗ The wizard will search for any available AOSS Access Points.
MEMO 13
MEMO 14
MEMO 15
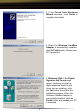
Buffalo Technology Technical Support Buffalo Technology offers Toll-Free Technical Support 24 hours a day, 7 days a week for this product. Customers in the United States and Canada can obtain technical support using the following information: ◗ Online Help: ◗ Web ◗ E-mail ◗ Telephone Available on the AirNavigator CD enclosed with your purchase. www.buffalotech.com/wireless info@buffalotech.