
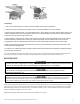
Replacement Part List
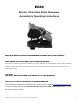

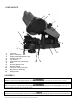

ECSS Electric Chain Saw Chain Sharpener Assembly & Operating Instructions
9
OPERATION
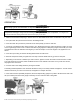
Wear safety eyewear and dust filters or respirators while using this tool.
Keep hands and fingers away from the rotating Grinding Wheel while it is in operation. Your fingers can
get stuck inside the rotating wheel and cause serious injury to the user.
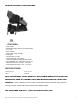
1. Clean the chain before sharpening it. Wash it with a non-flammable solvent. Don't use Gasoline to dry the chain.
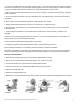
2. Lift up the Chain Stop and secure the chain in the Sliding Guides.
3. Lower the Chain Stop so that it is positioned on the tooth (blade) you want to start with.
4. Loosen the Lock Wheel to allow entire housing to turn. Rotate the housing to match the degree of angle you need
on the Angle Gauge Chains come in various sizes with varying degrees of sharpening angles. Check with your chain
manufacturers manual to determine what degree you need to sharpen at. Once the degree is set, tighten the Lock
Wheel.
5. Lower the Top Housing so that the Grinding Wheel shims the chain tooth.
6. Hold it at that position while you tighten the Lock Stop so that the Wheel will only go down to that point
7. Depending on the amount of material you wish to remove, tighten or loosen the lower Knob and set the Lock Nut.
The Lower Knob has a Lock Nut, which will determine how much material is removed. Once you set the Lock Nut,
fully tighten the Lower Knob.
8. Lock the chain in the Sliding Guides by turning the Handle.
The Sliding Guide Adjustment Lever should be situated so that you can easily release and tighten it. You will need to
release it each time you move to the next link, and tighten it to sharpen each link.
9. If the chain has been repeatedly sharpened, the chain depth limiting gauges may need to be taken down with a flat
file (not included). File down each gauge so that they are at a lower level than cutting teeth.