
User's Manual


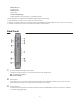
Table Of Contents
- User Manual
- Chapter 1 - Setup
- Chapter 2 - Settings
- Easy Admin
- Advanced Settings
- Internet
- PPPoE
- Dynamic DNS
- PPTP
- NAT
- LAN
- DHCP Lease
- Routing
- 2.4 GHz
- 5 GHz
- WPS
- AOSS
- MAC Filtering
- Multicast Control
- Guest Account
- Wireless Bridge
- Firewall
- IP Filter
- VPN Passthrough
- Port Forwarding
- DMZ
- UPnP
- Web Filtering and Parental Controls
- Disk Management
- Sharing
- WebAccess
- Media Server
- BitTorrent
- QoS
- eco Mode
- Network USB
- System
- Syslog Settings
- Reset / Reboot
- Update
- System Information
- Logs
- Packets
- Ping
- Chapter 3 - Wireless
- Chapter 4 - Utilities
- Chapter 5 - Troubleshooting
- Appendix A - Supplemental Information
- Appendix B - Tutorials
- Configuring the AirStation for Optimal Performance and Security
- Sharing a Printer
- Configuring Parental Controls
- Port Forwarding Basics
- Setting Up Port Forwarding Rules
- Configuring a USB Drive as a NAS
- Adding a Second AirStation as a Wireless Client
- Saving and Restoring Settings
- Setting Up WebAccess
- Connecting Wireless Devices Using AOSS
- Setting Up a VPN Server
- Using AirStations with 2Wire Residential Gateways
- How to Use QoS
- How to configure TCP/IP
9
1 AOSS button
To initiate AOSS, hold down this button until the wireless LED flashes (about 1 second). Then, push or click the
AOSS button on your wireless client device to complete the connection. Both devices must be powered on for this
to work.
2 Wireless LED
(Access point/wireless bridge control switch set to “AP”)
On:
Wireless LAN is enabled or transmitting.
Double blinks:
AirStation is waiting for an AOSS or WPS security key.
Continuously blinking:
AOSS/WPS error; failed to exchange security keys.
Off:
Wireless LAN is disabled.
(Access point/wireless bridge control switch set to “WB”)
On:
Wireless LAN is enabled or transmitting.
Blinking:
Wireless LAN is enabled but not connected.
Off:
Wireless LAN is disabled.
Note:
The wireless LED will be blue for 5 GHz wireless connections or amber for 2.4 GHz wireless connections.
3 Internet access LED (Blue)
On:
Internet access is available.
Off:
Internet access is not available.
Router functionality is disabled.
4 Router LED (Blue)
On:
Router functionality is enabled.
Off:
Router functionality is disabled.
5 Buffalo LED (White or Red)
On (White):
Power is on.
Off:
Power is off.
On (Red)*:
Booting.
2 blinks (Red)**:
Flash ROM error.
3 blinks (Red)**:
Wired Ethernet LAN error.
4 blinks (Red)**:
Wireless LAN error.