
User's Manual
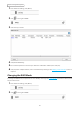
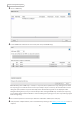
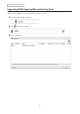
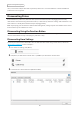
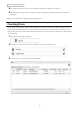
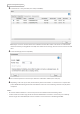
Table Of Contents
- User Manual
- Chapter 1 Getting Started
- Chapter 2 Configuration
- Chapter 3 File Sharing
- Chapter 4 Storage Management
- Chapter 5 Remote Access
- Chapter 6 Backup
- Chapter 7 Multimedia
- Chapter 8 Advanced Features
- Chapter 9 Configuring from Mobile Devices
- Chapter 10 Utilities
- Chapter 11 Appendix
- Chapter 12 Regulatory Compliance Information

47
Chapter 4 Storage Management
4 The “Confirm Operation” screen will open. Enter the confirmation number, then click [OK].
5 When the dismounting process is completed, it is safe to unplug the drive. Disconnect the drive from the
LinkStation.
Note: To remount the drive, unplug it and then plug it back in.
Checking Drives
A drive check tests the data on a drive on the LinkStation or one that is connected via USB for integrity. Errors are
fixed automatically. With large drives, a drive check may run for many hours. Shared folders cannot be accessed
during a drive check. Do not turn off the LinkStation until the drive check is finished. Follow the procedure below to
run a drive check.
1 From Advanced Settings, click [Drives].
2 Click [Drives] to check an internal drive or [USB Drives] to check an external drive.
3 Select the drive or array to test, then click [Check Disk].