
Operation Manual


10
Chapter 1 Getting Started
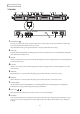
TS3410RN
10 17 10 18 3456 10 1710 9122
11 18 12 16 15 1113 14
19
1 Power Button ( )
To power on, connect the power cable and wait for 10 seconds, then press the power button. To power off,
press and hold the power button for three seconds.
If the TeraStation beeps, pressing this button for a short period will stop the beeping.
2 Power LED
For TS3210DN and TS3410DN, the LED glows green when the TeraStation is on. For TS3410RN, the LED glows
white when the TeraStation is on.
3 Info LED
If there is a status message, the amber info LED will light up. Check the Settings interface or NAS Navigator2 to
see the status message.
4 Error LED
If there is an error, the red error LED will light up. Check the Settings interface or NAS Navigator2 to see the
error message.
5 LAN1 LED
When LAN port 1 is connected, this LED glows green. It blinks when the connection is active.
6 LAN2 LED
When LAN port 2 is connected, this LED glows green. It blinks when the connection is active.
7 Function Button
Use this button for dismounting USB devices, rebuilding RAID arrays, configuring failover, stopping the
TeraStation’s beeping, and initializing settings using a USB drive.
8 Drive Lock ( )
Open the front panel with the key to replace drives or access the init button.
9 Init Button
Press and hold this button to initialize the TeraStation’s admin username and password, IP settings, SSL, and
service port restriction settings to their factory default values. The effects of this button can be changed in
Settings.