
User manual


5 Introduction
3.
1
Introduction
Confi guring the AirStation using a standard web browser requires basic wireless confi guration knowledge.
Setup includes manual wireless confi guration and basic administrative management.
3.2 Setup Preparation
The WLA-G54C is confi gured to function right out of the box. Basic settings for security and MAC Address
registration are offered in this section (3). Specialized setups for security, fi ltering and other features will be
explained in section 4 and confi gured by clicking the Advanced Button.
3.3 Setup Overview
Your computer must be physically connected to the AirStation with an CAT5 straight cable plugged into the LAN
port for initial configuration. Refer to the Quick Setup Guide for initial configuration information.
A Web browser version 4.5 or later should be used to configure the AirStation.
The WLA-G54C CD contains the Client Manager program. The Client Manager is used with a Buffalo
Wireless Client Adapter (CardBus, USB or PCI) to associate, setup and confi gure the AirStation and for
monitoring the wireless signal between the AirStation and Buffalo client.
Client Manager is currently not recommended for initial confi guration of the AirStation. Please refer to the
Buffalo website for the latest information and software for the AirStation.
Advanced settings for security, fi ltering and other features will be explained in Section 4.
3.4 Access the Web Interface
• Connect the AirStation according to the instructions in the Quick Setup Guide.
• The AirStation has a default LAN IP address of 192.168.11.1 and Subnet Mask of 255.255.255.0.
■ Note:
The computer used to confi gure the AirStation must be set to a static IP address of 192.168.11.2
with a subnet mask of 255.255.255.0. The Quick Setup Guide enclosed with the product contains detailed
instructions on how to confi gure your computer for initial confi guration.
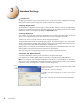
On the computer used to configure the AirStation, launch a Web
Browser 4.5 or later.
- Enter 192.168.11.1 into the URL field.
- A window will open prompting you to enter a User ID and
Password.
Enter “root” as the User ID and leave the password field blank.
3
Standard Settings
Figure 3.4
Login
Window