
User manual


en
Control elements
5
Front panel
The 1 POWER switch is used to turn the power of the
BUGERA amplier on and off.
The 2 STANDBY switch allows you to place the amp
in STANDBY mode (OFF position). This way the
amp is idle, but the operational temperature of the
valves is maintained (POWER switch turned on).
When the switch is set to its ON position the ampli-
er is activated.
ATTENTION! TO AVOID DAMAGE TO YOUR
!
AMP, NEVER USE THE BUGERA VALVE AM-
PLIFIER WITHOUT A LOUDSPEAKER CON-
NECTED!
The 3 CHANNEL push button switches between the
CLEAN and the LEAD channel.
You can also activate both channels with the
$
supplied footswitch. Refer to “Footswitch” for
details.
This is the 4 VOLUME control that lets you adjust the
volume level of the LEAD channel.
This 5 REVERB rotary knob adjusts the effect level of
the built-in REVERB in the LEAD channel. The pro-
vided footswitch activates the REVERB effect (see
Chapter “Footswitch”).
This is the 6 VOLUME control that lets you adjust the
volume level of the CLEAN channel.
This 7 REVERB rotary knob adjusts the effect level of
the built-in REVERB in the CLEAN channel. The pro-
vided footswitch activates the REVERB effect (see
Chapter “Footswitch”).
The 8 PRESENCE rotary knob changes the tone of
the amplier in the upper frequencies. This empha-
sizes the high end and makes the sound crisper.
The passive 9 TREBLE control adjusts the upper fre-
quency range.
The passive 10 MID control adjusts the middle fre-
quency range.
The passive 11 BASS control adjusts the lower fre-
quency range.
This 12 GAIN control species the input level of the
LEAD channel. Turn the control to the right to in-
crease the preamplier’s distortion and sustain.
This 13 GAIN rotary knob adjusts the input level of the
CLEAN channel. Turning the knob to the right in-
creases the level of the preamplier and, therefore,
the signal’s strength.
The jack labeled 14 INPUT is the 1/4" input connector
on the BUGERA for hooking up your guitar. Use a
commercially available 1/4" mono cable.
Control elements
Front panel of the BUGERA 1990
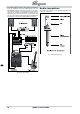
Rear panel of the BUGERA 1960
Rear panel
CAUTION!
!
Hot! Risk of injury! During use, the valves
get very hot and high surface temperatures
may be reached at the rear of this unit.
Avoid touching the controls and connectors
on the rear panel during use. To avoid acci-
dental contact with hot surfaces, place the
rear panel so that it faces a wall.
The 15 FOOTSW(itch) jack is used to connect to the
provided footswitch. Please make sure that a cable
has been connected before turning on the amplier.
For more information, read Chapter “Footswitch.”
The 16 LEVEL rotary knob adjusts the output level of
the signal sent to an external effects unit or any
other signal processor (0 – 10). Turning the knob to
the right increases the signal level, whereas turn-
ing it to the left decreases the signal level. In order
to produce sound with the least possible noise, we
suggest using a high setting without distorting the
signal.