
Installation Guide


Do not secure individual planks to the subŇoor as it is designed to be a ŇoĂƟŶŐŇoor.
Do not install cabinets on top of Vinyl Plank Ňooring.
It is recommended to separate all rooms using T molding, and to separate all rooms larger than 40’ (W) x 40’ (L) using T
molding.
Not recommended to install outdoors, in sun rooms, or in travel trailers/motorhomes.
InstallaƟon
1. Remove wall base and undeƌĐut door jambs, thisĐan be aĐĐŽmplished by turning a sĐƌĂp pieĐe of ŇŽoring upside down and
using a “jamb saw” or equivalent toĐut the jambs.
2. Level the substrate by sanding high spots or using aĐonĐƌete based leveling agent to reduĐe any other ŇŽor deviaƟŽns.
3. Sweep or vĂĐuum the substrate to remove any debris that may transfer through theŇŽoring aŌĞƌƟme.
4. First, determine how you want the ŇŽoring to run. TypŝĐĂůůy for planŬ produĐƚs, theŇŽoring runs t
he length of the room.
There may be exĐepƟons sinĐe it is all a maƩĞƌof preferenĐe.
5. To avoid narrow planŬwidths or short planŬ lengths near the walls/doors, it is important to do some pre-planning. Using
the width of the room,ĐaůĐƵůate how many full boards will Įt into the area and how muĐh spĂĐĞƌemains that will need to
beĐovered by parƟal planŬs.
6. Start with a whole planŬ in the leŌ handĐorner of the room with the tongue side and tongue end toward the wall. Lay the
Įƌst row of planŬs along aĐhaůŬ line and trim toĮƚ to the wall allowing a 1/4 inĐh expansion spĂĐĞ/ĨstaƌƟng theĮƌst row
with a whole width planŬ it will be neĐessary to trim the tongues next to the wall, then půĂĐe theĐut ends next to the wall.
To trim the planŬs, use a uƟůŝty Ŭnife and a straight edge to sĐŽƌĞthe top surfĂĐĞof the planŬ, and then bend it downward
to separate the pieĐes, youĐan also use a VCT (Vinyl ComposŝƟon TileͿĐuƩer for endĐuts only; a table saw or saber saw
also worŬs w
ell for both end and lengthĐuts.
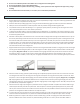
7. Align and aƩĂĐh the end joints of the planŬs in theĮƌst row using the fold down method. For length joints insert the tongue
into the groove while holding the planŬ at a 20° to 30° angle to theŇŽor. Apply pressure inward and down unƟů the planŬs
ůŽĐŬ together (Diagrams 1a & 1b). Use spĂĐĞƌs between the long edge and end of the planŬs next to the wall to maintain
the expansion spĂĐĞ&or eĂĐh row the use of a rubber mallet with tapping bůŽĐŬ on sides and with pull ba
r on ends is
reĐŽmmended, when needed, to ensure all joints are ƟŐŚtly assembled inĞĂĐ
h row. Do not hit ŇŽoring direĐƚůy with mallet.
Diagram 1a Diagram 1b
8. Start the seĐŽnd row using 1/3rd of a planŬ allowing 1/4 inĐh (6.35mm) expansion spĂĐĞat the start of the row. WůĂĐĞƚhe
Đut end against the wall. Insert the tongue on the long side of the planŬ into the groove of the planŬ in theĮƌst row. Hold
the planŬ in a 20° to 30° angle while app
lying pressure inward and down unƟů they loĐŬ together (diagram 1a) and (diagram
1b). A tapping bůŽĐŬ may be needed for addŝƟonal forĐe. Complete the seĐŽnd row by inseƌƟng the length jointsĮƌst, and
overlapping the end joints. Tap the length joint together using light taps to fully engage the joint whenŇĂƚ, and tap the end
joint downĮƌmly as explained in segment 7.
9. Start the third row using a 2/3rd length of a planŬ with theĐut end against the wall. CompleƚĞĞĂĐh row thereaŌĞƌusing a
random
layout with end joints oī-set by at least 8”. Plan the layout to avoid using small planŬs (less than 6”) at the walls.
TheĐut pieĐe at the end of the rowĐan oŌĞn be used to start the next row provided it aĐhieves a random layout. Always
půĂĐe theĐut end against the wall and allow for the expansion sp
ĂĐĞ
10. ToĐut the last row, lay your planŬs on top of the exisƟng row and use a small sĐƌĂp the width of the planŬ and sĐŽƌĞor
marŬ the material to show where toĐut, maŬe sure
to add the addŝƟonal 1/4" for expansion spĂĐĞ/nsert normally.
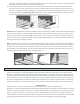
11. HDPC Vinyl planŬs are unique in that theyĐan also be installed using a pull bar or tapping bůŽĐŬ and rubber mallet or
hammer in diĸĐƵůt areas suĐh as the last row, and whenĮƫng under door trim. Use a pull bar and rubber mallet or